moxon-frame-generator
simple generator for 3D-printed frames for a moxon rectangle antenna
OpenSCAD★ 50
MMDVM-based Digital Voice Modem Host Software
 DVMProject
git clone https://github.com/DVMProject/dvmhost.gitDVMProject/dvmhostThe Digital Voice Modem ("DVM") Core Software Suite, provides the a set of applications that:
Please feel free to reach out to us for help, comments or otherwise, on our Discord: https://discord.gg/3pBe8xgrEz
THIS SOFTWARE MUST NEVER BE USED IN PUBLIC SAFETY OR LIFE SAFETY CRITICAL APPLICATIONS! This software project is provided solely for personal, non-commercial, hobbyist use; any commercial, professional, governmental, or other non-hobbyist use is strictly discouraged, fully unsupported and expressly disclaimed by the authors. For full project policies and support limitations, see: Usage & Support Guidelines.
This project suite generates a few executables:
dvmhost host software that connects to the DVM modems (both air interface for repeater and hotspot or P25 DFSI for commerical P25 hardware) and is the primary data processing application for digital modes. See configuration to configure and calibrate.dvmfne a network core, this provides a central server for dvmhost instances (and other instances like consoles or dvmbridges) to connect to and be networked with other instances, allowing switching of traffic and other data between dvmhost instances, as well as other peered dvmfne instances. See configuration to configure.dvmbridge a analog/PCM audio bridge, this provides the capability for analog or PCM audio resources to be connected to a dvmfne instance, allowing realtime vocoding of traffic. See configuration to configure.dvmpatch a talkgroup patching utility, this provides the capability to manually patch talkgroups of the same digital mode together. See configuration to configure.dvmcmd a simple command-line utility to send remote control commands to a dvmhost or dvmfne instance with REST API configured.dvmmon a TUI utility that allows semi-realtime console-based monitoring of dvmhost instances (this tool is only available when project wide TUI support is enabled!).sysview a TUI utility that allows near-realtime console-based monitoring of a dvmfne instance (this tool is only available when project wide TUI support is enabled!).tged a TUI utility that allows editing of talkgroup rules configuration files (this tool is only available when project wide TUI support is enabled!).peered a TUI utility that allows editing of peer list data files (this tool is only available when project wide TUI support is enabled!).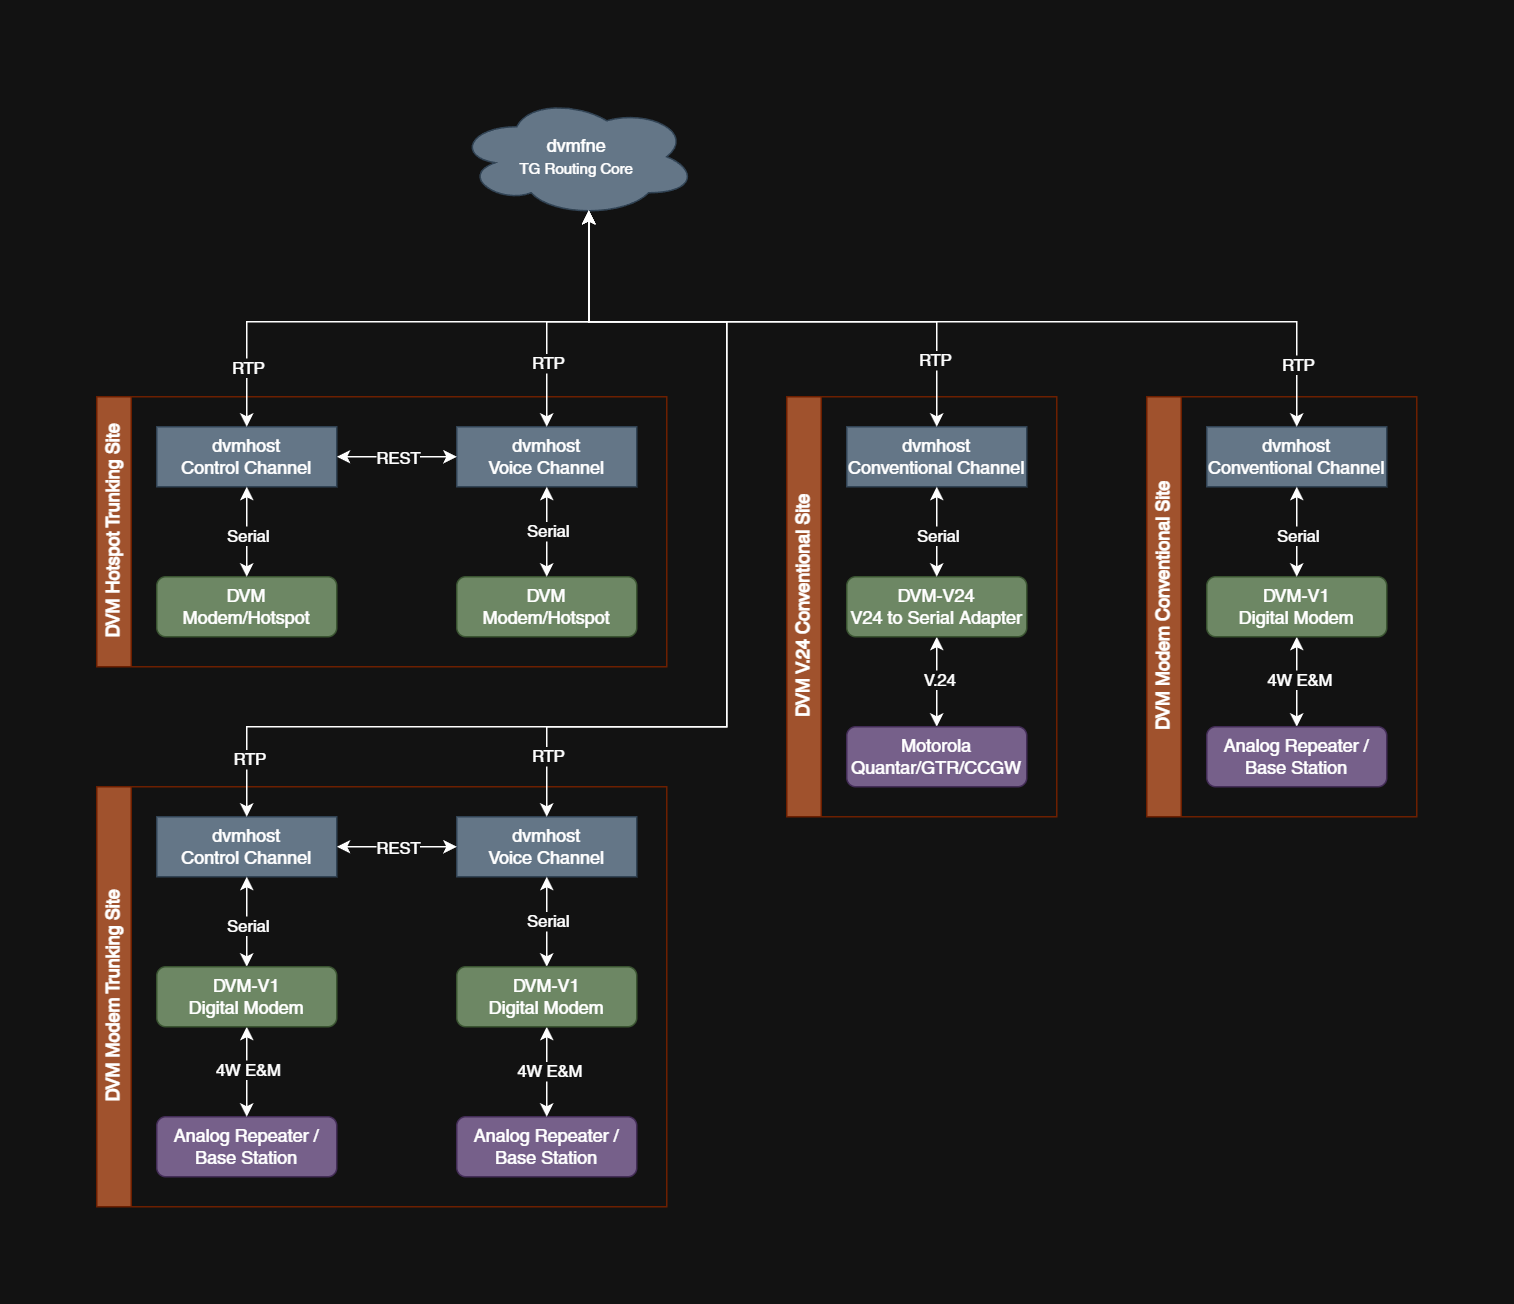
This project utilizes CMake for its build system. (All following information assumes familiarity with the standard Linux make system.)
The DVM Host software requires the library dependancies below. Generally, the software attempts to be as portable as possible and as library-free as possible. A basic GCC/G++ install, with libasio and ncurses is usually all that is needed to compile.
apt-get install libasio-dev libncurses-dev libssl-dev
apt-get install libasio-devapt-get install libncurses-devapt-get install libssl-devAlternatively, if you download the ASIO library from the ASIO website and extract it to a location, you can specify the path to the ASIO library using: -DWITH_ASIO=/path/to/asio. This method is required when cross-compiling for old Raspberry Pi ARM 32 bit.
If you want detailed stacktrace output on a crash, for compilation ensure libdw-dev is also installed. (apt-get install libdw-dev). For runtime you will need the elfutils package to be installed. (apt-get install elfutils).
If cross-compiling ensure you install the appropriate libraries, for example for AARCH64/ARM64:
sudo dpkg --add-architecture arm64
sudo apt-get update
sudo apt-get install libasio-dev:arm64 libncurses-dev:arm64 libssl-dev:arm64
sudo apt-get install libdw-dev:arm64
git clone https://github.com/DVMProject/dvmhost.git# cd dvmhost
dvmhost # mkdir build
dvmhost # cd build
dvmhost/build # cmake [options] ..
...
-- Build files have been written to: dvmhost/build
dvmhost/build # make
dvmhost/build # make strip
dvmhost/build # make tarball
make tarball completes file named dvmhost_R04Gxx_<arch>.tar.gz should be created. Run the following command to install:dvmhost/build # sudo tar xvzf dvmhost_R04Gxx_<arch>.tar.gz -C /opt
dvmhost/build # make strip
dvmhost/build # sudo make old_install
If cross-compiling is required (ARM 32-bit or ARM64), the CMake build system provides the following options:
-DCROSS_COMPILE_ARM=1 - Cross-compile dvmhost for generic ARM 32-bit
(ex: Raspberry Pi running a 32-bit OS; Debian/Raspbian Bullseye or newer)
-DCROSS_COMPILE_AARCH64=1 - Cross-compile dvmhost for generic ARM 64-bit
(ex: Raspberry Pi 4+ or other ARM64 systems; Debian/Raspbian Bullseye or newer)
Please note cross-compilation requires you to have the appropriate development packages installed for your system.:
ARM 32-bit (Debian/Ubuntu):
arm-linux-gnueabihf-gcc, arm-linux-gnueabihf-g++
ARM 64-bit (Debian/Ubuntu):
aarch64-linux-gnu-gcc, aarch64-linux-gnu-g++
The DVM TUI applications are optional, and dvmhost can still be compiled without it for systems or devices that cannot utilize it.
-DENABLE_SETUP_TUI=0 - This will disable the setup/calibration TUI interface.-DENABLE_TUI_SUPPORT=0 - This will disable TUI support project wide. Any projects that require TUI support will not compile, or will have any TUI components disabled.This source repository contains configuration example files within the configs folder, please review config.example.yml for the dvmhost for details on various configurable options. When first setting up a DVM instance, it is important to properly set the channel "Identity Table" or "Logical Channel ID" (or LCN ID) data, within the iden_table.dat file and then calibrate the modem.
The iden_table.dat file contains critical information used by dvmhost (and some other related applications) to calculate frequencies for Rx/Tx, these calculations are used for over the air broadcast messages that direct radios to which frequency to tune to when in trunking mode. Additionally, the iden_table.dat frequency calculations are also used to determine what frequency a hotspot operates on.
There is a helper CLI Python tool called iden-channel-calculator (For more information please, see: https://github.com/DVMProject/iden-channel-calculator) to help calculate and generate iden_table.dat entries, along with determine which relative channel number relates to a specified frequency.
It should also be important to read and review the calibration notes below.
The following setups assume the host is compiled with the setup TUI mode (if available) [NOTE: Steps 3 - 5 only apply to the air interface modem.]. It is possible to setup the modem without the setup TUI, and requires manually modifying config.yml and the iden_table.dat files.
config.yml and ensure the settings for the modem are correct, find the "modem" section in "system". Check that the uart settings have the appropriate UART port and port speed set (the config.yml defaults to /dev/ttyUSB0 and 115200).
dvmhost as follows: /path/to/dvmhost -c /path/to/config.yml --setup. This will start the dvmhost setup TUI mode.iden_table.dat file).dvmhost as follows: /path/to/dvmhost -c /path/to/config.yml --setup. This will start the dvmhost setup TUI mode. The best way to calibrate the DVM is to use a radio from which you can receive and transmit the appropriate test patterns (for example using ASTRO25 Tuner and an XTS radio to use the "Bit Error Rate" functions under Performance Testing).dvmhost as follows: /path/to/dvmhost -c /path/to/config.yml --cal. This will start the dvmhost calibration mode. The best way to calibrate the DVM is to use a radio from which you can receive and transmit the appropriate test patterns (for example using ASTRO25 Tuner and an XTS radio to use the "Bit Error Rate" functions under Performance Testing).dvmhost as follows: /path/to/dvmhost -c /path/to/config.yml --setup. This will start the dvmhost setup TUI mode. The best way to calibrate the DVM is to use a radio from which you can receive and transmit the appropriate test patterns (for example using ASTRO25 Tuner and an XTS radio to use the "Transmitter Test Pattern" functions under Performance Testing).dvmhost as follows: /path/to/dvmhost -c /path/to/config.yml --cal. This will start the dvmhost calibration mode. The best way to calibrate the DVM is to use a radio from which you can receive and transmit the appropriate test patterns (for example using ASTRO25 Tuner and an XTS radio to use the "Transmitter Test Pattern" functions under Performance Testing).config.yml file. In some cases when operating in trunking mode, for example, it may be necessary to change the orientation of the transmit antenna by using a 90 degree adapter as well as changing the gain mode to "Low" to prevent Rx desense.This source repository contains configuration example files within the configs folder, please review fne-config.example.yml for the dvmfne for details on various configurable options. When first setting up a FNE instance, it is important to properly configure a talkgroup_rules.example.yml file, this file defines all the various rules for valid talkgroups and other settings.
The other configurables on a dvmfne instance are within the fne-config.example.yml. Some of these are Radio ID (RID) access control listings, Peer ID (PID) access control listings, adjacent site maps for systems with trunked dvmhost instances connected, annd many other parameters.
Here is a listing of files in the configs folder in this repo that pertain to FNE configuration:
adj_site_map.example.yml - This is an example configuration file configuring adjacent site mappings for trunked dvmhost instances.fne-config.example.yml - This is the main/primary example configuration file for an FNE instance.peer_list.example.dat - This is a simple CSV-style file containing access control permissions for peers allowed to connect to the FNE (this includes both downstream peers (like dvmhost or dvmbridge) and other dvmfne instances connecting to the FNE instance).rid_acl.example.dat - This is a simple CSV-style file containing the access control permissions for radio ID (RID)s allowed to use a configured system/network.talkgroup_rules.example.yml - This is the second most important configuration file for an FNE, this file describes all the talkgroups and their related access control and configuration parameters.There is another file that is attributed to the FNE that an example is not provided for and that is the key-container.ekc file. This file provides cryptographic material needed for providing keyloading functionality across a configured system/network.
Most parameters within the fne-config.example.yml should be set to reasonable defaults for simply just starting up a FNE, the only parameters in the configuration that must be reviewed before starting up an instance are proper file paths for the ACL and other files used by the FNE.
There is no other real configuration for a dvmfne instance other then setting the appropriate parameters within the configuration files.
This source repository contains configuration example files within the configs folder, please review bridge-config.example.yml for the dvmbridge for details on various configurable options.
If using local audio with dvmbridge, command line arguments for the input and output device are required. (See command line parameters below.)
On Windows, by default dvmbridge will utilize WinMM (Windows Multimedia API), this should work for most uses. If necessary, in some situations (like many instances of dvmbridge for example), it may be desirable to use the Windows high-performance audio subsystem, WASAPI (Windows Audio Session API), normally dvmbridge will always default to using WinMM on Windows systems (even those with WASAPI support), but
using the command line parameter -wasapi will force dvmbridge to utilize WASAPI instead. (This may help with some cases of where audio is choppy as well.)
There is no other real configuration for a dvmbridge instance other then setting the appropriate parameters within the configuration files.
This source repository contains configuration example files within the configs folder, please review patch-config.example.yml for the dvmpatch for details on various configurable options.
There is no other real configuration for a dvmpatch instance other then setting the appropriate parameters within the configuration files.
usage: ./dvmhost [-vhdf] [--syslog] [--setup] [--cal][--boot] [-c <configuration file>] [--remote [-a <address>] [-p <port>]]

  -v        show version information
  -h        show this screen
  -d        force modem debug
  -f        foreground mode

  --syslog  force logging to syslog

  --setup   TUI setup and calibration mode

  --cal     simple calibration mode
  --boot    connects to modem and reboots into bootloader mode

  -c <file> specifies the configuration file to use

  --remote  remote modem mode
  -a        remote modem command address
  -p        remote modem command port
  -P        remote modem command port (local listening port)

  --        stop handling options
usage: ./dvmfne [-vhf][-p][--syslog][-c <configuration file>]

  -v        show version information
  -h        show this screen
  -f        foreground mode

  -p        promiscuous hub mode

  --syslog  force logging to syslog

  -c <file> specifies the configuration file to use

  --        stop handling options
usage: ./dvmbridge [-vhf][-i <input audio device id>][-o <output audio device id>][-c <configuration file>]

  -v        show version information
  -h        show this screen
  -f        foreground mode

  -i        input audio device
  -o        output audio device

  -wasapi   use WASAPI on Windows

  -c <file> specifies the configuration file to use

  --        stop handling options

Audio Input Devices:
    ... <list of audio input devices> ...

Audio Output Devices:
    ... <list of audio output devices> ...
usage: ./dvmpatch [-vhf][-c <configuration file>]

  -v        show version information
  -h        show this screen
  -f        foreground mode

  -c <file> specifies the configuration file to use

  --        stop handling options
usage: ./dvmcmd [-dvhs][-a <address>][-p <port>][-P <password>] <command> <arguments ...>

  -d                          enable debug
  -v                          show version information
  -h                          show this screen

  -a                          remote modem command address
  -p                          remote modem command port
  -P                          remote modem authentication password

  -s                          use HTTPS/SSL

  --                          stop handling options
NOTE: See dvmcmd -h for full help for commands and arguments.
Most of the DVM Core software suite has mostly low modern system requirements. Both dvmhost and dvmfne are however, heavily dependent on multi-threading and, as a result perform better on multi-core/multi-processor systems.
Please note these hardware requirements are not hard limits, the information below has been put together based on observation of installed instances. While there is no reason the software suite will fail to run on hardware below the minimal requirements, its is unlikely to provide a decent working experience.
dvmfne's requirements can change radically depending on network size. Larger, busier networks will require far more resources then smaller, less busy networks. (dvmfne has been tested with daily unique call
counts of up to 100,000+ calls on a x86_64 Server with 8GB RAM and 8-core processor, and in this environment it runs comfortably.)
The installation path of "/opt/dvm" is still supported by the CMake Makefile (and will be for the forseeable future); after compiling, in order to install to this path simply use: make old_install.
The installation of the systemd service is also still supported by the CMake Makefile, after using make old_install, simply use: make old_install-service.
After compilation the CMake build system has a configuration to generate tarball payload packages using make tarball. This will generate a tarball package, the tarball package contains the similar pathing that the make old_install would generate.
For maximize size reduction before performing a make install, make old_install or make tarball it is recommended to run make strip to strip any debug symbols or other unneeded information from the resultant binaries.
If you have old configuration files, missing comments or new parameters, there is a tool provided in the "tools" directory of the project called config_annotator.py this is a Python CLI tool designed to compare an existing configuration file against the example configuration file and recomment and add missing parameters (along with removing illegal/invalid parameters). It is recommended to backup your existing configuration file before running this tool on it. This tool is only designed for the dvmhost configuration file, and no other configuration file!
By default Linux may restrict the maximum size of the receive and send buffers used by the kernel for network traffic. Please check the limits with sudo sysctl net.core.rmem_max and sudo sysctl net.core.wmem_max, these should be at least 512K (524288), while DVM will operate in lower
limits, you will see startup errors similar to: "Could not resize socket recv buffer, XXXXXX != 524288", or "Could not resize socket send buffer, XXXXXX != 524288". See the documentation for your specific distribution of Linux to adjust these parameters.
Offically support for cross-compiling for RPi 1/2/3 was removed in DVM R05A02. There is no support for cross-compiling on these platforms. It is recommended not to run DVM on these platforms and to use more modern RPi4+.
It is highly recommended that the REST API interface not be exposed directly to the internet. If such exposure is wanted/needed, it is highly recommended to proxy the dvmhost REST API through a modern web server (like nginx for example) rather then directly exposing dvmhost's REST API port.
Some extra notes for those who are using the Raspberry Pi, default Raspbian OS or Debian OS installations. You will not be able to flash or access the STM32 modem unless you do some things beforehand.
/dev/ttyAMA0. On Rasbian OS or Debian OS, this is done by: sudo systemctl disable bluetooth then adding dtoverlay=disable-bt to /boot/config.txt./dev/ttyAMA0. This can conflict with the STM32, and is best if disabled. On Rasbian OS or Debian OS, this is done by: systemctl disable serial-getty@ttyAMA0.service/dev/ttyAMA0 gets rebuilt on boot via a systemd generator, even if you've already disabled it. You'll need to disable this generator with: sudo systemctl mask serial-getty@ttyAMA0.service/boot/cmdline.txt file in your favorite editor (vi or pico) and remove the console=serial0,115200 part.The steps above can be done by the following commands:
sudo systemctl disable bluetooth.service serial-getty@ttyAMA0.service
sudo systemctl mask serial-getty@ttyAMA0.service
grep '^dtoverlay=disable-bt' /boot/config.txt || echo 'dtoverlay=disable-bt' | sudo tee -a /boot/config.txt
sudo sed -i 's/^console=serial0,115200 *//' /boot/cmdline.txt
After finishing these steps, reboot.
This project is licensed under the GPLv2 License - see the LICENSE file for details. Use of this project is intended, for amateur and/or educational use ONLY. Any other use is at the risk of user and all commercial purposes is strictly discouraged.
THIS SOFTWARE MUST NEVER BE USED IN PUBLIC SAFETY OR LIFE SAFETY CRITICAL APPLICATIONS! This software project is provided solely for personal, non-commercial, hobbyist use; any commercial, professional, governmental, or other non-hobbyist use is strictly discouraged, fully unsupported and expressly disclaimed by the authors.
By using this software, you agree to indemnify, defend, and hold harmless the authors, contributors, and affiliated parties from and against any and all claims, liabilities, damages, losses, or expenses (including reasonable attorneys’ fees) arising out of or relating to any unlawful, unauthorized, or improper use of the software.
more like this
simple generator for 3D-printed frames for a moxon rectangle antenna
search projects, people, and tags