SimGAN
Pytorch Implementation of SimGAN: Hybrid Simulator Identification for Domain Adaptation via Adversarial Reinforcement L…
Python★ 50
An all-in-one VLA engineering platform for embodied AI — from data to real-robot deployment.
 FluxVLA

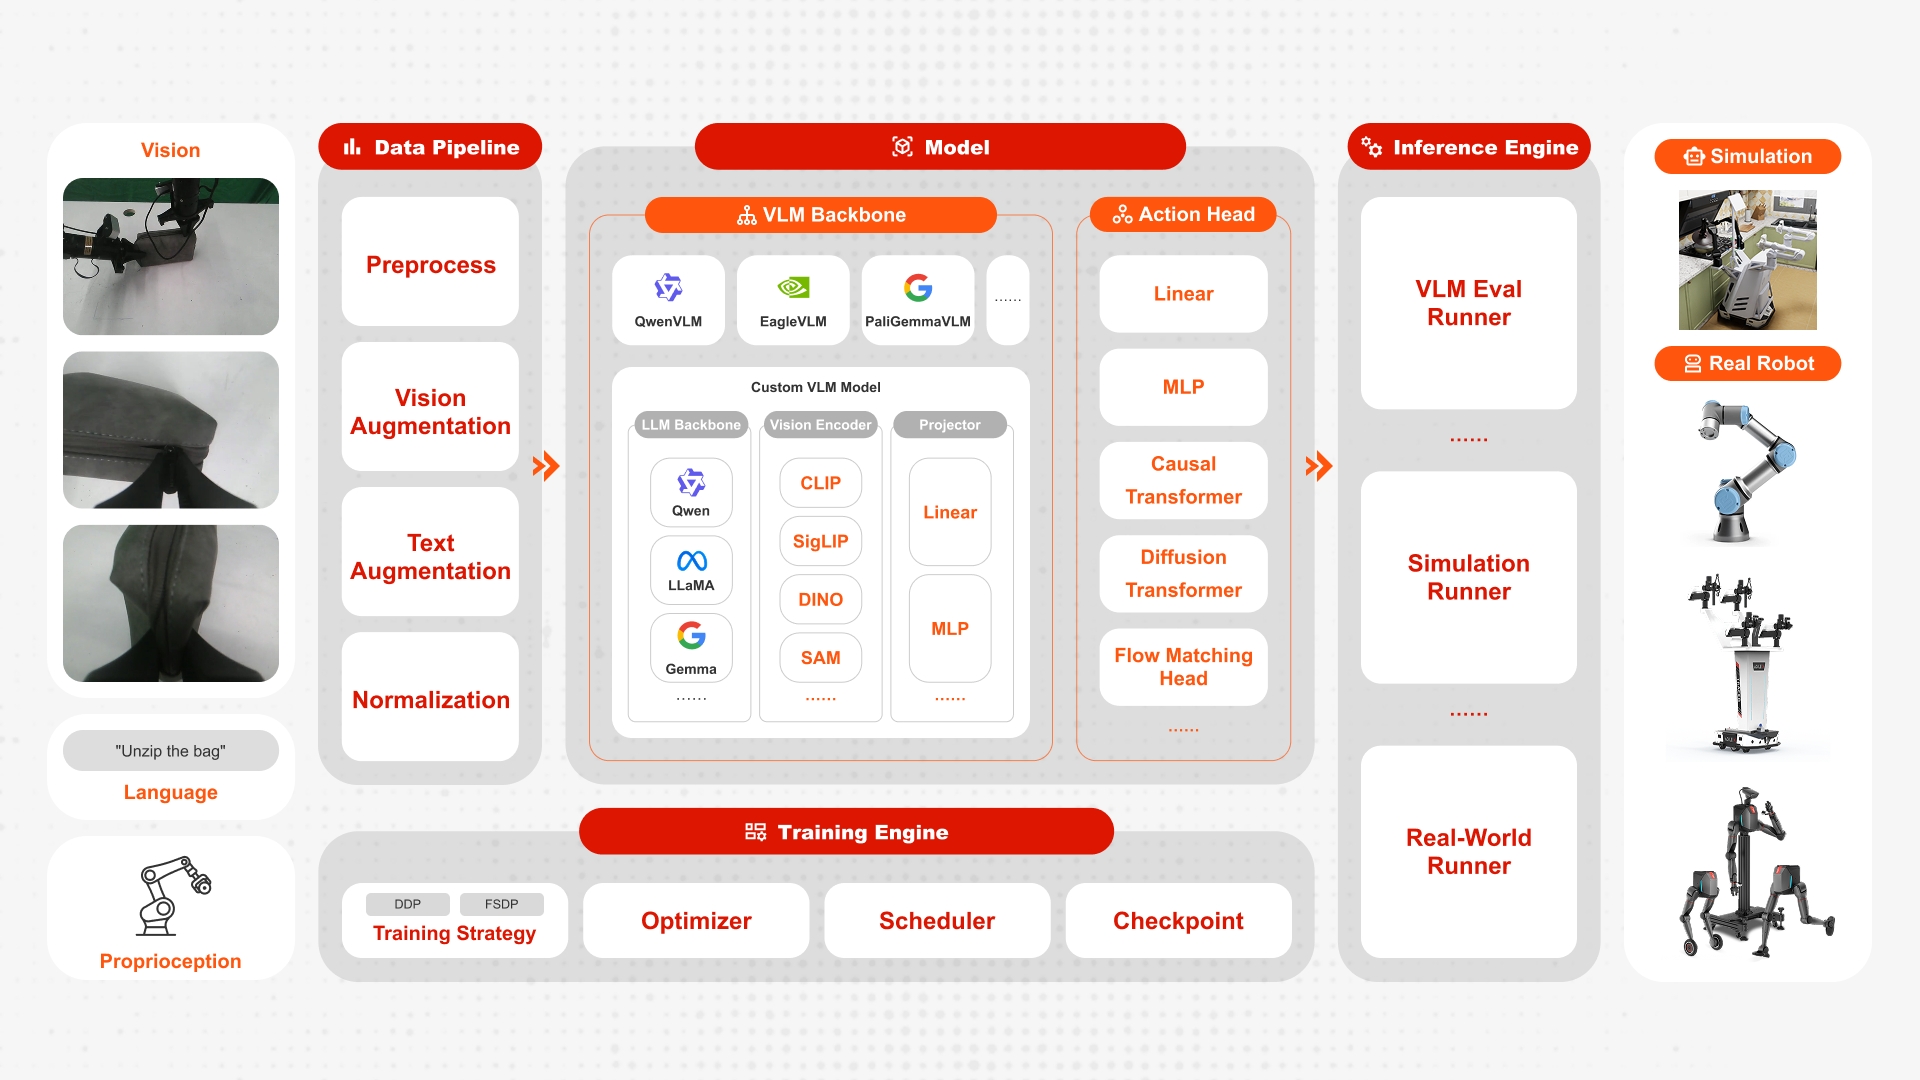
FluxVLA Engine is a full-stack, end-to-end engineering platform for deploying embodied intelligence applications. Built on the core design principles of unified configuration, standardized interfaces, module decoupling, and deployability, it creates a complete engineering loop from data to real-device deployment. With the goal of providing a standardized industry–academia–research foundation, it significantly lowers the engineering barrier for VLA research and development.
| Codebase | Libero-Spatial | Libero-Object | Libero-Goal | Libero-Long | Libero-Average |
|---|---|---|---|---|---|
| FluxVLA(SmolVLA) | 86.2 | 92.4 | 91.4 | 68.8 | 84.7 |
| FluxVLA(GR00T) | 97.4 | 96.2 | 94.6 | 93.0±1.5 | 95.3 |
| FluxVLA(Qwen3VL 0.6B+GR00T) | 96.0 | 99.4 | 95.2 | 94.2 | 96.20 |
| FluxVLA(DreamZero) | 98.2 | 98.8 | 93.2 | 94.8 | 96.25 |
| FluxVLA(PI0) | 98.6 | 98.8 | 96.8 | 93.2 | 96.85 |
| FluxVLA(PI0.5) | 98.6 | 99.6 | 98.0 | 95.6±1.0 | 97.95 |
Linked scores point to the corresponding checkpoints.
| Model | Training Data | Cabinet | Drawer | Microwave | Generalization | Average |
|---|---|---|---|---|---|---|
| FluxVLA(GR00T) | 24 tasks, 30 demos | 22.7% | 35.7% | 32.5% | 48.9% | 44.3%(50trials) |
Cabinet: PnPBottleToCabinetClose + PnPWineToCabinetClose.Drawer: PnPCanToDrawerClose + PnPCupToDrawerClose.Microwave: PnPMilkToMicrowaveClose + PnPPotatoToMicrowaveClose.Generalization: the remaining 18 post-train novel tasks.[2026/06/30] 🔥 Single-arm and dual-arm Franka real-robot inference is now supported, including joint/eepose control configs and a deployment guide. See docs/franka.md.
[2026/06/22] 🔥 A minimal Oli humanoid whole-body (loco-manipulation) real-robot inference path (operator + runner + example config) is now available. See docs/oli_whole_body.md.
[2026/06/17] 🔥 ARM reward modeling with RA-BC/AW-BC reweighting is now supported. See docs/arm.md for setup and usage.
[2026/06/10] 🔥 RoboCasa GR1 simulation tasks with GR00T are now supported.
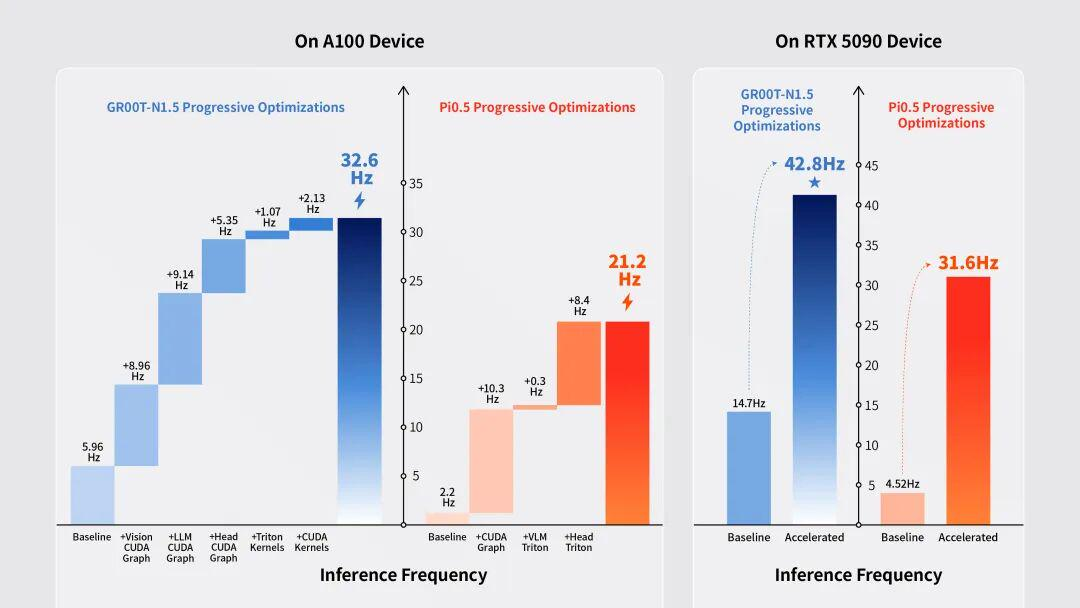
[2026/06/04] 🔥 Triton backend for Pi0.5-RTC is now supported, see inference_acceleration.
[2026/05/28] 🔥 FluxDAgger is now released: a model-decoupled DAgger pipeline for dual-arm manipulation, making it easy to integrate different VLAs and reward models.
[2026/05/28] 🔥 The embodied manipulation simulation benchmark FluxBisim is now released.
[2026/05/09] 🔥 SmolVLA is now supported.
[2026/04/24] 🔥 Pi0.5-RTC is now supported.
[2026/04/22] 🔥 ZMQ-based remote inference framework is now supported.
[2026/04/15] 🔥 DreamZero WAM is now supported.
[2026/04/08] 🔥 FluxVLA has been open-sourced.
Choose one of the following installation paths:
conda create -n fluxvla python=3.10 -y
conda activate fluxvla

# Choose one mode: sim-only, real-only, or full.
bash scripts/install_env.sh sim-only
# bash scripts/install_env.sh real-only
# bash scripts/install_env.sh full
sim-only installs simulation / LIBERO / RoboCasa runtime dependencies plus
the pinned RoboCasa source checkouts under ./src, real-only installs
real-robot and remote-inference dependencies, and full installs both. Pass
--skip-robocasa if you do not need the RoboCasa checkouts.
RoboCasa simulator assets are downloaded by default whenever the installer
installs the RoboCasa source checkouts (sim-only, full, or real-only --with-robocasa). The installer calls scripts/download_robocasa_assets.py
and uses FLUXVLA_ROBOCASA_ASSET_ENDPOINT (default: HF_ENDPOINT, then
https://hf-mirror.com). Use --skip-robocasa-assets to skip only the assets,
or --skip-robocasa to skip both the source checkouts and the assets.
The installer selects a CUDA PyTorch profile automatically from the current
CUDA toolkit / nvcc version first: CUDA >= 12.8 selects cu128, otherwise it
selects cu124. If no toolkit is visible, it falls back to driver-reported
CUDA and then GPU generation. Override it with --profile cu128 or
--profile cu124.
After PyTorch is installed, the FlashAttention wheel is selected from the
actual Python tag, PyTorch version, CUDA major version, C++ ABI, and CPU
architecture. If your platform has no matching prebuilt wheel, set
FLASH_ATTN_WHEEL_URL explicitly or pass --skip-flash-attn.
av is installed from the pip wheel first by default to avoid slow conda
dependency resolution; if no wheel is available, the installer falls back to
conda. Set FLUXVLA_AV_INSTALLER=conda if you specifically want the
conda-forge package.
Real-robot runners still require the system ROS installation itself. On ROS Noetic machines, source ROS before launching inference:
source /opt/ros/noetic/setup.bash
FlashAttention wheels are large, so GitHub release downloads can dominate a
fresh install on slow networks. For repeated installs, put the exact wheel file
in ./wheelhouse/, ./wheels/, or ~/.cache/fluxvla/wheels/; the installer
will use it before any network request. You can also point at a local file or
an internal mirror:
FLASH_ATTN_WHEEL_FILE=/path/to/flash_attn-2.8.3.post1+cu12torch2.8cxx11abiTRUE-cp310-cp310-linux_x86_64.whl \
bash scripts/install_env.sh sim-only --profile cu128

FLASH_ATTN_WHEEL_BASE_URLS="https://your-mirror.example.com/fluxvla/wheels" \
bash scripts/install_env.sh sim-only --profile cu128
The installer respects your existing pip configuration first. If that index is missing a package, or if no pip index is configured, it probes PyPI plus several common mirrors and retries by response time instead of pinning one mirror globally. For slow or unstable networks, customize the candidate list and timeouts:
PIP_INDEX_CANDIDATES="https://mirrors.aliyun.com/pypi/simple https://mirrors.cloud.tencent.com/pypi/simple https://pypi.tuna.tsinghua.edu.cn/simple https://pypi.org/simple" \
PIP_INSTALL_TIMEOUT=7200 \
PIP_NETWORK_TIMEOUT=900 \
GH_PROXY=https://ghfast.top \
bash scripts/install_env.sh full
If you already cloned and installed FluxVLA(v0.1.0), you do not need to recreate the conda environment. Pull the latest code and update only the packages whose versions changed for the current simulation / model stack:
bash scripts/update_env.sh
Use --skip-pull if you already updated the checkout yourself, and
--skip-project if you do not want to reinstall FluxVLA in editable mode.
git pull
python -m pip install --upgrade "transformers==5.3.0" "datasets==4.0.0"
python -m pip install "mujoco==3.2.6" gymnasium lxml bddl==1.0.1 hydra-core==1.2.0 robomimic==0.2.0
python -m pip install --force-reinstall --no-deps "libero @ git+https://github.com/yinchimaoliang/LIBERO.git@058fda1ddebe92918af091cb6816759ca6d003f0"
python -m pip install --force-reinstall --no-deps "robosuite @ git+https://github.com/yinchimaoliang/robosuite.git@e293cc32ff3c48957a4ebcad09952432b0dc9049"
python -m pip install --no-build-isolation -e .
python -c "import transformers; print(transformers.__version__)"
RoboCasa GR00T support is still optional. The installer manages the Isaac-GR00T
and RoboCasa GR1 local checkouts under ./src for sim-only and full; use
--skip-robocasa if you do not use RoboCasa configs.
The update helper does not reinstall PyTorch or FlashAttention. Existing
flash-attn==2.5.5 environments can keep using it only if it still imports
against the installed PyTorch/CUDA build:
python - <<'PY'
import torch, flash_attn
from flash_attn.flash_attn_interface import flash_attn_func, flash_attn_varlen_func
print("torch", torch.__version__, "cuda", torch.version.cuda)
print("flash-attn", flash_attn.__version__)
PY
If you upgrade PyTorch with the current installer or the commands below,
reinstall a matching FlashAttention wheel as well. The installer currently
defaults to flash-attn==2.8.3.post1 for the supported PyTorch profiles.
Use the manual path only if you are not using scripts/install_env.sh.
Install PyTorch first, then FlashAttention, then the remaining FluxVLA
dependencies.
conda create -n fluxvla python=3.10 -y
conda activate fluxvla
Important: Before running
pip install -r requirements.txt, you must install PyTorch from the official CUDA index first. The default PyPI index cannot fetch CUDA-enabled builds.
# CUDA 12.8
pip install torch==2.8.0 torchvision==0.23.0 torchaudio==2.8.0 --index-url https://download.pytorch.org/whl/cu128
For other CUDA versions, replace cu128 with the corresponding value (e.g., cu118, cu121). See: https://pytorch.org/get-started/locally/ and https://pytorch.org/get-started/previous-versions/.
The one-command installer downloads a prebuilt FlashAttention wheel from the official release assets. For manual installation, install the wheel matching your Python, PyTorch, and C++ ABI instead of building from source:
PYTAG=$(python - <<'PY'
import sys
print(f"cp{sys.version_info.major}{sys.version_info.minor}")
PY
)
ABI=$(python - <<'PY'
import torch
print(str(torch._C._GLIBCXX_USE_CXX11_ABI).upper())
PY
)

pip install --no-deps \
  "https://github.com/Dao-AILab/flash-attention/releases/download/v2.8.3.post1/flash_attn-2.8.3.post1+cu12torch2.8cxx11abi${ABI}-${PYTAG}-${PYTAG}-linux_x86_64.whl"
If you installed PyTorch 2.6, replace torch2.8 in the wheel URL with
torch2.6.
FlashAttention wheels are tied to the installed Python, PyTorch, CUDA, and C++
ABI. flash-attn==2.5.5 is not forbidden, but it is only safe to keep when it
was built for the exact PyTorch/CUDA stack you are still using. After any
PyTorch upgrade, reinstall a matching FlashAttention wheel.
conda install -c conda-forge av=14.4.0
pip install -r requirements.txt
pip install --no-build-isolation -e .
Note:
requirements.txtnow composesrequirements-base.txt,requirements-sim.txt, andrequirements-real.txt. It does not install PyTorch; install CUDA PyTorch first or usescripts/install_env.sh.
RoboCasa GR00T configs such as configs/gr00t/gr00t_eagle_3b_robocasa_finetune.py require the pinned Isaac-GR00T and RoboCasa GR1 task checkouts. The one-click installer handles them for sim-only and full by default and places them under ./src:
bash scripts/install_env.sh sim-only
Use FLUXVLA_ROBOCASA_SRC_ROOT=/path/to/src to choose another checkout root, --skip-robocasa to skip these source installs, and --with-robocasa to force them in real-only mode. Runtime dependencies and the patched robosuite build are installed from requirements-sim.txt.
If you are not using the installer, the equivalent manual commands are:
pip install "mujoco==3.2.6" gymnasium lxml
pip install "robosuite @ git+https://github.com/yinchimaoliang/robosuite.git@e293cc32ff3c48957a4ebcad09952432b0dc9049"

git clone https://github.com/NVIDIA/Isaac-GR00T.git ./src/Isaac-GR00T
git -C ./src/Isaac-GR00T checkout 4af2b622892f7dcb5aae5a3fb70bcb02dc217b96
pip install --no-deps -e ./src/Isaac-GR00T

git clone https://github.com/robocasa/robocasa-gr1-tabletop-tasks.git \
  ./src/robocasa-gr1-tabletop-tasks
git -C ./src/robocasa-gr1-tabletop-tasks checkout 4840e671596f93ca03651524b9f72ffb1aadfeff
pip install --no-deps -e ./src/robocasa-gr1-tabletop-tasks
--no-deps is recommended for editable installs so the RoboCasa packages do not replace the pinned FluxVLA model stack dependencies. RoboCasa assets and datasets are covered in Data & Assets Preparation.
If you want to evaluate LIBERO on devices that do not support ray tracing (e.g., A100), please refer to EGL Device GPU Rendering Configuration.
scripts/install_env.sh sim-only and scripts/install_env.sh full now probe MuJoCo EGL automatically. If EGL devices are not visible, the installer tries to install the system packages below, creates the NVIDIA GLVND vendor file, and writes a conda activation hook for MUJOCO_GL=egl. Use FLUXVLA_EGL_SETUP=always to make this check strict, or --skip-egl-setup to skip it.
Install system dependencies
export MUJOCO_GL=egl
export PYOPENGL_PLATFORM=egl
sudo apt-get update
sudo apt-get install -y libegl1 libglvnd0 libopengl0 libegl-dev libgl1-mesa-dev libx11-dev libglew-dev libosmesa6-dev
Environment checks
Make sure /proc/1/environ contains the following environment variables:
NVIDIA_DRIVER_CAPABILITIES=allNVARCH=x86_64NVIDIA_REQUIRE_CUDA=cuda>=12.4brand=tesla and driver>=470Create an EGL configuration file
Create file /usr/share/glvnd/egl_vendor.d/10_nvidia.json with the following content:
{
    "file_format_version": "1.0.0",
    "ICD": {
        "library_path": "libEGL_nvidia.so.0"
    }
}
Then launch eval with __EGL_VENDOR_LIBRARY_FILENAMES=/usr/share/glvnd/egl_vendor.d/10_nvidia.json unless your environment already exports it.
To ensure code quality and consistency (especially for C++/CUDA code), install pre-commit hooks:
pip install pre-commit
pre-commit install
This will automatically check and format code before every commit.
Weights & Biases is used for experiment tracking and visualization. Configure it as follows:
requirements.txt):pip install wandb
wandb login
export WANDB_PROJECT=fluxvla        # project name (default: fluxvla)
export WANDB_ENTITY=your-team-name  # team name or username (default: None)
export WANDB_MODE=online            # online, offline, or disabled (default: online)
export WANDB_MODE=disabled
Note: all wandb configuration is read from environment variables; no additional settings are needed in config files.
TensorBoard is supported as an optional logging backend for experiment metric visualization. Configure it as follows:
'tensorboard' to active_trackers in your config file:metric=dict(
type='VLAMetric',
active_trackers=('jsonl', 'wandb', 'tensorboard'),
...
)
Alternatively, enable it via command line without modifying the config file:
--cfg-options 'runner.metric.active_trackers=[jsonl,wandb,tensorboard]'
tensorboard --logdir work_dirs/tensorboard
Note: event files are saved to {work_dir}/tensorboard/{run_id}/ per run, enabling automatic comparison across experiments. If the TENSORBOARD_LOG_PATH environment variable is set, it will be used directly as the log directory.
Download the required datasets and place them under ./datasets. Download only the datasets you need according to your configuration.
| Dataset | Download link |
|---|---|
| libero-object | limxdynamics/FluxVLAData/libero_object_no_noops_lerobotv2.1 |
| libero-spatial | limxdynamics/FluxVLAData/libero_spatial_no_noops_lerobotv2.1 |
| libero-10 | limxdynamics/FluxVLAData/libero_10_no_noops_lerobotv2.1 |
| libero-goal | limxdynamics/FluxVLAData/libero_goal_no_noops_lerobotv2.1 |
| RoboCasa GR1 (30 demos) | limxdynamics/FluxVLAData/robocasa_gr1_24tasks_first30ep |
| RoboCasa GR1 | limxdynamics/FluxVLAData/robocasa_lerobot_V2.1 |
| ARM manual test | limxdynamics/FluxVLAData/ARM_manual_test_10Episodes_lerobotv3.0 |
| RealRobot_AgileX_aloha | limxdynamics/FluxVLAData/RealRobot_AgileX_aloha_lerobot_v2 |
| RealRobot_UR3_Chem | limxdynamics/FluxVLAData/RealRobot_UR3_Chem_lerobot_v2 |
| RealRobot_Franka_dual | limxdynamics/FluxVLAData/RealRobot_Franka_dual_lerobot_v2 |
For example, download the libero-10 dataset:
huggingface-cli download limxdynamics/FluxVLAData --repo-type dataset --include "libero_10_no_noops_lerobotv2.1/*" --local-dir ./datasets
Replace libero_10_no_noops_lerobotv2.1 with the corresponding folder name of the dataset you want to download.
For RoboCasa GR00T training with the released 30-demo subset, download the
dataset under ./datasets:
huggingface-cli download limxdynamics/FluxVLAData \
  --repo-type dataset \
  --include "robocasa_gr1_24tasks_first30ep/*" \
  --local-dir ./datasets
For full-data RoboCasa GR1 training, replace the include pattern with
robocasa_lerobot_V2.1/*.
The built-in ARM example config configs/arm/arm_clip_aloha_example.py expects a progress-labeled LeRobot v3.x dataset at ./datasets/ARM_manual_test_10Episodes_lerobotv3.0.
Download the released example dataset to the expected location with:
huggingface-cli download limxdynamics/FluxVLAData \
  --repo-type dataset \
  --include "ARM_manual_test_10Episodes_lerobotv3.0/*" \
  --local-dir ./datasets
ARM training reads the progress column directly from this dataset. For RA-BC / AW-BC on policy or DAgger datasets that do not already contain progress, first train or load an ARM checkpoint, then generate arm_progress.parquet with scripts/compute_arm_awbc_progress.py. See docs/arm.md and tools/arm_awbc/README.md.
Use the FluxVLA asset downloader below as the supported path for RoboCasa GR1 tabletop tasks. The table lists the upstream archives used by the script; manually downloading and extracting those archives is not sufficient for this stack because the script also fixes the directory layout and normalizes Objaverse XML metadata for the pinned RoboCasa GR1 checkout.
| Asset archives | Download link | Local directory |
|---|---|---|
objaverse.zip, textures.zip, generative_textures.zip |
robocasa/robocasa-assets | ./src/robocasa-gr1-tabletop-tasks/robocasa/models/assets |
fixtures.zip |
jianzhang96/robocasa-assets | ./src/robocasa-gr1-tabletop-tasks/robocasa/models/assets |
sketchfab.zip, lightwheel.zip |
nvidia/PhysicalAI-DigitalCousin-Assets | ./src/robocasa-gr1-tabletop-tasks/robocasa/models/assets |
When using scripts/install_env.sh, this downloader runs by default together
with the RoboCasa source checkouts unless --skip-robocasa or
--skip-robocasa-assets is passed. For manual installation or refreshing the
assets, run this command from the FluxVLA repository root. It downloads the
required archives through the selected Hugging Face endpoint, extracts them
into the RoboCasa asset directory, and normalizes the Objaverse XML metadata:
python scripts/download_robocasa_assets.py --endpoint https://hf-mirror.com
If the archives or extracted assets already exist locally, still run this
script so the XML compatibility step is applied. For assets that have already
been extracted into ./src/robocasa-gr1-tabletop-tasks/robocasa/models/assets,
you can run only the validation and XML normalization step:
python scripts/download_robocasa_assets.py --normalize-only
Symlinks are not required; they are only a convenience when the assets already live on another local disk or shared storage.
FluxVLA SARM workflows accept standard LeRobot v2.1 or v3.x datasets. Besides the usual observation / action fields, the dataset must carry SARM subtask annotations in episodes metadata.
Published SARM example datasets on Hugging Face:
Download them under ./datasets with:
huggingface-cli download limxdynamics/FluxVLAData --repo-type dataset --include "SARM_manual_test_10Episodes_lerobotv3.0/*" --local-dir ./datasets
huggingface-cli download limxdynamics/FluxVLAData --repo-type dataset --include "SARM_vlm_test_10Episodes_lerobotv3.0/*" --local-dir ./datasets
huggingface-cli download limxdynamics/FluxVLAData --repo-type dataset --include "SARM_manual_test_10Episodes_lerobotv2.1/*" --local-dir ./datasets
huggingface-cli download limxdynamics/FluxVLAData --repo-type dataset --include "SARM_vlm_test_10Episodes_lerobotv2.1/*" --local-dir ./datasets
Use the manual_* datasets directly for training / inference. Use the vlm_* datasets as clean starting points for manual stage writing or VLM auto-annotation. Prefer the v2.1 pair when another tool expects meta/episodes.jsonl plus per-episode videos; prefer the v3.0 pair when you want to keep native LeRobot v3.x metadata layout.
Before using a LeRobot v3.x SARM dataset, sanity-check the video metadata:
LeRobot v3.x allows either many episodes in one MP4 or one MP4 per episode.
If many episodes share one MP4, each episode that points to that file must
use correct from_timestamp / to_timestamp offsets.
If videos are already split as file-000.mp4, file-001.mp4, ..., each
episode should point to its own file_index, and from_timestamp will
usually reset to 0.0.
If the directory contains multiple MP4 files but all episodes still point to
file-000.mp4, the dataset metadata is malformed and should be fixed before
use.
For ready-to-use SARM dataset structure, annotation columns, and progress inference usage, see docs/sarm.md.
For writing manual stages or generating VLM-based annotations, see tools/sarm_annotate/README.md.
If you train with fluxvla on private datasets, you need to convert your raw data (e.g., HDF5 files collected by ALOHA robots) into the LeRobot Dataset v2.1 format. For a step-by-step conversion guide, see Data Conversion Guide.
For SARM specifically, FluxVLA supports both LeRobot v2.1 and v3.x datasets as long as the required SARM annotation columns are present. The SARM-specific metadata contract is documented in docs/sarm.md.
The converted dataset should follow this directory structure:
├── data
│   └── chunk-000
│   │   └── episode_000000.parquet
│   │   └── episode_000001.parquet
│   │   └── ... (more parquet files)
│   │   └── episode_00000N.parquet
│   └── chunk-001
│   └── ... (more chunks)
│   └── chunk-00N
├── meta
│   └── episodes.jsonl
│   └── episodes_stats.jsonl
│   └── info.json
│   └── tasks.jsonl
├── videos
│   └── chunk-000
│   │   └── camera name 0
│   │   │   └── episode_000000.mp4
│   │   │   └── episode_000001.mp4
│   │   │   └── ...(more mp4 files)
│   │   │   └── episode_00000N.mp4
│   │   └── camera name 1
│   │   └── ...(more cameras)
│   │   └── camera name N
│   └── chunk-001
│   └── ... (more chunks)
│   └── chunk-00N
Download the required pretrained checkpoints and place them under ./checkpoints. Download only the checkpoints you need based on your configuration.
For ARM and SARM workflows, you typically need a CLIP checkpoint for training / inference. SARM VLM-based annotation also needs the Qwen3-VL checkpoint used by the official SARM workflow. Detailed usage is documented in docs/arm.md and docs/sarm.md.
| Model | Size | Download link |
|---|---|---|
| GR00T N1.5 | 3B | 🤗 Hugging Face |
| OpenVLA | 7B | 🤗 Hugging Face |
| PI0_base | 3B | 🤗 Hugging Face |
| PI05_base | 3B | 🤗 Hugging Face |
| PI05_libero | 3B | 🤗 Hugging Face |
| PI05 RoboCasa full-data | 3B | 🤗 Hugging Face |
| SmolVLA | 450M | 🤗 Hugging Face |
Download the PI0.5 RoboCasa full-data checkpoint while preserving the path expected by the config:
hf download limxdynamics/FluxVLAEngine \
  --include "pi05_paligemma_robocasa_full_data_full_finetune_21aa5e82a_bs256/*" \
  --local-dir ./checkpoints
| Model | Size | Download link |
|---|---|---|
| Qwen2.5-VL | 3B | 🤗 Hugging Face |
| Qwen3-VL | 30B | 🤗 Hugging Face |
| SmolVLM2 | 500M | 🤗 Hugging Face |
| Model | Size | Download link |
|---|---|---|
| Qwen 2.5 | 3B | 🤗 Hugging Face |
| Qwen 2.5 | 7B | 🤗 Hugging Face |
| Llama 2 | 7B | 🤗 Hugging Face |
| Model | Download link |
|---|---|
| CLIP ViT-B/32 | 🤗 Hugging Face |
| ViT-Large (DINOv2) | 🤗 Hugging Face |
| ViT-SO400M (SigLIP) | 🤗 Hugging Face |
| SigLIP2 | 🤗 Hugging Face |
| paligemma | 🤗 Hugging Face |
Tip: You can speed up downloads with
huggingface-cli download <model-name> --local-dir ./checkpoints/<model-name>.
For the built-in ARM and SARM configs, place the CLIP files under ./checkpoints/clip-vit-base-patch32:
huggingface-cli download openai/clip-vit-base-patch32 --local-dir ./checkpoints/clip-vit-base-patch32
If you use VLM-based SARM annotation, place the official SARM VLM under ./checkpoints/Qwen3-VL-30B-A3B-Instruct.
/root/miniconda3/envs/fluxvla/bin/torchrun --standalone --nnodes 1 --nproc-per-node [NUM_GPUS] scripts/train.py --config [CONFIG_PATH] --work-dir [WORK_DIR] --cfg-options train_dataloader.per_device_batch_size=[PER_DEVICE_BATCH_SIZE]
Example:
export WANDB_MODE=disabled
/root/miniconda3/envs/fluxvla/bin/torchrun --standalone --nnodes 1 --nproc-per-node 2 scripts/train.py --config configs/pi05/pi05_paligemma_libero_10_full_finetune.py --work-dir ./checkpoints/pi05_paligemma_libero_10_full_finetune --cfg-options train_dataloader.per_device_batch_size=2
RoboCasa GR00T smoke training example:
WANDB_MODE=disabled TOKENIZERS_PARALLELISM=false \
torchrun --standalone --nnodes 1 --nproc-per-node 1 scripts/train.py \
  --config configs/gr00t/gr00t_eagle_3b_robocasa_finetune.py \
  --work-dir work_dirs/smoke_groot_robocasa_train \
  --cfg-options \
    runner.type=FSDPTrainRunner \
    runner.sharding_strategy=no-shard \
    train_dataloader.per_device_batch_size=1 \
    runner.enable_gradient_checkpointing=False \
    runner.max_steps=2 \
    runner.save_iter_interval=1 \
    runner.max_keep_ckpts=2 \
    "runner.metric.active_trackers=('jsonl',)"
/root/miniconda3/envs/fluxvla/bin/torchrun --standalone --nnodes 1 --nproc-per-node [NUM_GPUS] scripts/eval.py --config [CONFIG_PATH] --ckpt-path [CKPT_PATH] --cfg-options [CFG_OPTIONS]
Example:
export WANDB_MODE=disabled
/root/miniconda3/envs/fluxvla/bin/torchrun --standalone --nnodes 1 --nproc-per-node 2 scripts/eval.py --config configs/pi05/pi05_paligemma_libero_10_full_finetune.py --ckpt-path checkpoints/pi05_paligemma_libero_10_full_finetune_bs64/checkpoints/step-028548-epoch-18-loss=0.0111.safetensors
RoboCasa GR00T evaluation example:
MUJOCO_GL=egl WANDB_MODE=disabled TOKENIZERS_PARALLELISM=false \
PYTHONHASHSEED=7 \
torchrun --standalone --nnodes 1 --nproc-per-node 1 scripts/eval.py \
  --config configs/gr00t/gr00t_eagle_3b_robocasa_finetune.py \
  --ckpt-path work_dirs/gr00t_eagle_3b_robocasa_gr1_24x30_finetune_bs64/checkpoints/step-010000.safetensors \
  --cfg-options \
    eval.norm_stats_path=work_dirs/official_groot_gr1_dataset_statistics.json \
    eval.output_dir=work_dirs/gr00t_eagle_3b_robocasa_eval \
    eval.num_trials_per_task=50 \
    eval.seed=7
eval.seed controls the RoboCasa episode seeds and stochastic GR00T action
sampling seeds during evaluation. PYTHONHASHSEED is independent and must be
set before Python starts; using the same value is recommended when reproducing
reported RoboCasa results.
export WANDB_MODE=disabled
bash scripts/train.sh [CONFIG] [WORK_DIR] --cfg-options train_dataloader.per_device_batch_size=[PER_DEVICE_BATCH_SIZE] train_dataloader.batch_size=[GLOBAL_BATCH_SIZE] runner.max_steps=[MAX_STEPS] runner.save_interval=[SAVE_INTERVAL] runner.max_keep_ckpts=[MAX_KEEP_CKPTS] --eval-after-train
To resume training from a checkpoint, use the --resume-from argument to specify the checkpoint file path. Training will continue from the saved global step, epoch, model state, and optimizer state.
Local training example:
export WANDB_MODE=disabled
/root/miniconda3/envs/fluxvla/bin/torchrun --standalone --nnodes 1 --nproc-per-node 2 scripts/train.py \
  --config configs/pi05/pi05_paligemma_libero_10_full_finetune.py \
  --work-dir ./work_dirs/pi05_paligemma_libero_10_full_finetune \
  --resume-from ./work_dirs/pi05_paligemma_libero_10_full_finetune/checkpoints/checkpoint_epoch_5.pt \
  --cfg-options train_dataloader.per_device_batch_size=2
Cluster training example:
export WANDB_MODE=disabled
bash scripts/train.sh [CONFIG] [WORK_DIR] \
  --resume-from [CHECKPOINT_PATH] \
  --cfg-options train_dataloader.per_device_batch_size=[PER_DEVICE_BATCH_SIZE] runner.max_steps=[MAX_STEPS]
export WANDB_MODE=disabled
bash scripts/eval.sh [CONFIG] [CKPT_PATH] --cfg-options [CFG_OPTIONS]
When running inference on a real robot, first install the environment on the robot side, and then run:
python scripts/inference_real_robot.py --config [CONFIG] -- ckpt-path [CKPT_PATH]
A: If you encounter Hugging Face connectivity issues (e.g., slow downloads, timeouts, or connection refused), set the following environment variable before running the command and use hf-mirror:
export HF_ENDPOINT="https://hf-mirror.com"
conda install av is very slow at resolving the environment.A: You can use the libmamba solver to speed up dependency resolution:
conda install -c conda-forge av=14.4.0 --solver=libmamba
A: This is expected. GR00T's performance on LIBERO is sensitive to random seeds, the hardware environment, and the number of training epochs. Small changes in these factors may cause noticeable fluctuations in evaluation results. It is recommended to run experiments with multiple random seeds and select the best checkpoint based on evaluation performance.
pip install -r requirements.txt, building egl_probe fails with RuntimeError: CMake must be installed.A: egl_probe needs CMake to build. Install it via conda (recommended) or apt:
conda install -c conda-forge cmake
# or
sudo apt install cmake
Note: Do not use
pip install cmake. The pip package is a Python wrapper and may fail because pip isolates the build environment.
egl_probe build fails and reports Compatibility with CMake < 3.5 has been removed from CMake.A: This is usually because your CMake version is too new for the egl_probe CMakeLists.txt. Set the following environment variable before installing:
CMAKE_POLICY_VERSION_MINIMUM=3.5 pip install -r requirements.txt
RuntimeError: Numpy is not available or version incompatibility warnings).A: During installation, some dependencies may overwrite the pinned NumPy version. Reinstall the correct version directly:
pip install numpy==1.26.4
Please see the contribution workflow and guidelines in docs/CONTRIBUTING.md.
Quick conventions:
upstream/main and use prefixes like feat/, fix/, docs/, etc. (details in the contributing guide).If you encounter any issues while using this repository, feel free to contact us. You can reach us directly at mason@limxdynamics.com and wayne@limxdynamics.com, or open a GitHub issue for help.
If you use FluxVLA in your research or projects, please cite the relevant works as:
@software{FluxVLA2026,
  author  = {Li, Yinhao and Mao, Weixin and Lan, Zihan and Rong, Jikun and Zhu, Minzhao and Mao, Yiming and Shen, Bowen and Huang, Xu},
  title   = {{FluxVLA Engine: A One-Stop VLA Engineering Platform for Embodied Intelligence}},
  year    = {2026},
  month   = apr,
  version = {1.0.0},
  doi     = {10.5281/zenodo.20049506},
  url     = {https://github.com/FluxVLA/FluxVLA},
  license = {Apache-2.0},
}

@InProceedings{Mao_2026_CVPR,
    author    = {Mao, Yiming and Yu, Zixi and Mao, Weixin and Li, Yinhao and Hu, Qirui and Lan, Zihan and Zhu, Minzhao and Chen, Hua},
    title     = {ARM: Advantage Reward Modeling for Long-Horizon Manipulation},
    booktitle = {Proceedings of the IEEE/CVF Conference on Computer Vision and Pattern Recognition (CVPR) Workshops},
    month     = {June},
    year      = {2026},
    pages     = {4468-4477}
}
Acknowledgements: This project benefits from the following open-source projects and community efforts. Thanks to: LeRobot, NVIDIA Isaac GR00T, DreamZero (code), OpenVLA, OpenPI (pi0), LLaVA, DeepSpeed, Qwen, Triton, RTC, Training RTC, and Realtime-VLA. If we missed your project or contribution, please open an issue or pull request so we can properly acknowledge it.
more like this
Pytorch Implementation of SimGAN: Hybrid Simulator Identification for Domain Adaptation via Adversarial Reinforcement L…
search projects, people, and tags