BPS
A BLE positioning sytem for Homeassistant providing realtime tracking indoors. Dependent on the Bermuda component built…
 Hogster
git clone https://github.com/Hogster/BPS.gitHogster/BPS
BLE Positioning System (BPS)
A BLE positioning system for Home Assistant providing realtime, multi-device, floor plan tracking indoors. Dependent on the Bermuda component built by @agittins.
Follow the discussion on Home Assistant Community
[![BuyMeCoffee][buymecoffeebadge]][buymecoffee]
Huge thanks to @maxi1134
Version 0.2.0 is a major upgrade made possible by an extraordinary contribution from @maxi1134.
Maxi took BPS far beyond the original feature set — polygon zones, auto-calibration, a modern panel UI, receiver status on the Lovelace card, away detection, crash-safe storage, authenticated APIs, and a long list of bug fixes and polish. Most of that work was shared in issue #34 via the BPS-improved fork (based on their v1.7.2 release).
This upstream release incorporates that work with gratitude. If you benefit from these improvements, please star their fork and say thanks: maxi1134/BPS-improved.
BPS also continues to build on @agittins' excellent Bermuda integration.
What it does
BPS uses Bermuda's near-realtime distance estimates to ESPHome bluetooth_proxy devices and trilaterates a precise indoor position on your floor plan.
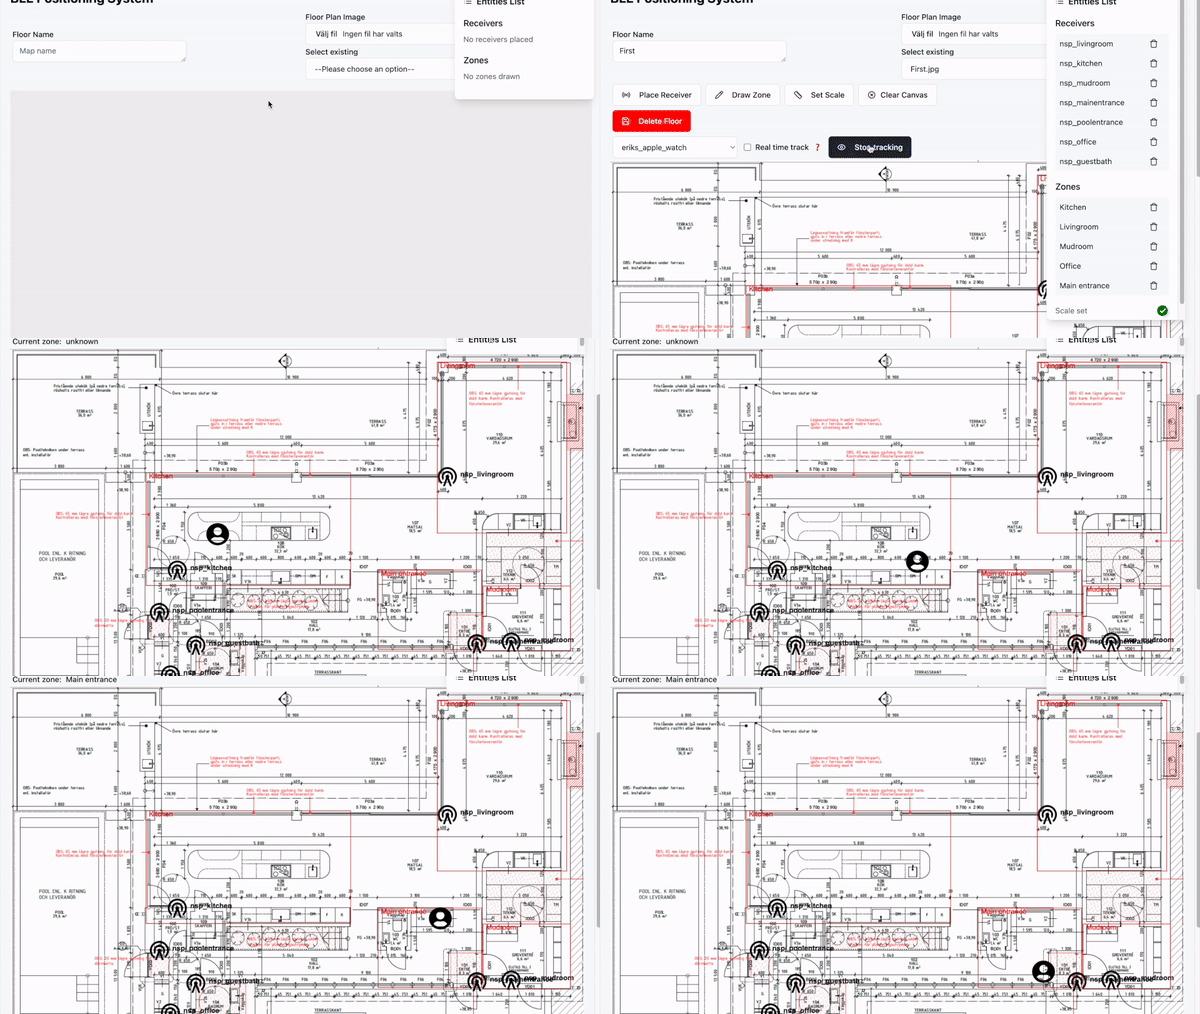
With receivers placed and zones defined, BPS can show:
- Exactly where a device is on a floor plan
- Which floor a device is on (great for floor-change automations)
- Which zone (Kitchen, Bedroom, …) a device is in
What you need
- Home Assistant
- Bermuda tracking at least one Bluetooth device
- At least three ESPHome
bluetooth_proxydevices (or compatible proxies such as Shelly Plus)
Install BPS via HACS:
Documentation and help — the Wiki
See The Wiki for setup details.
SciPy dependency
This integration depends on SciPy, which requires native binary support.
- Supported: 64-bit Home Assistant installs (aarch64 / ARM64 or x86_64)
- Not supported: 32-bit systems (e.g. ARMv7)
Even on supported hardware (such as Raspberry Pi 4/5 with a 64-bit OS), installation may fail depending on the Home Assistant environment, since SciPy cannot always be installed inside the restricted Python environment used by Home Assistant.
If you encounter issues, consider running Home Assistant in a container where you control the Python environment.
What's new in 0.2.0
Positioning & sensors
- Nearest-zone sensor
- Per-device grouping
- Positions stay on the map
- Away detection
- Reliable across reboots
The setup panel
- Modern, dark, zoomable panel
- Polygon zones
- Sub-zones
- Zone colours
- Adjust zones
- Pre-populated receiver picker
- Offline receivers
- Debugging tab
Accuracy
- Receiver auto-calibration
- Kalman position smoothing
- Trilateration visualization
- Trace path
- Receiver distances
The Lovelace card
Authenticated panel APIs, path-safe map uploads, crash-safe layout storage, and many stability fixes from the same contribution.
Nearest-zone sensor
Each tracked device already exposes sensor.<device>_bps_floor and
sensor.<device>_bps_zone. BPS also exposes a third:
sensor.<device>_bps_nearest_zone— always the closest zone on the device's floor. Inside a zone it matches_bps_zone; it readsunknownwhen the device is out of range (no receiver currently measures a distance to it), or when the elected floor has no zones.
The two zone sensors differ in how they handle a device that leaves:
_bps_nearest_zone drops to unknown as soon as the device goes out of range
(within ~30 s — Bermuda's distance timeout), a clean "which room is this person
in, or is nobody home" signal to automate on. _bps_zone (and _bps_floor)
instead keep their last value through a grace period, so a brief detection
gap doesn't blink someone out of their room — see Away detection.
(While the device is in range, a fix that lands between rooms is snapped back
into the nearest zone before it's published — see Positions stay on the
map — so _bps_zone no longer flickers to
unknown from trilateration jitter.)
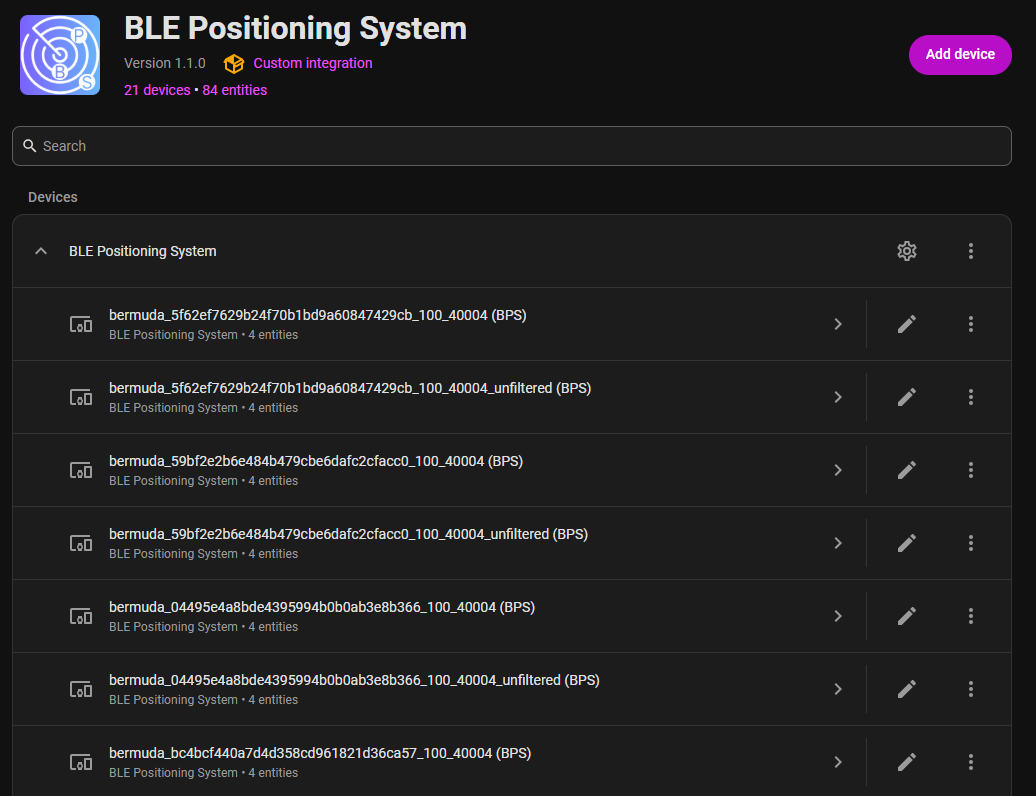
Per-device grouping
Every tracked device's BPS sensors — _bps_zone, _bps_floor,
_bps_nearest_zone, and _bps_sub_zone — are grouped under their own Home
Assistant device, named <device> (BPS), instead of piling into one shared
list. That BPS device is nested under the matching Bermuda tracker device
(via via_device), so a device's positioning sensors sit alongside the rest of
its entities.
Only genuine Bermuda trackers get BPS sensors: entities from other integrations
that merely expose a _distance_to_* sensor (for example an mmWave presence
sensor's _distance_to_detection_object) are no longer mistaken for trackers.
Positions stay on the map
Noisy BLE readings used to let the solver place a device far outside the floor plan, or in the dead space between rooms. BPS constrains positioning in two ways:
- The trilateration solver is bounded to the floor (the extent of its receivers and zones), so a fix can never leave the map — when an unconstrained solve would escape, the result lands on the boundary instead.
- A fix that still sits outside every zone is snapped to the nearest point of the nearest zone before it's published.
The map card, /api/bps/cords, and the zone sensors all see the same corrected
position.
Away detection
Previously a person who left home stayed frozen on the map at their last position indefinitely, with the zone and floor sensors stuck at their last values.
Now a tracker that no receiver has detected for 5 minutes disappears from
the map, and its _bps_zone, _bps_floor and _bps_nearest_zone sensors go
to unknown. It reappears on the first fix once it's back in range. Tune the
grace period with a top-level "position_timeout" (seconds) in bpsdata.txt.
(For a faster "out of range" signal, _bps_nearest_zone already reacts within
~30 s — Bermuda's own distance timeout — while the map position keeps the
5-minute grace so brief detection gaps don't blink people off the map.)
Reliable across reboots
BPS used to stop producing data after a full restart until you manually reloaded the integration. The sensors are now recreated correctly on boot even when their registry entries survived an unclean shutdown, and BPS cancels its background tasks promptly at shutdown so restarts stay clean.
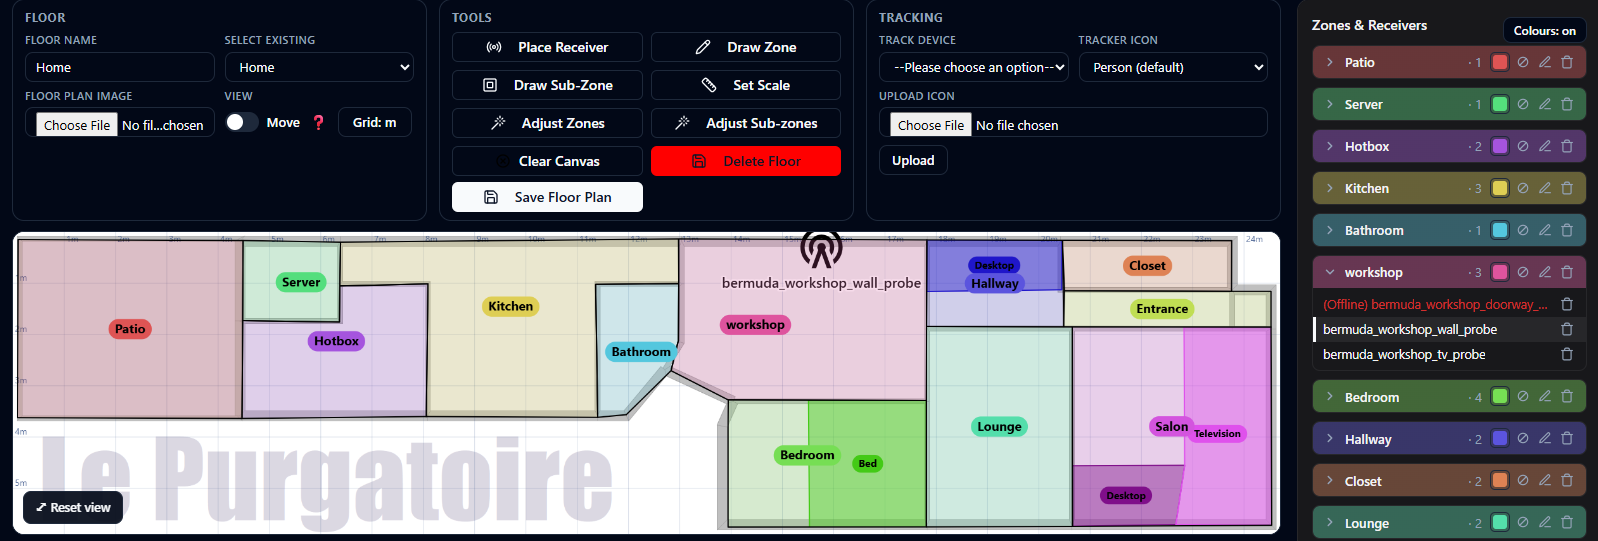
Modern, dark, zoomable panel
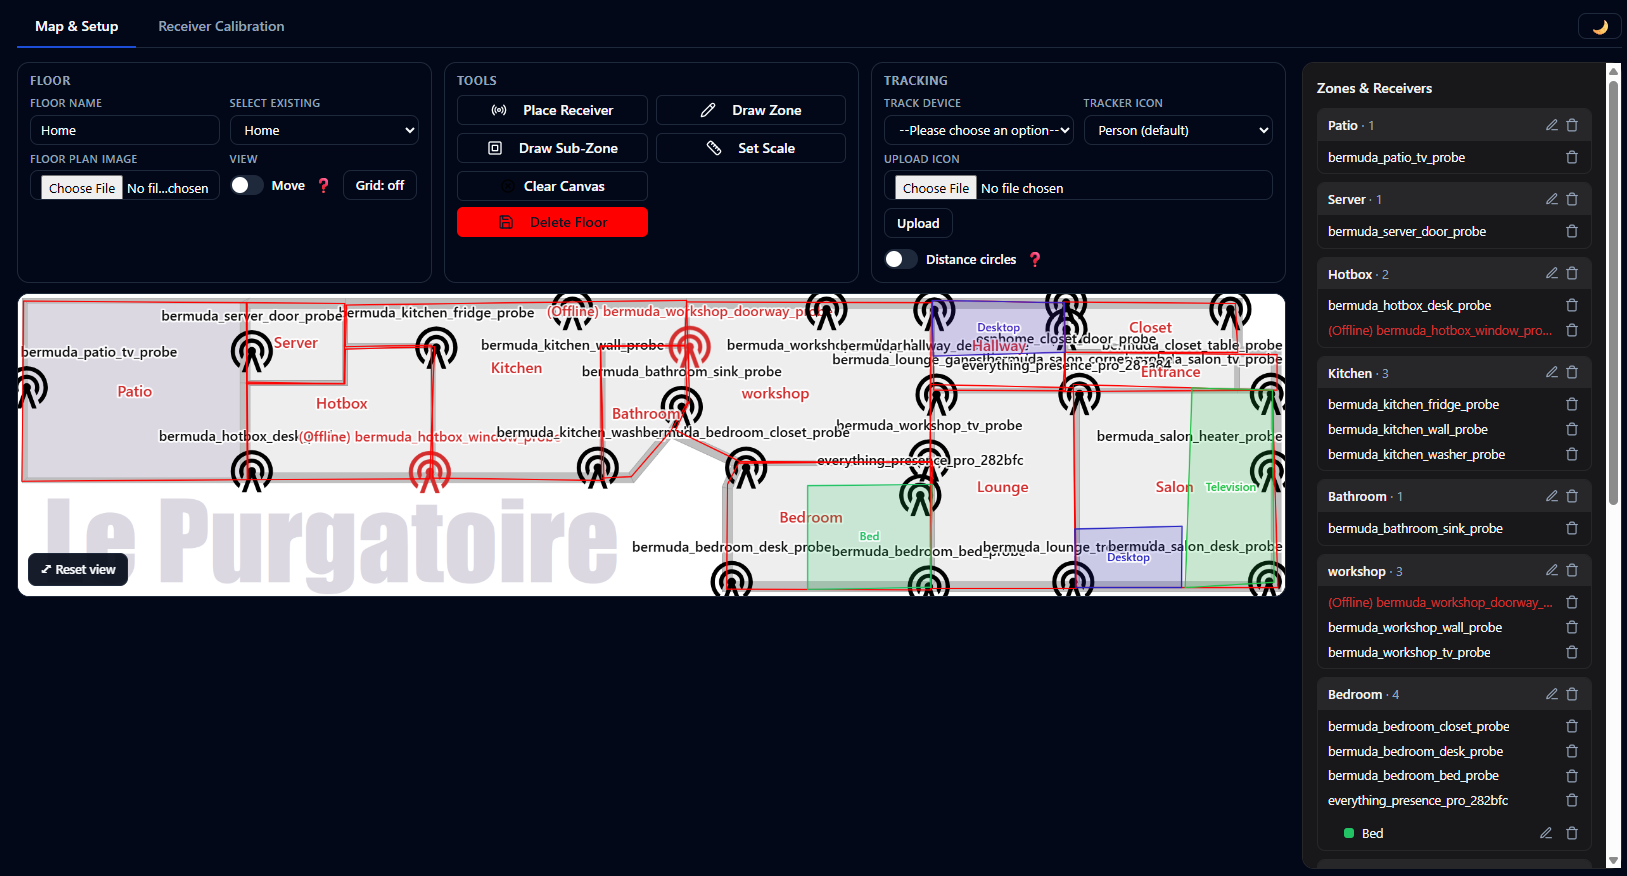
The BPS side panel was reworked into a modern, dark-themed layout split across three tabs — Map & Setup (the floor plan, tools, and tracking), Receiver Calibration (the matrix, on its own tab so it no longer crowds the setup page), and Debugging (the full receiver-to-Bermuda linking picture). The map itself is interactive:
- Zoom with the mouse wheel (cursor-centered, 1×–8×) and pan by dragging. A Reset view button sits in the lower-left corner. Zooming and panning never change your placed coordinates — it's purely a view.
- Distance grid overlay (toggle in the toolbar), spaced from the floor's calibration scale, in meters or feet. Grid labels stay pinned to the visible edges and readable at any zoom.
- Zones & Receivers sidebar replaces the old floating list: one section per zone, with the receivers that physically sit inside each zone listed under it, plus a delete button on every row.
- If you have a single floor, the panel opens straight onto it. The Select existing floor dropdown lists floors by their name, not the image filename.
- Zone names are centered in their room. Receiver names are hidden by default so they can't pile up on top of one another — hover a receiver's icon (or its row in the Zones & Receivers sidebar), or focus it, to reveal its full name.
Moving and focusing receivers
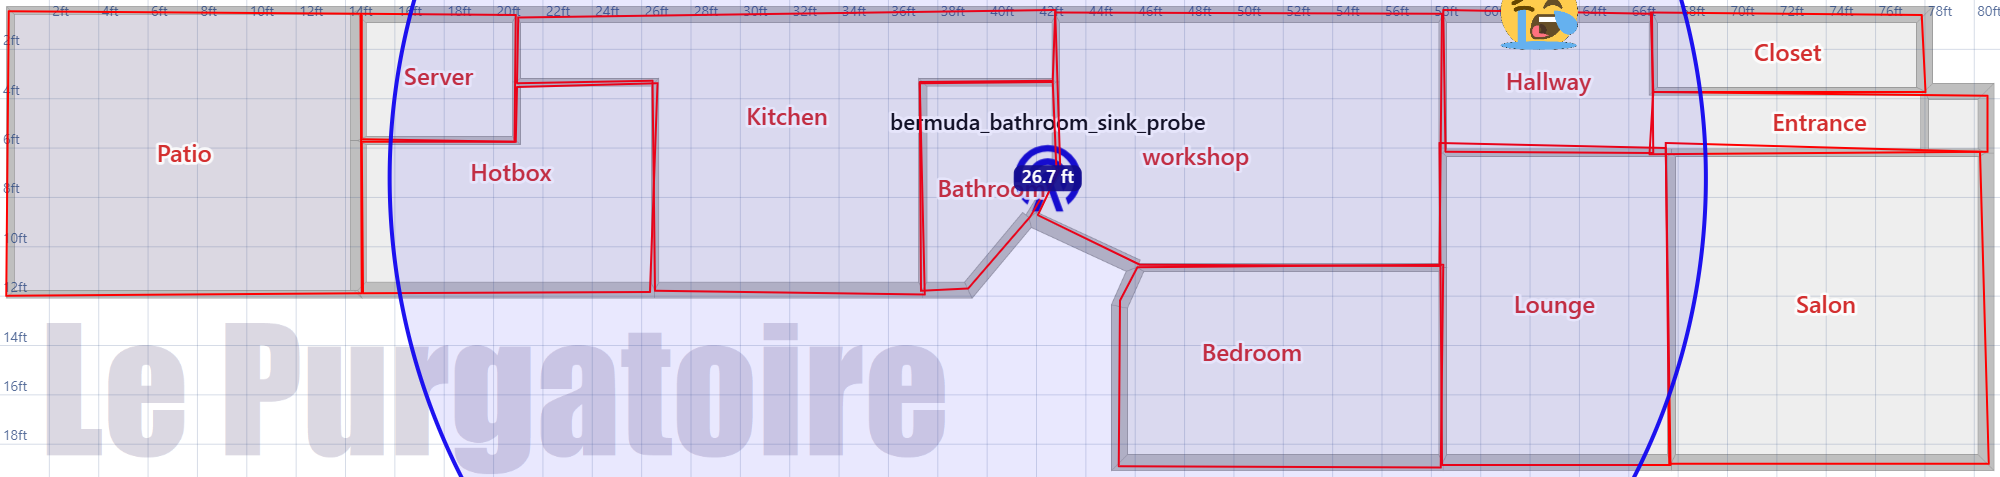
- A Move receivers toggle (off by default) controls dragging. With it on, drag a receiver to reposition it, then Save Floor Plan. With it off, dragging pans the map.
- With Move off, clicking a receiver focuses it — only that receiver, its distance circle, and the tracked device stay on the map, so you can study one receiver's contribution. Click it again, or click empty space, to show everything.
- You can also click a receiver's row in the Zones & Receivers sidebar to focus it — the same effect as clicking its icon. The focused row is highlighted, and clicking it again clears the focus.
Offline receivers
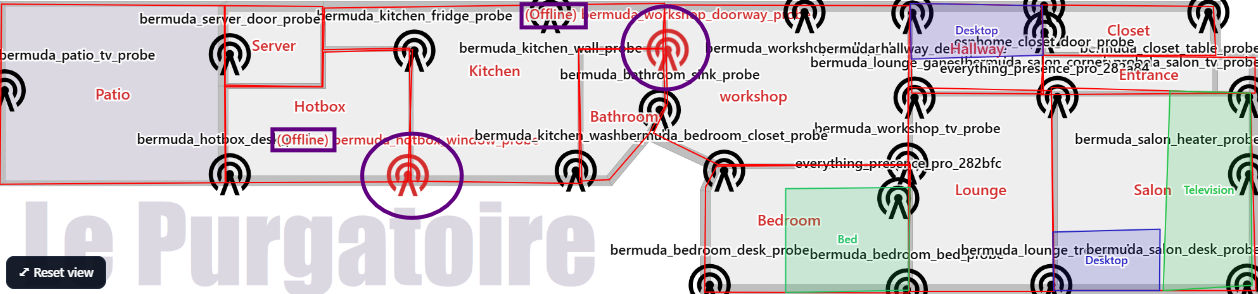
A receiver the system can't currently reach is flagged in red in the panel:
its Zones & Receivers row and its map label read (Offline) <name>, and
— when distance circles are off — the beacon icon itself turns red. The
markers refresh live, without reloading the panel.
"Offline" here means the proxy is actually down, not merely that no tracked
device is near it: the panel uses the same automatic tiers as the
map card — Bermuda scanner liveness, then a
connectivity status sensor, then the proxy's Home Assistant device
availability — so a probe that drops off the map only because everyone left the
house is not flagged.
Light or dark theme
The panel opens in dark mode, but a theme toggle (🌙 / ☀️) at the right of the tab bar flips the whole panel — map, sidebar, toolbar, and the calibration matrix — between dark and light. Your choice is remembered across reloads.
Ultrawide layouts
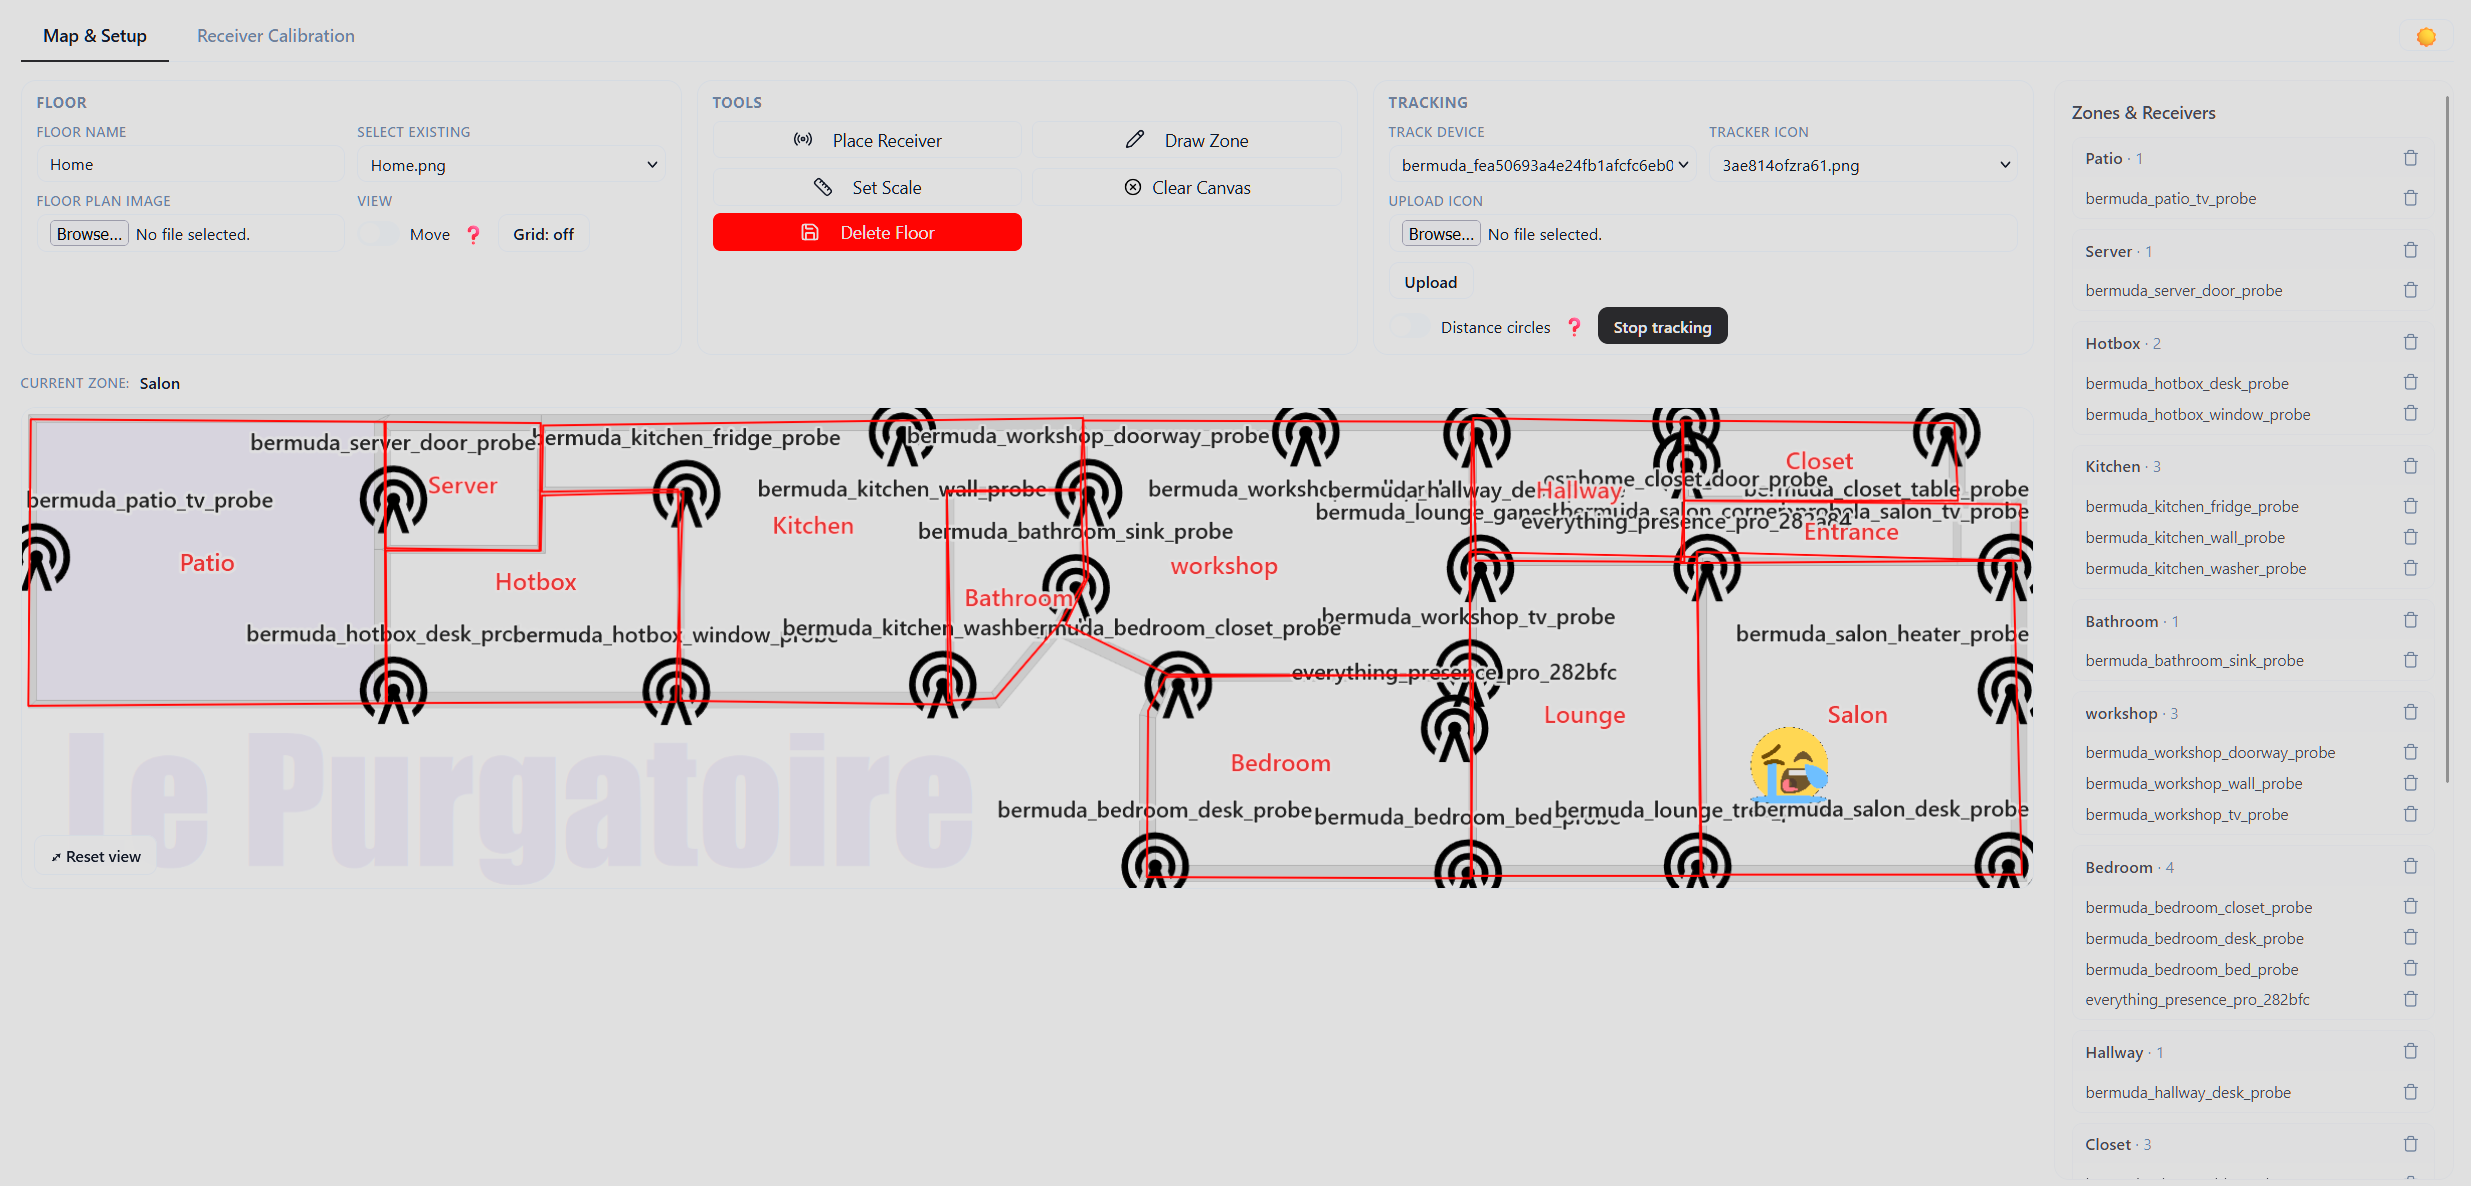
The panel uses the full width of the window at every resolution. On a very wide screen (32:9 and similar) it goes a step further and reflows into three columns — the Floor, Tools, and Tracking cards stacked on the left, the map enlarged in the center, and the Zones & Receivers list on the right — so nothing is cramped and the map gets the space it deserves.
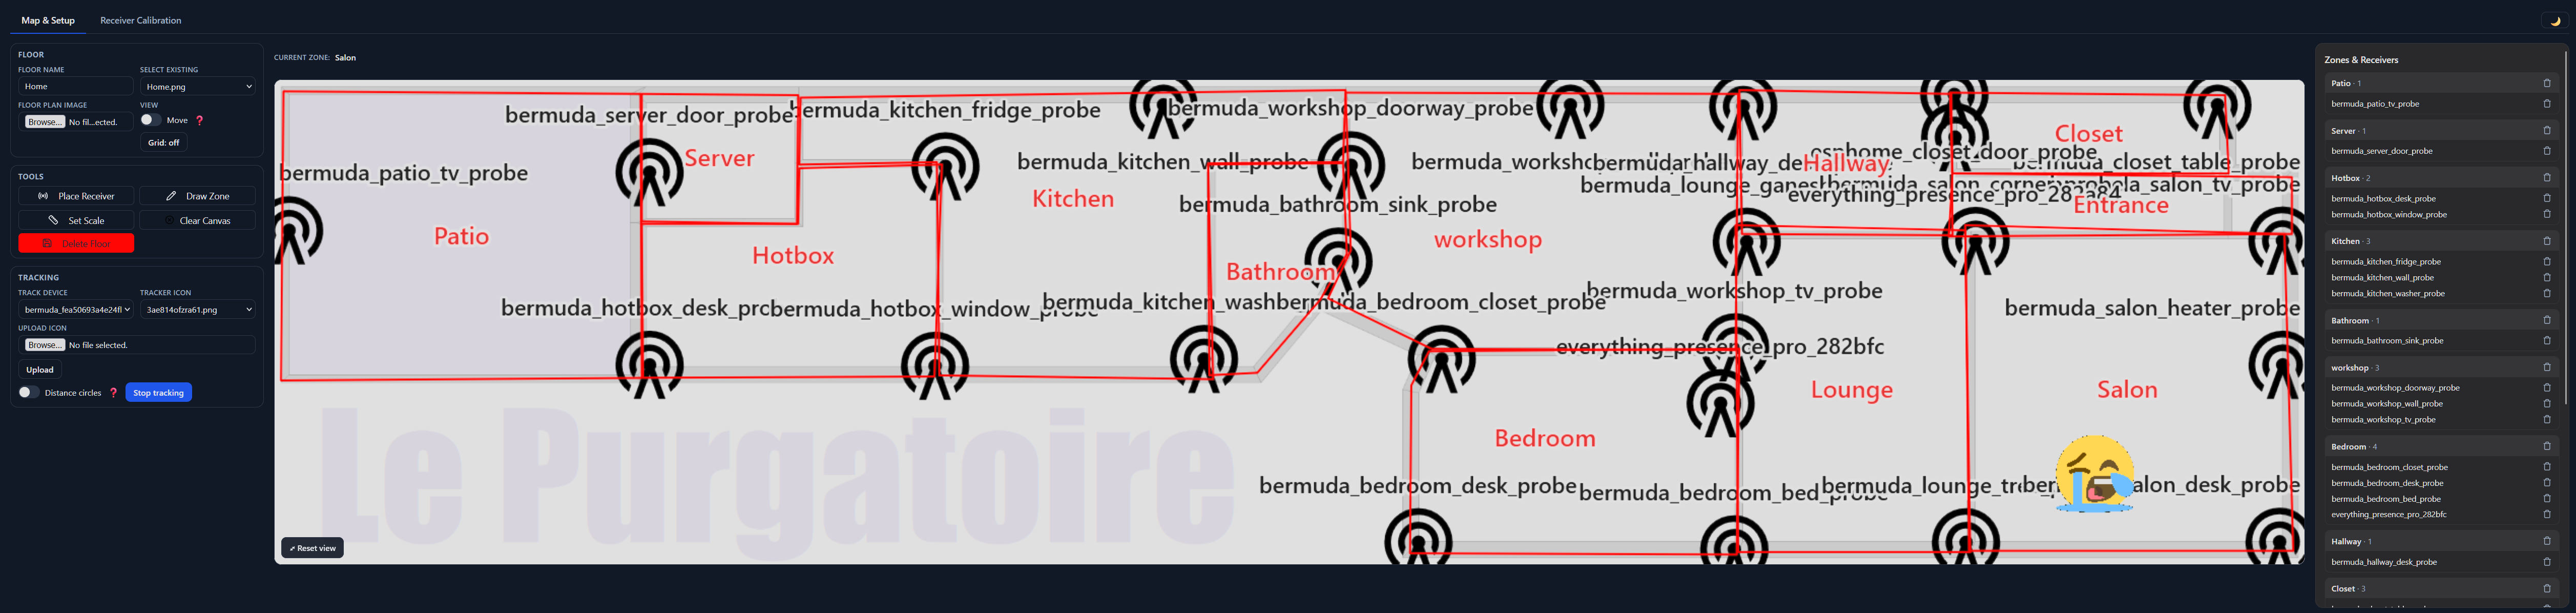
Polygon zones
Zones are no longer limited to rectangles. When drawing a zone:
- Click the floor plan to place each corner, one by one — any shape with three or more corners, including L-shaped rooms.
- Drag a corner to adjust it, or drag inside the zone to move the whole shape. Dragging is clamped so a corner can never end up off-screen (the old trap where an off-canvas handle became ungrabbable).
- Right-click a corner to delete it (right-clicking empty space removes the last corner you placed); deleting the last remaining corner cancels the shape. A zone needs at least three corners to be saved.
Zones drawn with the old rectangle tool keep working unchanged.
Editing a saved zone: click the ✎ pencil next to a zone in the Zones & Receivers sidebar to reopen it in the editor — drag its corners, drag the whole shape, add or right-click-delete corners, then Save Zone.
Sub-zones
Sub-zones are smaller polygons drawn inside a zone — a couch, a bed, a desk, a reading nook — for when "which room" isn't precise enough.
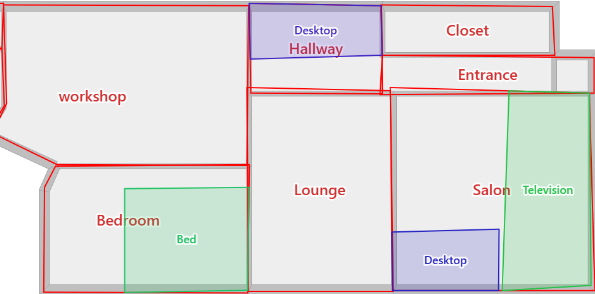
- Click Draw Sub-Zone, then click inside the zone you want it in (that becomes its parent) and place corners just like a zone. Every corner is kept inside the parent zone, and each sub-zone is drawn in its own shade of the parent's colour (see Zone colours). Sub-zones are editable the same way zones are (✎ pencil in the sidebar).
- Sub-zones are listed under their parent in the sidebar, each with edit and delete buttons; deleting a zone removes its sub-zones with it.
- Each tracked device gets a
sensor.<device>_bps_sub_zoneentity whose state is the sub-zone it is currently in (unknownwhen in none), with aparent_zoneattribute naming the enclosing zone. - The Lovelace map card can draw sub-zones too — enable Show sub-zones
(
show_sub_zones: true) in the card config.
Zone colours
Every zone is tinted its own colour on the panel map — a light translucent fill with a solid black outline — and the room name sits in a colour pill (the zone's colour at full opacity, black text) so it stays legible over any fill. Colours are assigned automatically, so no two zones look alike.
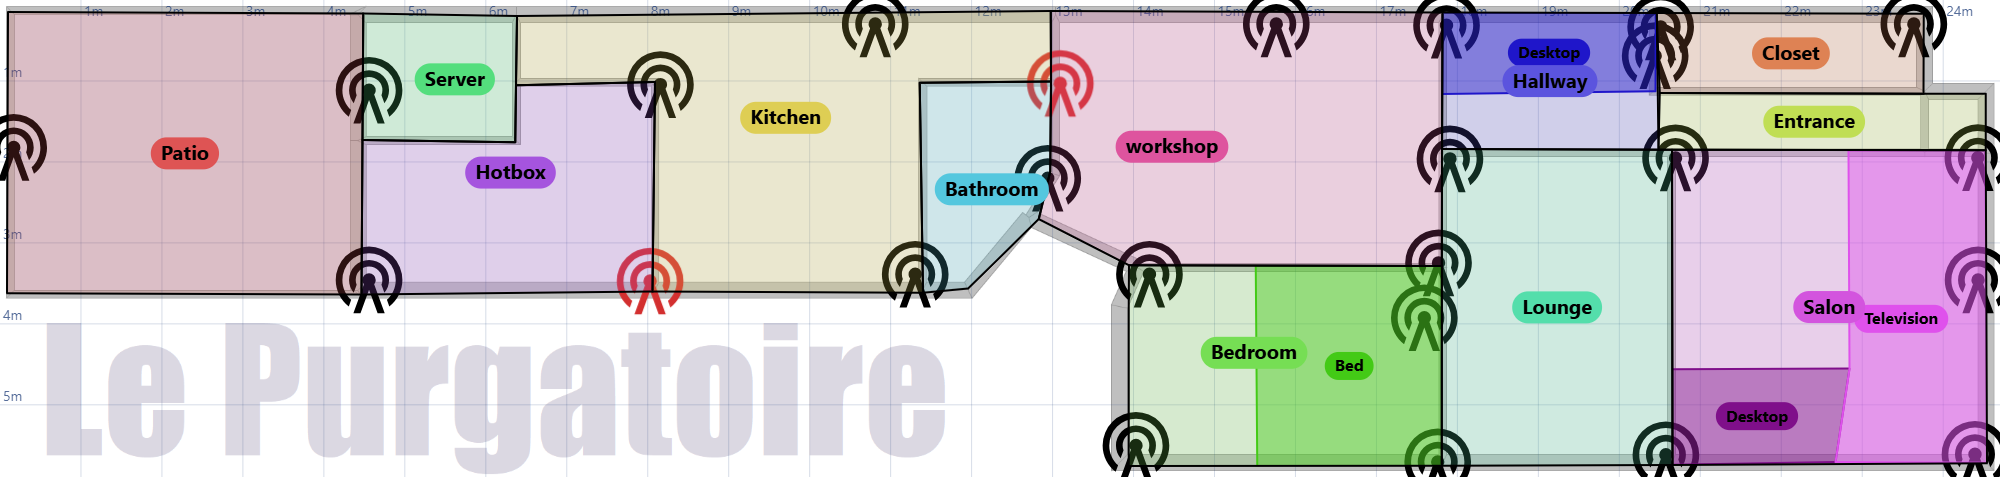
- Sub-zones are drawn in shades of their parent zone's colour, each sibling a distinct shade, so you can tell them apart while still reading them as "part of that room."
- Pick a colour for any zone from the swatch beside it in the Zones & Receivers sidebar, or remove a zone's colour to leave it plain.
- The sidebar's zone headers are tinted to match the map.
- A
Colours: on/Colours: offbutton in the sidebar header hides or restores every zone colour at once, for when you want a plain map.
Colouring is purely cosmetic — it never changes zone geometry or any sensor.
Adjust zones
Hand-drawn rooms rarely line up: walls overlap a little, corners miss by a few centimetres, and rooms meant to be square aren't quite. Two buttons clean this up — Adjust Zones for the main rooms and Adjust Sub-zones for the areas inside them — each with its own preview, so the two are never actuated at once.
Adjust Zones squares rooms that are already nearly rectangular, snaps neighbours so they share edges (both at shared corners and where a corner meets the middle of a wall), and removes overlaps.
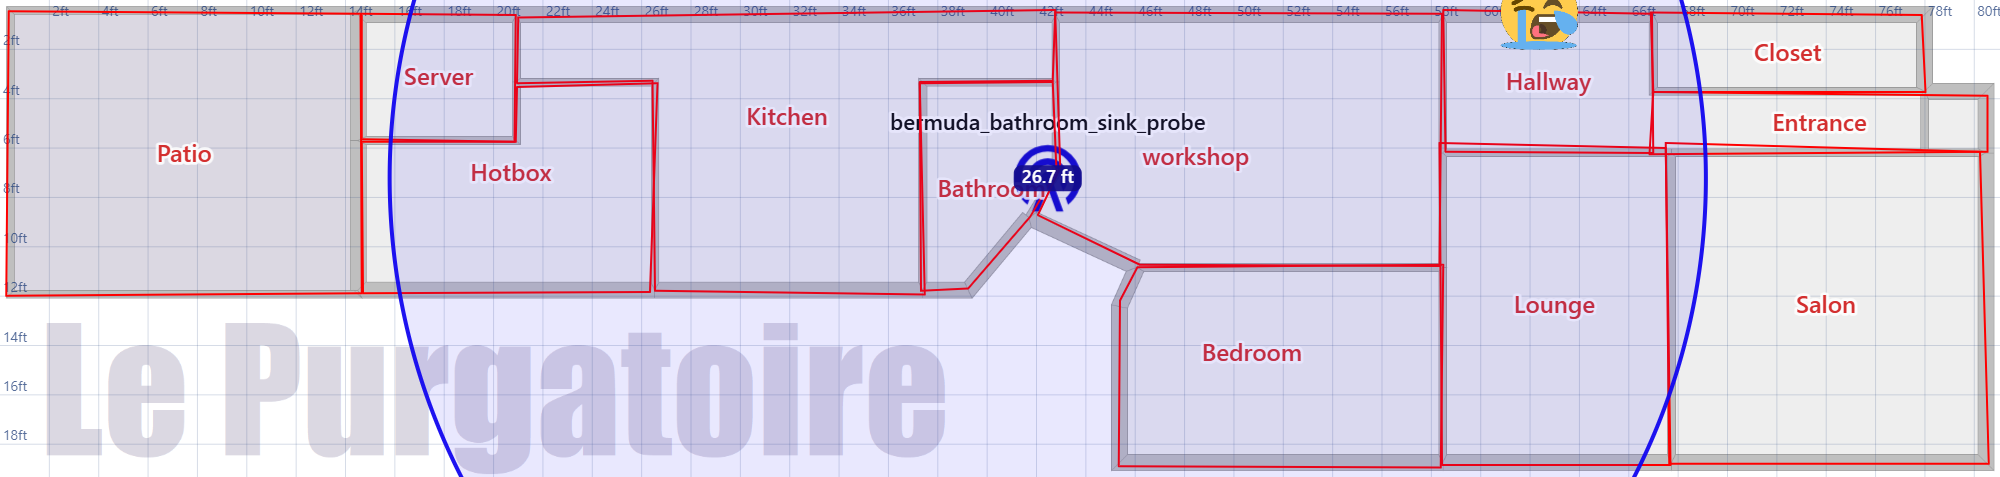
Clicking Adjust Zones draws the proposal as a green dashed overlay on top of your current zones, with a control bar — a Snap slider (how large a gap/overlap to close, in cm), a Square rooms toggle, and Cancel / Apply — plus a summary of what changed. Moving the slider re-previews live.
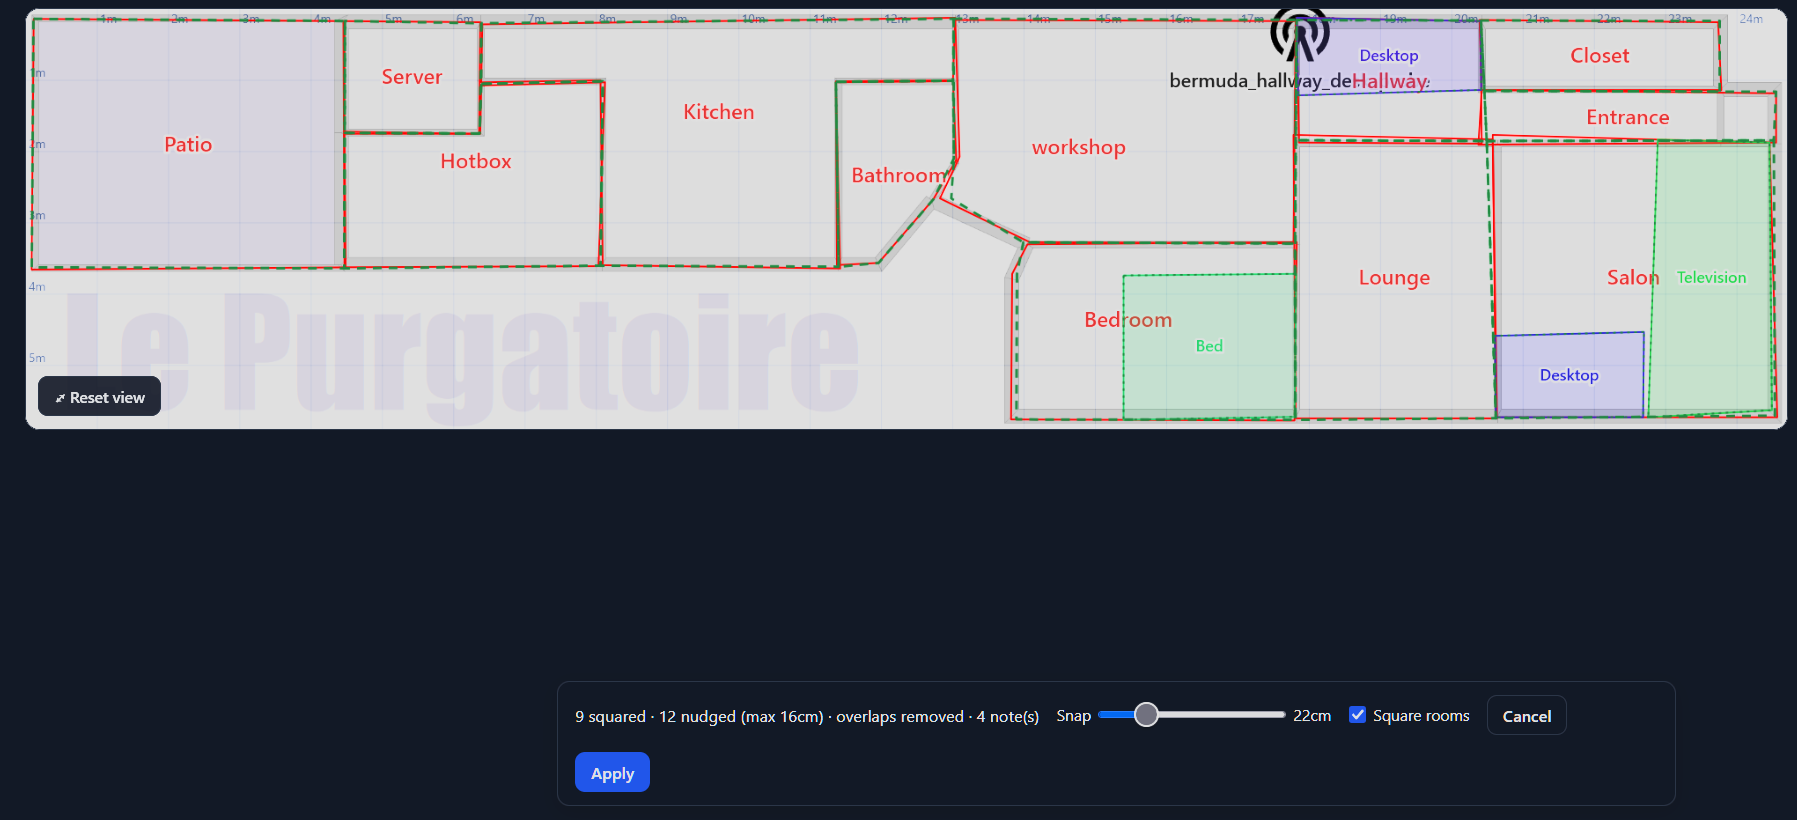
Apply writes the proposal into the floor; nothing is persisted until you click Save Floor Plan (reloading discards it).
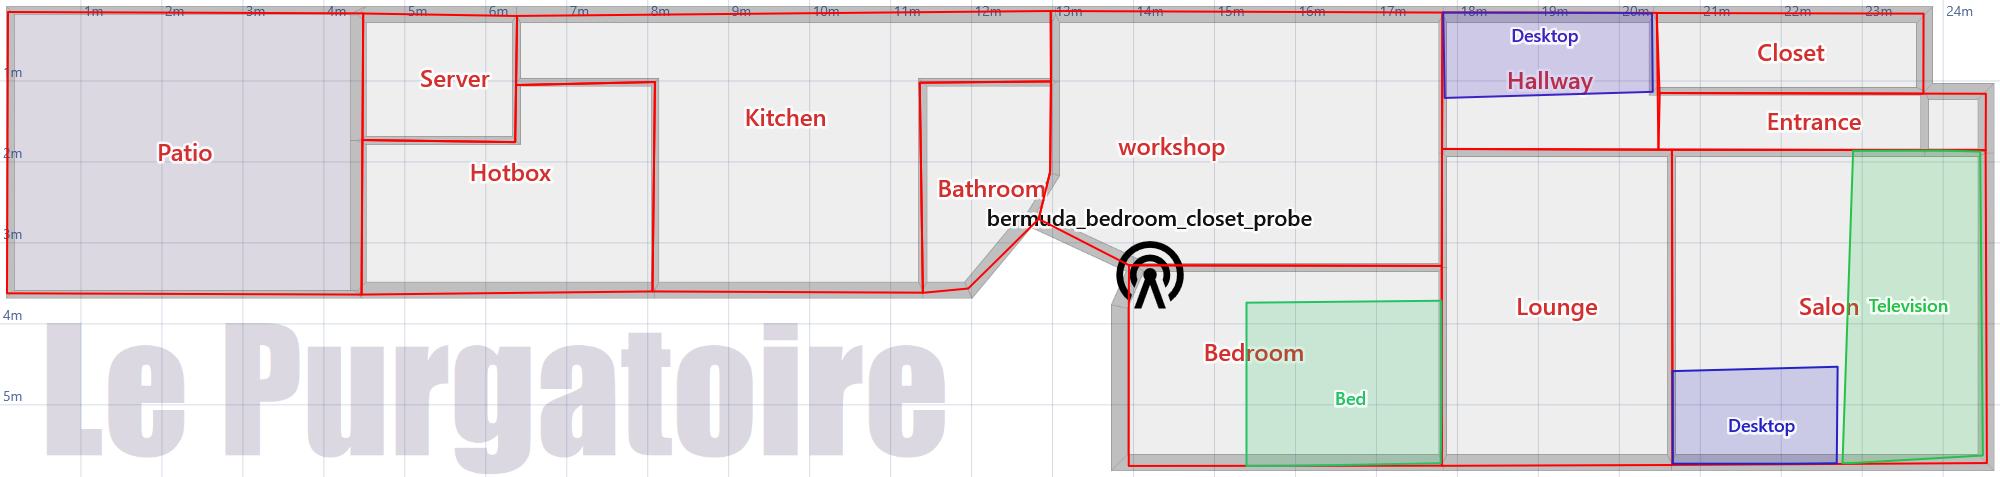
It is deliberately conservative: only rooms already close to rectangular are squared (L-shaped and diagonal rooms are left alone), only gaps small enough to be drawing slop are closed (a real gap — say, to a closet — is kept), and it never invents area. Contested overlaps go to the larger room. If a result isn't what you want, Cancel and lower the Snap tolerance.
Adjust Sub-zones does the same for the smaller areas, one parent room at a time: it squares each sub-zone, snaps it to its parent's walls and to its siblings, removes overlaps between siblings, and clamps each one inside its parent. Run it after adjusting zones if a room moved and left a sub-zone poking out.
Pre-populated receiver picker
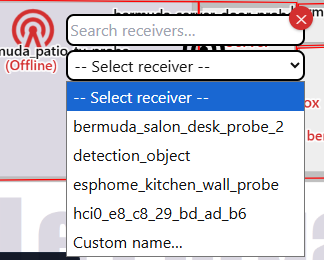
Placing a receiver no longer means typing its Bermuda scanner name from memory.
You now pick it from a searchable dropdown of every receiver Bermuda currently
reports (derived from the sensor.*_distance_to_* entities) — type to filter
the list — with a "Custom name…" option for receivers Bermuda hasn't seen yet.
Receivers already placed on any floor are hidden from the list — a receiver belongs to exactly one floor, and placing the same one on several floors would make those floors compete for the tracker.
Debugging tab
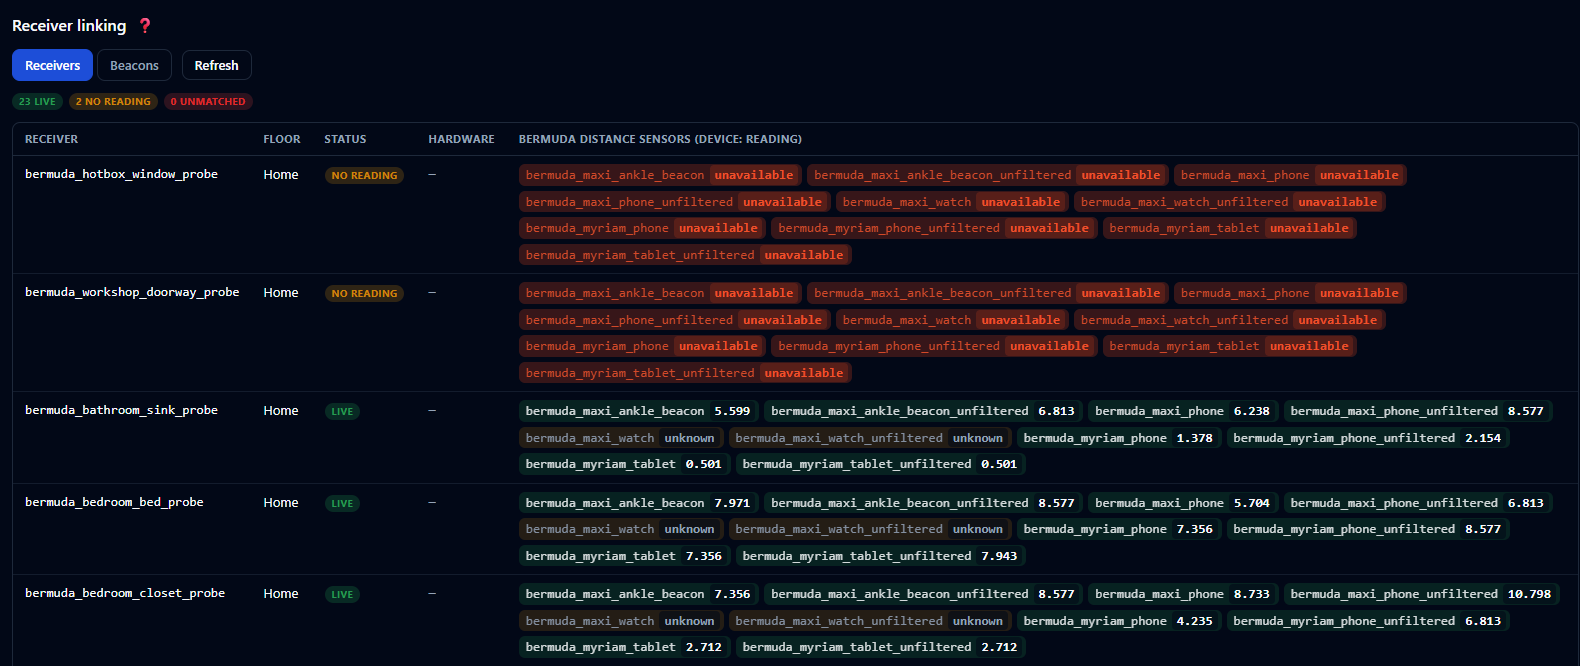
A third panel tab, Debugging, shows the full picture of how BPS is wired to Bermuda right now — the tool to reach for when a device won't place or a receiver seems ignored. It's a live snapshot; press Refresh to re-check. It has two sub-tabs, both laid out as tables.
Receivers lists every placed receiver with its floor, a status chip (Live / No reading / Unmatched), its hardware token, and the per-device Bermuda distance sensors feeding it. Each sensor is a pill showing the device and its current reading, coloured by state:
- green — a live distance,
- amber — matched but no value right now (usually just no recent BLE contact),
- bright orange-red —
unavailable(the entity is actually gone).
A summary counts Live / No reading / Unmatched, and a second table lists scanners that carry distance sensors but aren't placed on any floor. Together this makes it easy to tell a real naming mismatch (Unmatched — no distance sensor carries that name) apart from a receiver that's linked correctly but simply quiet (No reading).
Beacons is the inverse view: one row per tracked device (beacon), with the receivers currently detecting it listed closest first as distance pills. Beacons that nothing detects sort to the top with a None status, so a device that's dropped off the system stands out at a glance.
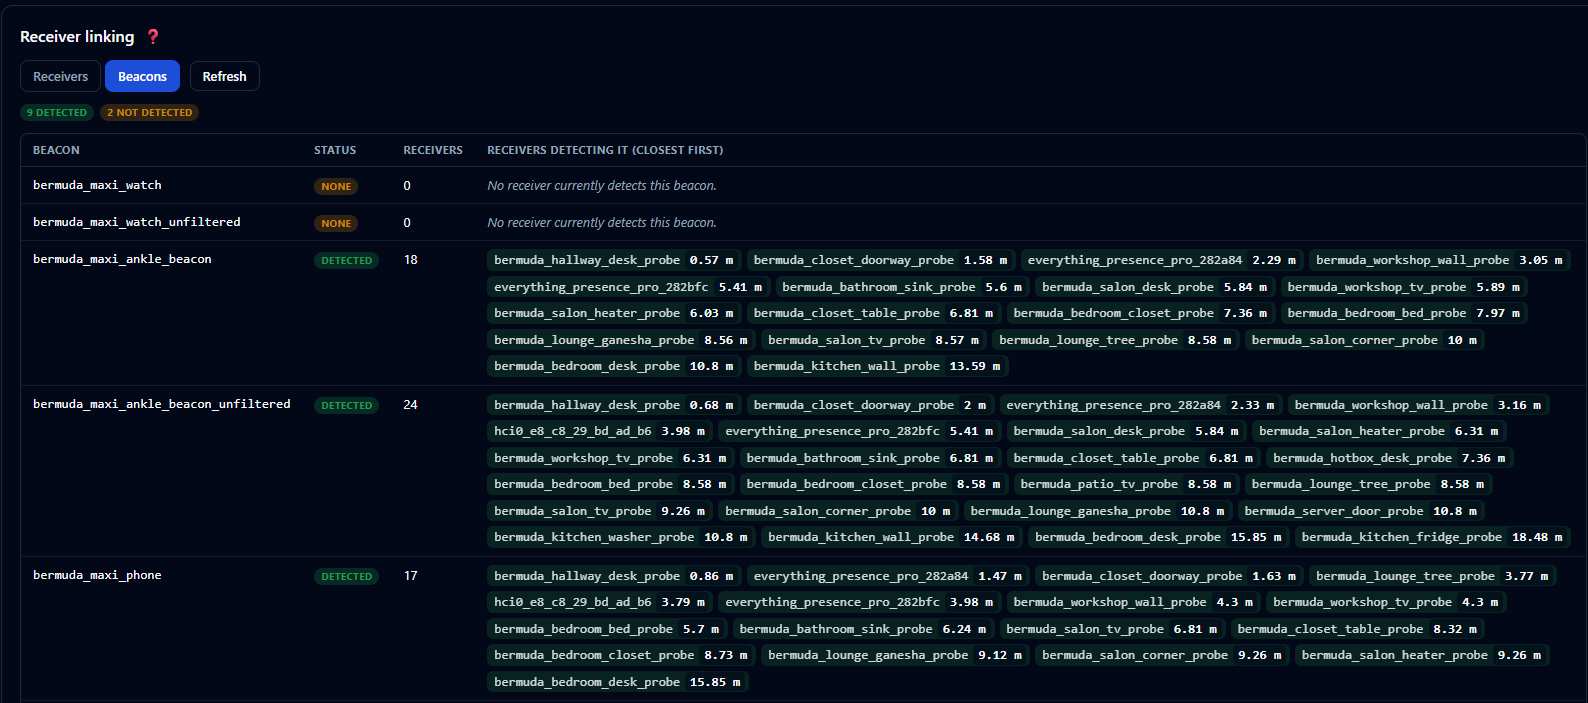
(The Map & Setup tab keeps a compact heads-up of any receivers that are linked but not reporting right now; the Debugging tab is where the full per-entity detail lives.)
Receiver auto-calibration
BLE distance estimates vary per receiver (antenna, enclosure, mounting, TX power). BPS can measure and correct that automatically — the same idea as ESPresense-companion's node calibration, but with zero manual configuration.
The receivers calibrate each other: every probe advertises an iBeacon, so its siblings range it, and comparing those probe-to-probe distances against the receivers' placed positions reveals each receiver's error.
Prerequisite: make each probe advertise
Add one block to your ESPHome proxies. The whole fleet shares the UUID; make the
minor unique per probe (deriving it from the static IP's last octet needs no
per-device edits):
esp32_ble_beacon:
  type: iBeacon
  uuid: fde3b150-2f64-43ba-aee9-867f75ee4a6f
  major: 1
  minor: ${ static_ip.split('.')[3] | int }
  min_interval: 500ms
  max_interval: 1000ms
Nothing needs to be set up in Bermuda — BPS reads the probe-to-probe
measurements through the bermuda.dump_devices service.
Running it
In the panel's Receiver Calibration section, select a floor and start a run (10 minutes is a good default). The result is a matrix: rows transmit, columns receive; blue cells measure short, red cells measure long. Through-wall pairs showing red is expected — walls only lengthen BLE estimates, and the fit accounts for that by trusting each receiver's cleanest paths and the wall-free difference between the two directions of every pair. Receivers flagged ⚠ got an aggressive correction or had too few usable pairs (typically no line of sight to any sibling) — verify their placement before applying.
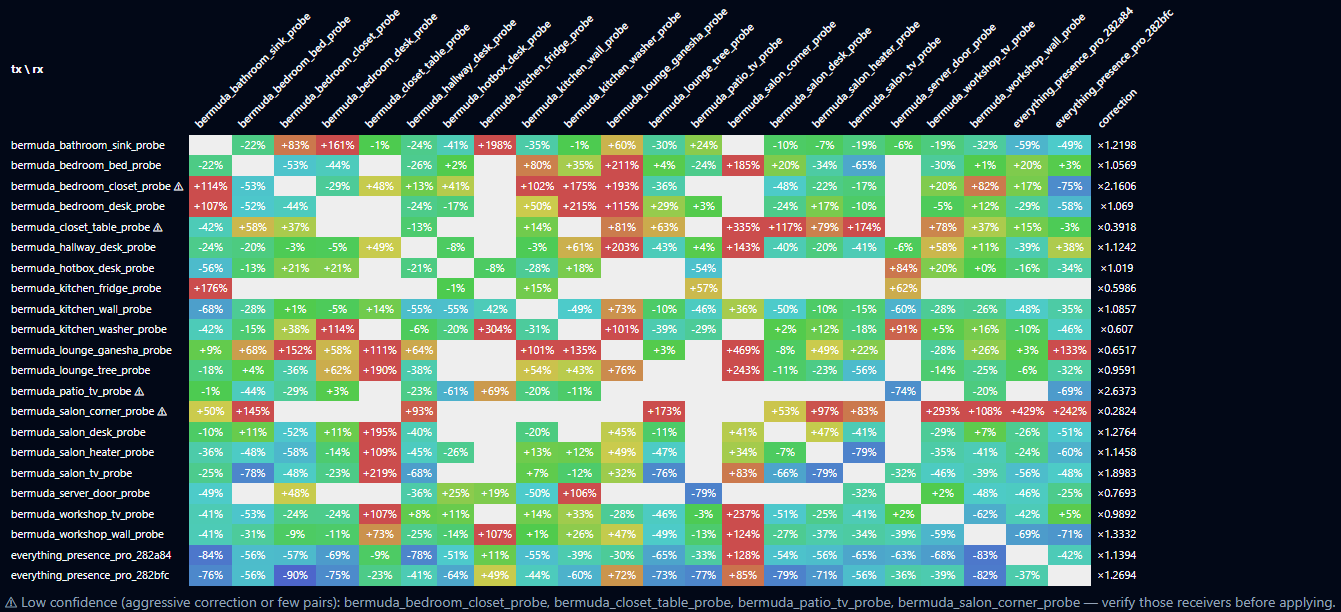
Apply corrections stores a per-receiver factor in bpsdata.txt, and the
backend multiplies every distance that receiver reports from then on. Because
Bermuda's path-loss model is exponential, this is exactly equivalent to a
per-scanner RSSI offset — and the result lists the equivalent Bermuda
"Calibration 2" rssi_offset per scanner if you'd rather calibrate at the
source. Corrections are relative (normalized so they never rescale all
distances at once); the absolute scale stays with Bermuda's own
ref_power/attenuation. Reset corrections removes them.
Auto calibration
Toggle Auto calibration and it runs permanently: sampling every 30 seconds
into a rolling ~6-hour window, re-solving every 15 minutes for every floor, and
re-applying corrections whenever they shift by more than 1%. It keeps adapting
as the environment changes (furniture moves, a probe is swapped, a door stays
open). The toggle is stored in bpsdata.txt (alongside the corrections), while the
latest solve and the rolling sample window are persisted separately in
bps_calibration_state.json. So after a restart the toggle sticks, the matrix
reappears immediately, and the window resumes warm instead of rebuilding from
zero.
Kalman position smoothing
Published positions used to be smoothed with a fixed 3-sample moving average — every fix weighted equally, so the map always trailed a walking person by the same lag, still or moving. That average is replaced by a constant-velocity Kalman filter (the same family of filtering ESPresense and other BLE positioning projects apply to their signals, applied here at the position level, since Bermuda already smooths the distances BPS reads):
- The filter carries a velocity estimate, so while you walk it predicts along your motion instead of dragging behind the average of old fixes — and while you're still it trusts its accumulated estimate and damps jitter harder than a 3-sample mean ever could.
- Its noise model is defined in metres and converted through each floor's scale, so smoothing behaves identically on floor plans of any resolution.
- The state resets whenever the tracker changes floors, goes out of range, or is pruned — no ghost velocity carrying over from before an absence.
The spike gate feeding the solver got smarter too: a receiver whose distance jumped since the last update used to be discarded outright (a hard 50% cut-off), which could starve the solver below the three receivers it needs — precisely while you were walking, when every distance legitimately changes. Spiky readings are now down-weighted instead of dropped: the solver keeps every receiver, trusting sudden jumps proportionally less.
Trilateration visualization
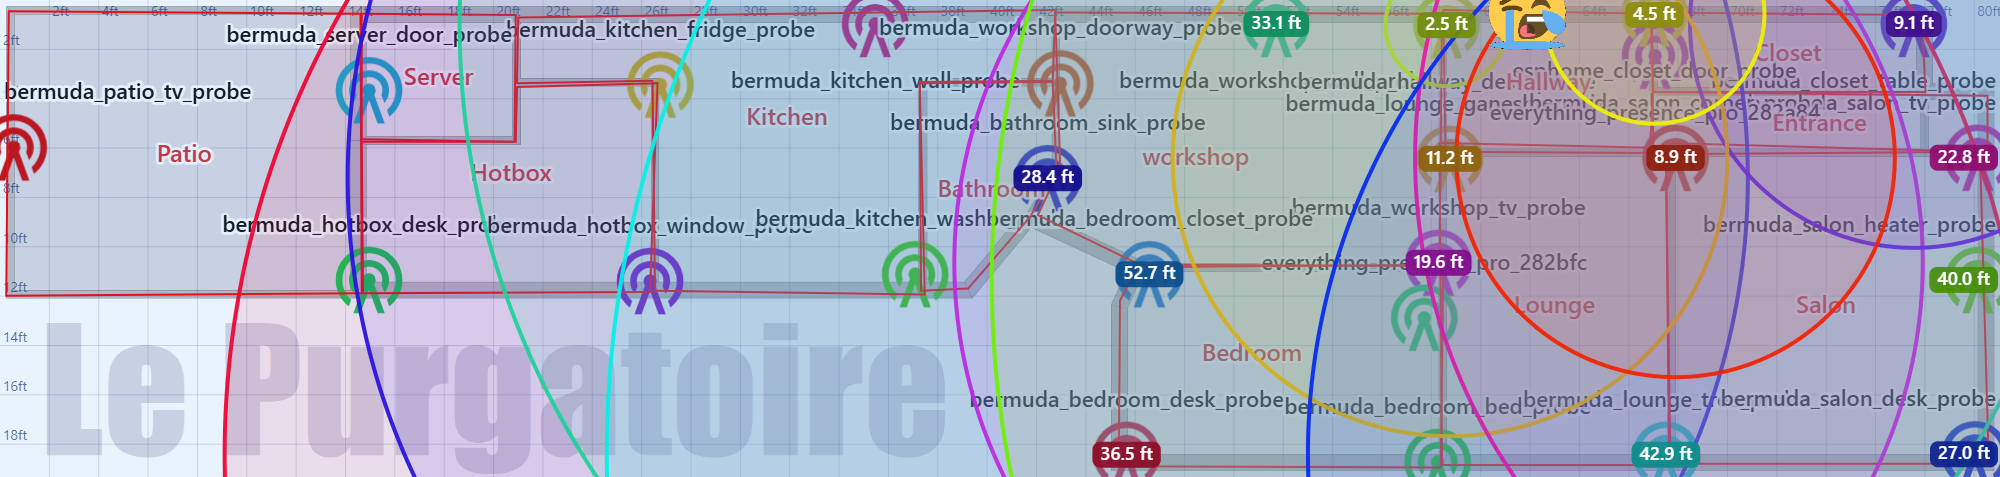
During tracking, a Distance circles toggle draws each receiver's measured distance as a circle around it — the tracked device sits where the circles intersect, which makes the trilateration (and any mis-calibrated receiver) visible at a glance.
- Each receiver's icon takes the color of its circle, so you can tell which circle belongs to which receiver even when they overlap.
- Each receiver carries a pill showing the measured distance (in the grid's unit — meters or feet).
- The circles and distances are the exact radii the solver used, including any calibration corrections — not a separate estimate.
Trace path
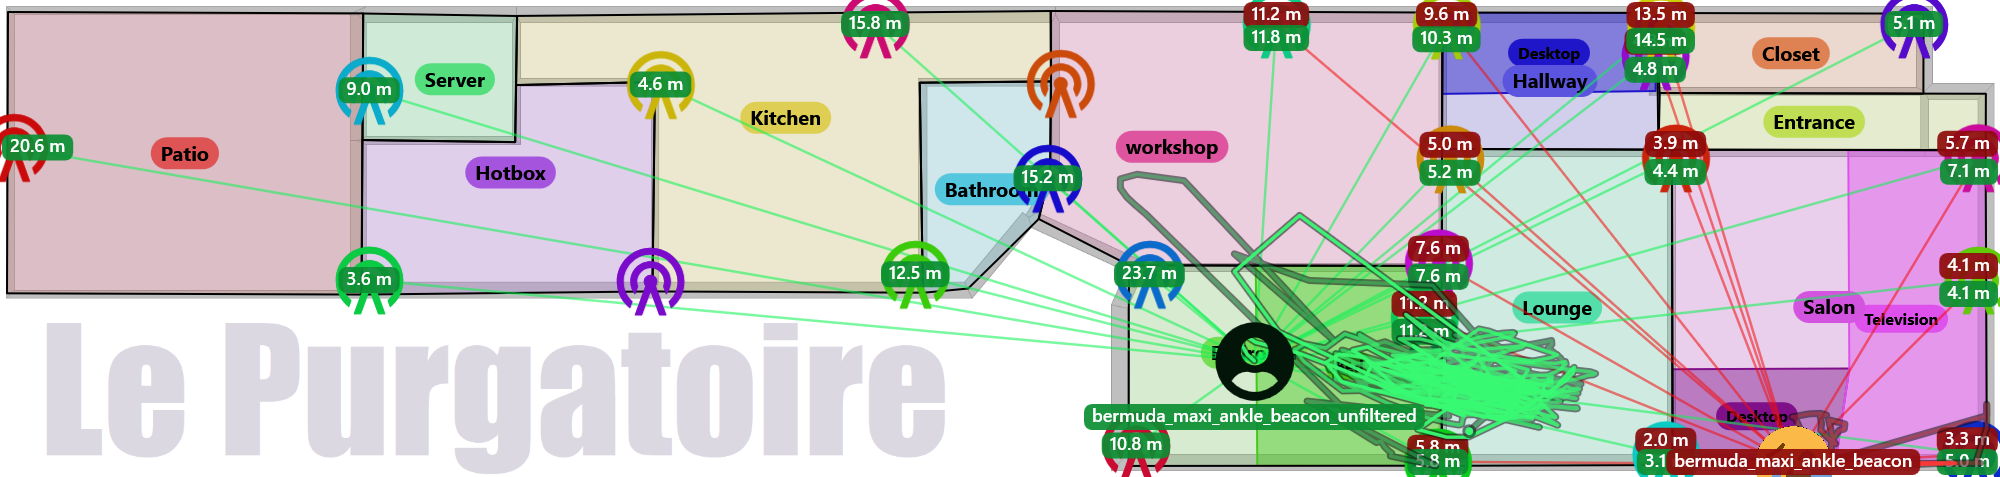
A second tracking toggle, Trace path, draws the route the tracked device has taken since the session started — handy for judging how stable and responsive the positioning really is (does the path hug the hallway, or zig-zag through walls?).
- The path fades with age: the newest stretch is brightest, so the direction of travel reads at a glance. A dot marks where the session began.
- It draws on top of everything — distance circles included — so it stays visible with both debugging overlays on.
- Fixes are recorded for the whole session even while the toggle is off, so flipping it on mid-session shows the full route so far. Starting a new session clears the previous trace.
- Only fixes belonging to the floor on screen are drawn; a stretch spent on another floor breaks the line instead of connecting through it.
Like Distance circles, the toggle appears only during an active tracking session, is off by default, and remembers its state.
It makes the value of clean distance data obvious. Below is the same ankle
beacon tracked at once on Bermuda's unfiltered vs filtered distance:
the unfiltered feed (…_unfiltered, centre) smears into a jittering tangle
that never settles, while the filtered feed (lower-right) holds a stable,
accurate fix — a stark reminder to track the filtered distance, and to keep
receivers well calibrated (see Receiver distances).
Receiver distances
A Receiver distances toggle in the Tracking column draws a line between
every pair of receivers that measure each other, straight on the floor plan.
Hover a line (or a receiver) to read a pill with measured (real) — the
distance the receivers measure between themselves (after calibration
corrections) next to the true map distance between their placed positions. The
pills stay hidden until you hover so a dense floor's colour map stays readable;
the lines themselves are the at-a-glance signal. While you hover, every other
line dims to 10% so the one path (a hovered line, or all of a hovered receiver's
links) stands out of the mesh.
- Lines take the calibration table's colour code: green measures accurately, red measures long, blue measures short — a mis-behaving receiver stands out at a glance. A two-way link is coloured by its worse direction, so a receiver that only transmits badly can't average itself green. A legend overlaid on the map's top-left spells the gradient out.
- A grey dashed line means one of its receivers was moved after the last solve: the old judgement would be meaningless over the new geometry, so the pill switches to the live map distance and asks for a recalibration instead.
- A Closest selector next to the toggle limits how many lines each receiver contributes (its 1–5 nearest neighbours by map distance, or all links) — on a dense floor the full mesh is a lot of lines.
- A colour selector filters by calibration result: show only the accurate (green), too-short (blue), or too-long (red) links, or every off-colour one (red and blue together) to see just the receivers that need attention.
- A distance selector switches the detected distance between Calibrated (after the per-receiver correction — the residual error) and Raw (the uncorrected reading — the sensor's own error). It drives both the pill value and the line colour, so flipping it shows exactly what calibration is doing: a link that's red raw and green calibrated is one the correction fixed.
- Click a receiver to declutter: only that receiver and the lines to the receivers it exchanges measurements with stay visible. Click a neighbour to move the focus there; click the focused receiver again (or empty space) to show everything.
- Click a line or its distance pill to isolate that single link — it's drawn highlighted and every other line is hidden, so you can read one pair without the surrounding mesh. Click it again, or an empty spot, to show all.
- The values come from the latest calibration solve for the floor (run one from the Calibration tab, or leave auto calibration on to keep them fresh); distances honour the grid's unit (meters or feet), and the pills stay a fixed on-screen size while you zoom, like every other distance pill.
- Unlike the two toggles above it needs no active tracking session; it is off by default and remembers its state.
Receiver mount heights
BLE distances are slant ranges — the straight line through the air — but the map is flat. That mismatch costs accuracy twice:
- In calibration: two receivers 3 m apart on the map, one on a shelf at 0.3 m and one on the ceiling at 2.2 m, are really 3.55 m apart. Judged against the flat 3 m, that pair reads "18% long" and the fit bakes the phantom error into the receivers' corrections — shrinking all their distances during tracking.
- In tracking: a ceiling probe at 2.5 m reading 1.6 m to the person right below it is really ~0.6 m away horizontally (with the beacon carried at ~1 m). The inflated circle drags the fix toward nowhere — and it's worst on the nearest receivers, exactly the ones the solver trusts most.
Setting a receiver's mount height fixes both. Enter it when placing the receiver, or later via the ruler button on its sidebar row (the current value shows as a badge; leave it empty to keep the old flat behaviour):
- Calibration judges each pair against the true 3D distance — heights apply when both receivers in a pair have one. The Receiver-distances overlay uses the same 3D truth, so changing a height flags its links to other height-set receivers grey ("recalibrate") just like moving the receiver would.
- During tracking the vertical leg is removed from every reading
(
horizontal = √(slant² − Δz²)) before trilateration, assuming trackers are carried ~1 m above the floor (override with a top-level"tracker_height"inbpsdata.txt, 0–5 m — e.g.0.3if you mostly track a pet; values outside that range fall back to the 1 m default). - The floor election is untouched — it still compares the calibrated slant ranges, because "which receiver is nearest" must be judged before any floor-specific geometry can be assumed.
- Alongside this, the solver's inverse-square distance weighting now caps the influence of readings under 0.5 m (they are all equally "right here"): previously a spuriously tiny reading could single-handedly own the fix by a million-fold weight. This applies to every setup, heights or not.
Recalibrate after setting or changing heights: existing corrections were learned against the flat distances and would double-correct otherwise. (The panel reminds you, and blocks a calibration Apply while unsaved layout edits are pending.)
Floor election by hypothesis competition
Which floor a tracker is on used to be decided by one number: the floor of the single receiver reporting the smallest distance. BLE passes straight through ceilings, so one noisy reading from the floor above could steal the tracker for a cycle — the kitchen ↔ bedroom flapping of #94.
The election is now a competition between floors, each judged on how well it explains all of its receivers (the way ESPresense scores its per-floor scenarios) instead of on a single loudest reading:
- Each cycle, the nearest floors that have at least three receivers hearing the tracker are each solved (the incumbent floor always defends its title when it can solve), and each fit is scored by how well the position agrees with every reporting receiver on that floor (weighted residual, in metres, corrected for receiver count) plus how many receivers corroborate it. A through-ceiling reading fits one receiver and contradicts the rest — it scores poorly.
- Scores feed smoothed per-floor probabilities. A challenger must lead the incumbent for several consecutive cycles before the floor switches (~3 s when you really change floors), and a cycle where the incumbent floor briefly drops below three receivers simply holds the last position instead of handing the tracker to whoever else was solvable that instant. A single blip no longer flaps the floor, the published zone, or the position filter.
- The probabilities are published per tracker (
floorsin/api/bps/cords), so "why did it pick this floor" is now inspectable. - Bonus: a tracker heard by too few receivers on the nearest floor but by three or more on another now gets a position instead of none.
No-go zones
Some spots on an upper floor are physically impossible: the upper footprint of a double-height foyer or great room open to the floor below. Nothing can stand there — but the downstairs receivers hear a beacon in that shared air just fine, so the upper floor sometimes "wins" it and the tracker hovers in mid-air over the void (#60).
Mark such a zone no-go with the no-entry button on its row in the Zones & Receivers sidebar. It draws as grey hatched dead space on the map, and in tracking it:
- Down-weights the floor whose fit lands in it. Because the floor election is now a competition, a no-go hit just makes that floor score poorly — so the floor where the same spot is a real room (the one open below) wins on its merits. No hard-coded override, and it rides the same anti-flap smoothing.
- Never strands a tracker. If the no-go floor is the only one that can solve (nobody downstairs hears the beacon), it still gets a position — the point is just snapped out of the dead space to the nearest real room, and the zone sensors never report the no-go zone.
Marking a zone no-go changes only tracking; it doesn't need a recalibration.
Receivers on the map card
The Lovelace map card can now draw your receivers (bluetooth proxies), colored by whether they're working:
type: custom:bps-map-card
floor: first
entities:
  - sensor.eriks_iphone_16
show_receivers: true
show_receiver_labels: true   # optional: print the receiver name next to the icon
scale_receiver_icon: 100     # optional: receiver icon size (defaults to scale_icon)
scale_receiver_labels: 75    # optional: receiver label size (defaults to scale_labels)
receiver_status:             # optional: explicit status entity per receiver
  nsp_kitchen: binary_sensor.nsp_kitchen_status
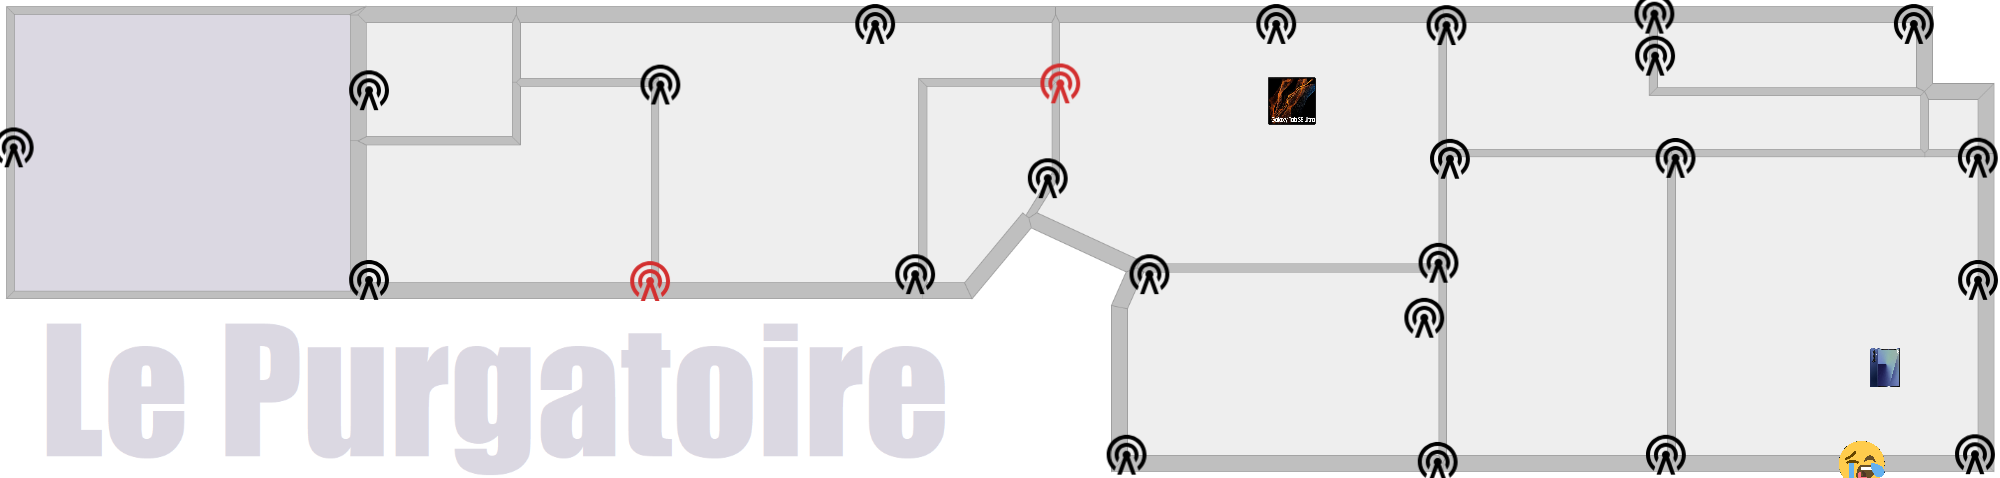
The beacon icon is drawn black when the receiver is working and red when it is offline/unavailable. The decision is made per receiver, first match wins:
receiver_statusmapping (if given): the mapped entity decides — an offline-like state (off,unavailable,unknown,none,false,not_home,offline,disconnected, or empty) shows red, anything else black. Any entity of the device works (e.g. an uptime sensor). Map a receiver tofalse(orheuristic) to skip tiers 2–4 and force the distance heuristic.- Bermuda scanner liveness (automatic): the card asks Bermuda
(
bermuda.dump_devices) and matches scanners to receivers by name. A receiver is working while its scanner heard any advertisement withinreceiver_timeoutseconds (default 30, min 10). This is the strongest tier — it catches a proxy whose BLE scanning died while its network stayed up. binary_sensor.<receiver>_statuswith device classconnectivity— the conventional ESPHomestatussensor.- Device availability (automatic): the HA device whose name matches the
receiver is online while any of its entities isn't
unavailable. A connectivity-class entity of that device is authoritative. - Bermuda distance sensors (fallback): working while at least one
sensor.*_distance_to_<receiver>reports a distance (Bermuda holds the last reading ~30 s), so a dead — or unreachable — proxy turns red after about half a minute.
Tiers 2–4 need no configuration and match by the receiver name you used in the
panel (normally the proxy's HA device name). If a receiver shows red while the
device is online, map it explicitly in receiver_status.
The full card guide (all options, per-floor behavior, labels/icons/zones, troubleshooting) is in the upstream wiki.
Feedback & contributions
Issues and pull requests are welcome on Hogster/BPS. Join the discussion on the Home Assistant Community thread.
Enormous thanks again to @maxi1134 for the BPS-improved work that powers much of 0.2.0, to @agittins for Bermuda, and to everyone who files issues and PRs.
more like this
PowerDisplayESPHome
A small display for ESPHome and Home Assistant to retrieve the current house consumption and energy price via a sensor…