meine
meine 🌒 - A CLI file manager and system utility built with Textual. It combines intuitive command parsing with rich t…
Python★ 50
A dark indigo CSS theme for Firefox and a large collection of privileged scripts to add new buttons, menus, behaviors a…
 aminomancer
git clone https://github.com/aminomancer/uc.css.js.gitaminomancer/uc.css.js
A Firefox theme (duskFox) and a variety of privileged scripts to add new behaviors and functions.



Installing this theme is a bit more involved and requires more decisions than pure CSS themes. So, I'm going to explain what this is, introduce the major moving parts, and define some jargon to ensure that anyone can follow the instructions, regardless of prior experience or knowledge. More advanced users can just skip ahead to Recommended settings.
Because theme addons are restricted to changing colors and other variables, many Firefox users continue to use other, unsupported approaches to customizing the browser. By far the most common is userChrome customization, wherein you use CSS files to customize the browser visually. To be clear, a CSS file is called a stylesheet, not a script. For the purposes of this theme, a stylesheet is a file ending in .css. However, just like theme addons are restricted by the theme API, userChrome customization is restricted by the CSS language, which only allows us to style existing elements.
Firefox's frontend uses JavaScript (a human-readable, interpreted scripting language) for a huge variety of dynamic/interactive features. A JavaScript file is typically called a script. For the purposes of this theme, a script is a file ending in .js or .jsm. As it happens, Firefox exposes a mechanism for loading custom scripts. That mechanism involves giving Firefox an autoconfig file, which Firefox reads like a JavaScript file. At runtime, the autoconfig file has access to the same powers as some of Firefox's internal scripts. We can use it to run JavaScript code or even load additional script files. So, whereas most other themes are purely visual, this theme can and does create new elements, shortcuts, and dynamic behavior.
A third, lesser known avenue for customization is Firefox's component registrar. This is a pretty arcane object called an XPCOM interface, so don't worry about the details — Firefox uses this system to organize itself. Instead of using absolute paths, the Firefox frontend usually uses special URLs to reference its internal files. For example, the "new tab" icon is located at chrome://browser/skin/new-tab.svg. This corresponds to a local path that's been registered to this URL. We can use the registrar to do the same thing: to register chrome:// URLs or override existing ones. If I don't like Firefox's "new tab" icon, I can just replace it by loading a manifest file. That means we don't need to use CSS to modify every element that uses the icon and update that CSS every time one of them is changed. For the purposes of this theme, a manifest file is a file ending in .manifest.
Firefox also has a preferences system, which can be managed by navigating to about:config. A preference (or pref) is simply a key-value pair. Pref keys are always strings, and their values can be strings, integers, or Boolean (they can also be floating-point numbers, but these are encoded like strings). Firefox has several thousands of prefs, which are used for all sorts of things from major configurations to obscure mods and even simply counting events. Firefox's UI can be visually customized to some extent using prefs. Since we can make our own prefs, I also use them to make customizing this theme easier. The most important prefs are listed below in the settings section. Some individual scripts have prefs as well, which will be listed in their descriptions.
So, for the purposes of this theme, a "stylesheet" is a .css file used to visually customize the browser UI or content; a "script" is a .js or .jsm file used to functionally customize the browser, and in this theme, usually a .uc.js file placed in the JS folder; a "manifest" is a .manifest file used to register or override the browser's internal URLs. When I use the term "resources" I'm usually referring to the resources folder, where the theme stores its icons and content stylesheets (among other things). These terms may have other meanings outside of this context, but within this readme, that's what they mean.
For best results, set density mode to Normal and theme to Dark in the customization menu. (right click on the navbar and click "Customize Toolbar...") I strongly recommend using this on Firefox Nightly and updating the theme at least weekly. To that end, you might find it easier to clone the repo to your chrome folder so you can pull updates quickly.
I also recommend setting the following prefs in about:config. There are two preset user.js files in the prefs directory that can automatically set the prefs for you and prevent Firefox from changing them on update. Just choose one, rename it to user.js, and move it to your profile folder, not your chrome folder. The first of these files, required.js contains just the bare minimum prefs to ensure functionality, omitting most of the prefs that represent aesthetic choices. The second, recommended.js, includes the required prefs and some other more subjective prefs that compliment the theme — this is the preset I would personally recommend. There are also OS-specific prefs that are not in either file, so you should still check the list below. The following are in alphabetical order, not in order of importance. Most are optional, but the few that are required are in italics and are marked in the Notes column.
| Pref name | Type | Value | Notes (optional unless otherwise noted) |
|---|---|---|---|
| accessibility.mouse_focuses_formcontrol | Number | 0 | Don't focus elements on click, only on tab. Helps to eliminate ugly 1px dotted outline |
| browser.display.background_color.dark | String | #19191b |
Default background color for color-scheme: dark pages like about:blank |
| browser.display.use_system_colors | Boolean | false | |
| browser.display.windows.non_native_menus | Number | 1 | |
| browser.privatebrowsing.enable-new-indicator | Boolean | false | Remove the "Private browsing" window label |
| browser.startup.blankWindow | Boolean | false | These two settings eliminate the blank white window during startup |
| browser.startup.preXulSkeletonUI | Boolean | false | |
| browser.tabs.tabMinWidth | Number | 90 | User preference, but mine is 90 |
| browser.tabs.tabmanager.enabled | Boolean | true | Enables "all tabs menu" |
| browser.urlbar.accessibility.tabToSearch.announceResults | Boolean | false | The following disable some urlbar results |
| browser.urlbar.quicksuggest.enabled | Boolean | false | |
| browser.urlbar.richSuggestions.tail | Boolean | false | |
| browser.urlbar.searchTips | Boolean | false | |
| browser.urlbar.suggest.quicksuggest.sponsored | Boolean | false | |
| browser.urlbar.tabToSearch.onboard.interactionsLeft | Number | 0 | |
| browser.urlbar.trimURLs | Boolean | false | Don't hide http:// in the urlbar |
| browser.urlbar.groupLabels.enabled | Boolean | false | Don't show urlbar result group labels like "Firefox Suggest" |
| browser.urlbar.resultMenu | Boolean | false | Don't show meatball menu buttons on urlbar results |
| full-screen-api.transition-duration.enter | String | 0 0 |
Remove the fade in/out transition when switching to/from fullscreen |
| full-screen-api.transition-duration.leave | String | 0 0 |
|
| full-screen-api.warning.delay | Number | -1 | Remove the warning when switching to/from fullscreen |
| full-screen-api.warning.timeout | Number | 0 | |
| gfx.color_management.mode | Number | 0 | Disable ICC color management. Use a color calibrator for best results. |
| gfx.font_rendering.cleartype_params.cleartype_level | Number | 100 | These settings are a major improvement to text rendering on Windows imo. They shouldn't do anything on Mac/Linux |
| gfx.font_rendering.cleartype_params.force_gdi_classic_for_families | String | <empty> |
Leave the value completely empty |
| gfx.font_rendering.cleartype_params.force_gdi_classic_max_size | Number | 6 | |
| gfx.font_rendering.cleartype_params.pixel_structure | Number | 1 | |
| gfx.font_rendering.cleartype_params.rendering_mode | Number | 5 | |
| gfx.font_rendering.directwrite.use_gdi_table_loading | Boolean | false | |
| layout.css.backdrop-filter.enabled | Boolean | true | Required for the acrylic/glass gaussian blur effect |
| layout.css.moz-document.content.enabled | Boolean | true | Required |
| mousewheel.autodir.enabled | Boolean | false | Allow mousewheel ⇅ to scroll ⇄-only scrollboxes |
| prompts.contentPromptSubDialog | Boolean | true | Use the modern content dialog instead of modal prompts |
| reader.color_scheme | String | dark |
|
| slider.snapMultiplier | Number | 0 | When dragging a scrollbar, if the mouse moves too far from the scrollbar, the scrollbar will snap back to the top. Disable this. |
| svg.context-properties.content.enabled | Boolean | true | Required for making some icons white |
| security.allow_unsafe_dangerous_privileged_evil_eval | Boolean | true | Required for any scripts that use eval() |
| toolkit.legacyUserProfileCustomizations.stylesheets | Boolean | true | Required, of course |
| ui.IMERawInputBackground | String | #000000 |
This affects the appearance of IME overlays. e.g. when typing Hangul or Pinyin |
| ui.IMESelectedRawTextBackground | String | #7755FF |
|
| ui.key.menuAccessKeyFocuses | Boolean | false | Disable Alt-key opening menubar if you use my Alt+M hotkey |
| ui.prefersReducedMotion | Number | 0 | Make sure this pref is 0 or doesn't exist if you want animations |
| ui.submenuDelay | Number | 100 | How long before a context menu's submenu opens. 300 default, 100 feels more responsive imo |
| ui.tooltipDelay | Number | 300 | How long before a tooltip opens. The default 300 works for me |
| ui.skipNavigatingDisabledMenuItem | Number | 1 | When focusing menuitems with arrow keys, skip past disabled items |
| ui.SpellCheckerUnderline | String | #E2467A |
|
| ui.SpellCheckerUnderlineStyle | Number | 1 | Use dotted underline for spell checker. The default groove can get cut off for some fonts |
| ui.systemUsesDarkTheme | Number | 1 | Enable browser dark scheme |
| layout.css.prefers-color-scheme.content-override | Number | 0 | Enable content dark scheme |
| ui.selecteditem | String | #2F3456 |
Background for selected <option> elements and others |
| ui.highlight | String | hsl(250, 100%, 60%) |
Configure the system color "Highlight" |
| ui.selecteditemtext | String | #FFFFFFCC |
Text color for selected <option> elements and others |
| ui.textHighlightBackground | String | #7755FF |
These prefs control the appearance of text highlighted by the findbar. I choose white text on purple/pink background |
| ui.textHighlightForeground | String | #FFFFFF |
|
| ui.textSelectBackground | String | #FFFFFF |
|
| ui.textSelectAttentionBackground | String | #FF3388 |
For Fx > v96 |
| ui.textSelectAttentionForeground | String | #FFFFFF |
For Fx > v96 |
| ui.textSelectDisabledBackground | String | #7755FF |
For Fx > v96 |
| ui.textSelectBackgroundAttention | String | #FF3388 |
For Fx ≤ v96 |
| ui.textSelectBackgroundDisabled | String | #7755FF |
For Fx ≤ v96 |
| ui.infobackground | String | hsl(233, 36%, 11%) |
Tooltip background color (fallback if CSS doesn't apply) |
| ui.infotext | String | #FFFFFF |
Tooltip color (fallback) |
| userChrome... | Several of my scripts use custom prefs beginning with userChrome for user customization. See the individual script files for details. The stylesheets also use the following: |
||
| userChrome.bookmarks-toolbar.icons-only | Boolean | false | If true, bookmark buttons in the toolbar are just square icons |
| userChrome.contextmenu.reduce-menuseparators | Boolean | false | If true, hide some of the separators in the main context menu to reduce clutter |
| userChrome.css.hide-promotion | Boolean | false | If true, hide official ads on system pages, e.g. for Mozilla VPN |
| userChrome.css.mac-ui-fonts | Boolean | true | Replace UI font with SF Pro, the system font for macOS. Click here for details |
| userChrome.css.menupopup-shadows | Boolean | true | Add a shadow behind context menus and panels |
| widget.non-native-theme.scrollbar.style | Number | 2 | Enable the GTK scrollbar style in web content, regardless of your OS. Supports: 0 (default), 1 (macOS), 2 (GTK), 3 (android), 4 (win10), 5 (win11) |
| widget.non-native-theme.scrollbar.size.override | Number | 11 | Make the scrollbar track 11px wide for GTK (scrollbar.style = 2) |
| widget.non-native-theme.gtk.scrollbar.thumb-size | Number | 0.818 | Make the scrollbar thumb 9px wide for GTK |
| widget.non-native-theme.win.scrollbar.use-system-size | Boolean | false | Override the scrollbar size (for Windows) |
| userChrome.css.remove-tooltip-borders | Boolean | false | Remove the thin border on tooltips. Not recommended |
| userChrome.css.titlebar-buttons-on-left | Boolean | false | If true, move the titlebar buttons (close/min/max) to the left side of the window |
| userChrome.css.wikipedia.dark-theme-enabled | Boolean | false | Enable the custom dark theme for Wikipedia.org (this is deprecated, I recommend skipping it) |
| userChrome.findbar.hide-on-unfocus | Boolean | false | Automatically hide the findbar when you blur (unfocus) it |
| userChrome.panels.allow-height-flex | Boolean | false | If true, allow panels to flex down in height. Will cause stutters on weaker hardware |
| userChrome.panels.vibrant-fxa-banner | Boolean | true | Highlight the profile button in the app menu with a vibrant background |
| userChrome.tabs.all-tabs-menu.reverse-order | Boolean | true | Display the all tabs menu in reverse order (newer tabs on top, like history) |
| userChrome.tabs.pinned-tabs.close-buttons.disabled | Boolean | true | This controls whether close buttons are shown on pinned tabs |
| userChrome.tabs.drag-scrolling.enabled | Boolean | false | This controls whether scrollbuttons will be shown when dragging tabs |
| userChrome.tabs.tooltip.always-show-lock-icon | Boolean | false | There's an icon in the tab tooltip representing page security. It's expanded by this script to show many security types. But by default, the icon is hidden on fully secure web pages. Setting this pref to true shows the icon on ALL pages |
| userChrome.urlbar.focus-ring-enabled | Boolean | true | Outline the urlbar/searchbar when focused |
| userChrome.urlbar.hide-bookmarks-button-on-system-pages | Boolean | true | Hides the urlbar's bookmark button on about:blank & new tab page |
| userChrome.urlbar.hide-pointless-icons | Boolean | true | Hide urlbar notification icons that don't offer any action (e.g. DRM icon) |
| userChrome.urlbar-results.disable_animation | Boolean | false | Toggle to true if you don't want the urlbar results to animate as they pop up |
| userChrome.urlbar-results.hide-help-button | Boolean | true | New "Firefox Suggest" urlbar results have little help buttons. This will hide them |
| userChromeJS.gBrowser_hack.enabled | Boolean | true | I don't think it's necessary, but enable just in case if you use a lot of scripts |
| widget.content.allow-gtk-dark-theme | Boolean | true | May style some in-content elements consistently with Linux themes |
| widget.macos.native-context-menus | Boolean | false | Required to use some of my scripts on macOS, and for context menu styles on macOS |
| devtools.inspector.showAllAnonymousContent | Boolean | true | Show native anonymous content (like scrollbars or tooltips) and user agent shadow roots (like the components of an <input> element) in the inspector |
| devtools.inspector.showUserAgentStyles | Boolean | true | Show user agent styles in the inspector |
| browser.newtabpage.activity-stream.asrouter.devtoolsEnabled | Boolean | true | Enable ASRouter Devtools at about:newtab#devtools (useful if you're making your own CSS theme) |
| app.update.suppressPrompts | Boolean | true | Disable update restart prompts; delay update available prompts for ~1 week |
Because most of the scripts and stylesheets here are tethered to the Nightly release channel, I also recommend disabling automatic updates in your Firefox preferences and setting app.update.suppressPrompts to true in about:config (or click "Show fewer update notification prompts" in about:preferences). Rather than immediately flashing a popup window that requires you to click something to dismiss it, available updates will just add a green update badge to the app menu "hamburger" button. To update you can just click the hamburger button, then click the update banner at the top of the app menu. However, if you wait longer than a week to install the update, it will eventually open a popup. If you don't want any update popups at all, you can download my update alert script. It replaces all the popups with badges and banners only.
As with any CSS theme, to use duskFox, you need to make a chrome folder in your profile's root directory (which can be found in about:profiles) and place the files from this repo into it. For user stylesheets to work you also need to enable some of the prefs described above, or download one of the prefs files, rename it to user.js, and place it in your profile's root directory. This will allow the basic userChrome and userContent stylesheets to take effect, but some additional steps are required beyond that.
This theme requires more technical setup than most because it changes a lot of lower-level stuff like javascript methods and icon/animation source code, but if you follow the instructions fully it'll work for anyone on any modern desktop OS, regardless of background knowledge. It requires fx-autoconfig to register the icon package and replace some of Firefox's lower-level stylesheets. Instructions for setting up fx-autoconfig are below. To be clear, this specific loader is required, unless you know how to register your own manifest from scratch.
The theme is tightly integrated with some (though not all) of the scripts on this repo. Although fx-autoconfig is mainly required for the purpose of registering files with the manifest, it also allows you to load scripts. So because you already need fx-autoconfig for the basic theme to work, I recommend reading through the scripts section to decide which scripts you want to use. Scripts with ✨ stars next to their description are particularly important for the theme to work as intended. In particular, the theme fundamentally requires the agent & author sheets listed in the special stylesheets section, and they are loaded by a script. So although most of the scripts are optional, a fully scriptless installation of this theme is not possible.
⛔️ Please do not install every script in the JS folder at once. Unlike the theme's other resources, not all of the scripts are meant to be used at the same time. For example, a few scripts have both a standalone and a theme version which are totally redundant. Undesired scripts can be deleted from the JS folder or disabled via the Tools > userScripts menu. After disabling a script and restarting Firefox, fx-autoconfig will no longer run the script at startup.
If you haven't already, download the resources folder and place it in your chrome folder, along with the CSS files. fx-autoconfig will automatically register this folder to the path chrome://userchrome/content/. This theme also requires downloading utils/chrome.manifest. Most of the theme will work without it, but it's crucial for certain things.
In particular, it replaces some icons and modifies some internal scripts and stylesheets that would be very hard to override with either CSS or javascript. Simply replace the chrome.manifest file from fx-autoconfig with my version. This will strictly redirect some chrome:// URIs from the vanilla files to files from this theme, so the changes will apply globally. Without this, it would be very difficult to do certain things. We use this to restore the pre-Proton tab sound icons, to change the appearance of plaintext files and other lower-level internal pages, and to change the styling for very hard-to-reach elements.
For example, menupopup scrollbuttons are contained in shadow trees within shadow trees. There is no way to select them with any kind of specificity except to use javascript to give them custom classes/attributes, or to inject stylesheets into the shadow trees. I used to use the latter method but now that we use the manifest so liberally (and still judiciously) it makes more sense to modify arrowscrollbox.css with the manifest. So now we can make blanket changes to how these elements are styled without losing the ability to select attributes or classes on the shadow host.
The manifest also makes it much easier to change icons, and makes it possible to customize some icons that would be simply impossible to change otherwise. For example you would not be able to change the icon for an element like <image src="chrome://global/skin/icons/icon.svg"> because src is not a CSS property. But with the manifest, we can change which icon actually exists at that URL. For all these reasons, the manifest has become a central part of this theme and is one of my go-to solutions for difficult problems because it's so clean.
This is a standard dark theme, not a high-contrast theme or a compact theme. I aim for compactness similar to Firefox's Photon UI. I designed this theme for my own use, so the colors are oriented toward my own displays. These are color-grading monitors so the color profile is created by a color calibrator based on Rec709-Rec1886. This is why I recommend setting gfx.color_management.mode to 0.
The basic aim of this theme's colors can be summed up as "dark mode." I think dark gray is a little boring and overdone, so I went with dark indigo and slate colors in the UI, and dark gray in content. As everything revolves around "dark mode," any instance of a big white interface is jarring and creates a negative user experience. So the theme modifies every parent process interface and even many content interfaces to eliminate these light vestiges. It includes stylesheets for some specific websites, but by and large you're expected to use Dark Reader if you want consistent dark content. It also includes stylesheets for several extension pages, since Dark Reader can't style most of them.
One of the objectives of this theme is to restore all the icons to their pre-Proton style. This isn't strictly necessary, but with Proton, the icon style was changed and a bunch of icons were removed simultaneously, so many icons never got an update. That means if we want context menu icons, we need to use the old icon style or make new icons (this theme does a mix of both). I generally liked the old icon style, so that's the direction I took the theme in. Eventually I may change my mind and aim for a less busy, icon-free style like Proton. But until then we'll use a mix of pre-Proton icons, Google Material icons, and my own custom icons.
I said before that this is not a "compact theme," but I think my idea of "normal density" is a bit more compact than the Proton designers'. So, one of the principles is to compactify anything that is superfluously large. For example, Firefox's findbar has always been needlessly huge, filling an arbitrarily large amount of horizontal space with emptiness, while simultaneously wasting vertical space. One of the very first things I did with this theme was to turn the findbar into a floating panel of about 400 x 40px. It floats on top of the content rather than pushing it up or down. I turned all the buttons and checkboxes into icons. It wound up looking very much like VS Code's findbar, so I decided to use VS Code's icons for it. This comes with some trade-offs, though. For example, webpage elements that just happen to fall under the findbar will be unclickable while the findbar is open. However, it's pretty rare for websites to put elements up there, the findbar is now very small, and it's easy enough to just close it for the moment. Since this is a custom theme, we can afford to make that kind of opinionated decision that Firefox can't implement without alienating some of its users.
Proton also removed most of Firefox's UI animations. This should make Firefox more responsive on low-end hardware, so it's a fine decision. But this repo is not intended for low-end hardware, so we can get away with using lots of animations. The theme and some of the scripts restore animations that were built into Firefox prior to Proton. In other cases, they create new animations and transitions to make things feel smoother. I try to avoid what I consider excessive animations, but everyone has different tastes. By my estimate, the theme is in the middle of that spectrum.
For linting/formatting, I use ESLint, Prettier, and Mozilla's ESLint plugin. All of those can be installed by running npm install --save-dev in the repo's root directory.
The userContent.css file handles stuff like the devtools, some UI pages and context menus, plaintext pages, browser background color while pages are loading, and the built-in HTML video player. It also includes some reskins for specific websites and extension pages/popups. The Firefox UI is increasingly integrated with content browsers, so it's not feasible to make a theme so dramatically different from vanilla Firefox without userContent.css. The big content area isn't the only browser, there are tiny ones all over the place. For example, several modal dialogs that appear to be part of the parent process are actually content.
So userContent.css isn't strictly required for the rest of the theme to work, but without it you'll find some elements look inconsistent with the theme, and it also takes care of some issues that make the fabled global dark mode harder to realize. If you already have a userContent file, I'd suggest changing its name to custom-content.css and placing it in the resources/in-content folder. The theme doesn't include this file, since it's purely intended for end-user modifications, but it automatically loads the file if it exists. It loads last and therefore wins any conflicts of equal priority & specificity. You can also delete any of the content stylesheets you don't want to use, or remove their @import rules from userContent.css.
I've bundled some of my addons in this repo as well. They are in the extensions folder. My custom new tab page is signed (it's a modded fork of Tab Notes by wildsky) but you will still need to "install addon from file" in about:addons since you're not downloading the extension package from a Mozilla domain. There are several search engine addons in the extensions/search-extensions folder. These simply add one-off search engines for websites like Google Images or YouTube, and some include search suggestions/autocomplete. Firefox already comes with Amazon and Wikipedia addons, but they have ugly icons and unnecessarily long labels. Mine are simply called Amazon and Wikipedia, and have icons that match the theme. Some of Firefox's built-in search engines also lack search suggestions even though the websites can provide suggestions. Some are signed and hosted on AMO, but others remain unsigned due to an AMO bug. You can download the following search engines from AMO: YouTube; Google Translate; Brave; Firefox Add-ons; Searchfox; Bugzilla; MDN Web Docs; Library Genesis; Etsy.
userChrome.css doesn't require any fonts, but there's an optional preference in about:config which lets you replace fonts in the UI (not in-content) with SF Pro, macOS's system font, on Windows or Linux. You can enable this by downloading the font and opening it in 7-Zip. From here, double click the .pkg file, then Payload~, then ., Library, and Fonts. From here you can drag all the files to a working folder, select all of them, then right click and click "Install for all users."
After that, you just need to toggle userChrome.css.mac-ui-fonts to true in about:config. Currently, this setting requires a local copy of three variants of the font: SF Pro, SF Pro Display, and SF Pro Text (all from SF-Pro.dmg). If you use the Arabic abjad, download SF Arabic too since the theme now uses it too. Additionally, userContent.css can use Fira Code or SF Mono for plaintext files. This repo includes a copy of Fira Code that the stylesheets can load, so you technically don't need to install it yourself, but I recommend installing it anyway. It's one of the best monospace typefaces in my opinion, and it's completely free. Install FiraCode-VF.ttf from the variable_ttf folder, but do not install the other font files since they can conflict.
If you want the functional features shown in the animations, you'll need to install some of the scripts. The stylesheets do not strictly require installing any scripts, but some scripts are designed to solve problems that CSS can't, so I recommend reading the full list of script descriptions. Since the theme itself already requires fx-autoconfig, installing the scripts doesn't require any extra time or setup. Most scripts do not require installing the CSS theme either, but the few exceptions are noted in the descriptions and at the top of each script file. Instructions and explanations for the scripts are below.
Most of the important colors can be changed in uc-low-globals.css, uc-globals.css and uc-variables.css. Changing the hues is easy, but at the moment I wouldn't recommend trying to convert it to a "light" color scheme. Instead of modifying uc-globals and uc-variables directly, it'll be easier to make your own stylesheet that overrides the variables.
To modify the main window UI (as you'd do with userChrome.css) place your custom chrome styles in the custom-chrome.css file in the chrome folder. To modify content (as you'd normally do with userContent.css) place your custom content styles in the custom-content.css file in resources/in-content. The theme automatically looks for and imports these stylesheets. They load after the theme's stylesheets, so they will override rules from the theme with equal specificity.
Normally in Firefox, the default search icon in the urlbar is a magnifying glass. This is the icon that shows when you start typing in the urlbar. In previews of duskFox you might have noticed that this icon instead looks like a Google logo, a Firefox logo, or something else. This is achieved with the Search Mode Indicator Icons script. Combined with the CSS theme, it will automatically detect your default search engine (and your one-off search engines) and try to find a matching icon, minimizing customization effort. Check the script description for more instructions.
If you want to use a UI language pack other than English for Firefox Nightly, you need to follow some additional steps. Mozilla only releases language packs for Release and Beta builds, but these can still be made compatible with Nightly builds. Find the latest Firefox release directory, click it, then click the subdirectory for your OS, e.g. win64. From there, scroll down to the folder labeled xpi. In here, locate the file with your language code, e.g. zh-TW.xpi for traditional Chinese.
If you simply click the language pack link, Firefox will try to install it directly and tell you it's incompatible. Instead you need to download it and unpack it with 7-zip. You can try downloading it with another browser, but I prefer to use Multithreaded Download Manager, which lets you download the file by opening a context menu on the link.
Once you've downloaded the xpi file, unpack it with 7-zip. Delete the folder labeled META-INF, then open the manifest.json file in a text editor. Search for the property labeled strict_max_version and delete it. Make sure you delete the trailing comma on the strict_min_version line above it. In the id property above it, replace @firefox.mozilla.org with @your-name. Save the file, then select all the files in the unpacked folder, right click, and hit "Add to archive..." to bundle it all up in a zip file. You can zip it any way you want, as long as you zip the folder contents, not the folder. That is, manifest.json should be in the archive root.
Now you need to open about:config and change some prefs. intl.multilingual.downloadEnabled and intl.multilingual.enabled both need to be set to true, while extensions.langpacks.signatures.required and xpinstall.signatures.required need to be set to false. Once you've done this, you can go to about:addons, click the gear icon, hit "Install Add-on From File..." and select the zip file you just created. Now that you have the language pack installed, go to about:preferences, scroll down to the Language and Appearance section, and under Language choose the new language pack. Then click the "Apply and Restart" button.
Language packs installed this way will need to be updated manually, following the same steps outlined above, so I encourage you to bookmark the directory so you can check back periodically for updates. Unfortunately, there isn't an automatic update method, but maybe it's possible to hook up push notifications for this site so you'll at least be alerted when a new version directory is added.
⚠️ I designed most of these code products to be compatible with other languages, but I can't read right-to-left scripts such as Arabic or Hebrew. I read left-to-right, so it's difficult for me to debug in RTL scripts, and I am alone on this project. So although I am pretty confident that left-to-right language packs work well with the theme and scripts, there are still likely to be some display issues with right-to-left language packs. If anyone wants to help with this, I'll welcome PRs and gists that follow the conventions.
Release packages are available as a courtesy, but since the theme and scripts are updated on a daily basis to keep up with Nightly, the latest release package may not be completely up to date. If you want the very latest stylesheets/scripts, you should either download the source code and drag its contents to your profile's chrome folder, clone the repo directly to your chrome folder, (use GitHub Desktop if all of this sounds like gibberish to you) or download individual folders with GitZip or Refined GitHub.
The files in the JS folder are not content scripts like you'd load in Tampermonkey. They're meant to execute in the same context as Firefox's internal scripts. They're scripts for the Firefox frontend itself rather than for webpages. The Firefox UI is largely built with markup, styled with CSS, and dynamically modulated with JavaScript — just like a webpage. So to modify the UI visually, CSS is commonly used. But CSS can only do so much. Even some of this theme's features that appear to be purely visual may require JavaScript, like the search engine icons shown in the GIF above.
These scripts need to be loaded by an autoconfig script loader. I recommend fx-autoconfig by MrOtherGuy which is robust and uses the safest method I'm aware of. Some of my scripts are not fully compatible with loaders other than MrOtherGuy's. In particular, most will be incompatible with xiaoxiaoflood's loader, and a few will be incompatible with Alice0775's loader.
⛔️ Please do not install every script in the JS folder at once. Unlike the theme's other resources, not all of the scripts are meant to be used at the same time. For example, a few scripts have both a standalone and a theme version which are totally redundant. Undesired scripts can be deleted from the JS folder or disabled via the Tools > userScripts menu. After disabling a script and restarting Firefox, fx-autoconfig will no longer run the script at startup.
⚠️ If you plan to install scripts in a new profile, make sure you run Firefox with that profile at least once before installing any scripts. If you're installing scripts on an existing profile that you've already used, then don't worry about this. When you first create a profile, Firefox needs to set some things up during runtime. Although CSS is fine, you don't want any third-party javascript running during this process. So launch Firefox with the appropriate profile, log into your Firefox account, (if you have one) then quit, install the scripts, and restart the application.
You first need to find your Firefox installation folder. On Windows that's C:/Program Files/Firefox Nightly/. On Linux it should be usr/lib/firefox/. On macOS this is more complicated. You need to open the application file itself, probably in Macintosh HD/Applications/. It's the file you double-click to open Firefox, but it's actually a package, not a binary. If you right click it, there will be an option in the context menu labeled "Show Package Contents." Clicking this takes you to the app constants. From there, navigate to Contents/Resources/ to reach the root directory. So whichever OS you're on, you should end up with...
config.js in your Firefox installation's root directory;defaults in the root directory;pref inside that defaults folder;config-prefs.js inside that pref folder;JS folder in your profile's chrome folder;utils folder in your chrome folder, containing chrome.manifest and boot.sys.mjs;⚠️ If you're using my theme, (the CSS files) you should also have a resources folder in your chrome folder, containing all the icons and content stylesheets.
You may already have a file called channel-prefs.js inside the pref folder. This is unrelated, so leave it alone.
If you're using fx-autoconfig like I recommended, then your scripts should go in the JS folder by default. fx-autoconfig comes with scripts for loading agent and author sheets. If you use those scripts, your agent/author sheets should go in the resources folder. But if you're using my agent/author sheet loader instead, then agent/author sheets (the files ending in .ag.css or .au.css) should go in the chrome folder with the rest of your userchrome sheets.
The sheet loader that comes with fx-autoconfig will work just fine, and has one advantage over mine, but it will not load your agent/author sheets in browser toolbox windows. See the section below if you want to style native-anonymous elements or shadow parts in the toolbox. Significant applications include modifying tooltips and scrollbars in browser toolbox windows. If you follow this guide fully, installing all the CSS files and my agent/author sheet loader, you'll end up with the custom tooltips and scrollbars in every window, including the devtools.
⚠️ Older versions of this theme required users to rename the JS folder to script. The name was arbitrarily set before I started recommending fx-autoconfig, and I never bothered to change it until now. But this is no longer required — scripts go in the JS folder that comes with fx-autoconfig. So if you're updating from an old version of the theme, please update utils/chrome.manifest and change the script folder's name to JS.
After you've installed the files, the script loader will locate any scripts you place in the proper folder that end in .uc.js. Once you have this set up you can download scripts, put them in the correct folder for your script loader, restart, and you should see the changes immediately. You can automatically update scripts with my about:userchrome script, which adds a script manager located at about:userchrome. When updating scripts, be sure to clear your startup cache. With fx-autoconfig, you can click "Tools" in the menubar, then "userScripts," then "Restart now!" and it will clear the startup cache as it restarts. If you install App Menu Mods, there will also be a restart button in the app menu (the hamburger button at the end of the navbar). Right-clicking or Ctrl+clicking this button will clear the cache and restart. To manually clear the startup cache, you can navigate to about:profiles and click the "Open Folder" button in your profile's local directory row. Then quit Firefox, and in the local directory delete the folder labeled startupCache before restarting the browser.
Firefox is updated every night, so my theme and scripts are updated on a regular basis to ensure compatibility with the latest build from mozilla-central, which is distributed through the Firefox Nightly branch. This means that files on this repo are not expected to be compatible with every Stable, ESR, Beta, or Developer Edition release of Firefox — only Nightly. If you update Firefox and a script stops working, or your UI suddenly looks ugly, check the repo to make sure your scripts are up to date. Compare the @version number at the top of a given file to the version of your copy. If your problem is still present, feel free to post in the Issues section.
If you use any of my scripts, please disable telemetry. If you use one of my user.js files, it will handle this for you. Otherwise, you can disable telemetry by navigating to about:preferences#privacy and unticking the boxes towards the bottom that say "Allow Nightly to send technical and interaction data to Mozilla" and "Allow Nightly to install and run studies." Because we're modifying the way the browser's internal systems work, sending Mozilla data about your browser environment is useless and may actually confound their studies. Any interaction data emitted by functions that we modify with these scripts has the potential to confuse and mislead Firefox developers and waste valuable time.
Users can't disable the crash reporter at the profile level. The user.js files will disable auto-reporting, but in the event that Firefox crashes, a dialog will still appear, asking if you want to send a report. You can simply close the window to avoid sending a report. It's possible to disable the crash reporter at the app level by making an environment variable called MOZ_CRASHREPORTER_DISABLE and setting its value to 1. If you think one of my scripts is causing a global crash (unlikely) and you want to send me a report, you can disable the reporter while still preserving crash dumps by instead setting the variable MOZ_CRASHREPORTER_NO_REPORT to 1. The dumps will be saved in your profile directory, in a folder called minidumps.
The first script you need to download if you plan to use duskFox is the Agent/Author Sheet Loader. This loads the special stylesheets userChrome.ag.css and userChrome.au.css, which the theme absolutely relies on.
In the main directory on this repo you might notice two files: userChrome.ag.css and userChrome.au.css. The "ag" is an abbreviation for user agent sheet, and "au" is an abbreviation for author sheet. They're used for rules that would not work if we put them in userChrome.css. But Firefox will not load these stylesheets on its own. These are loaded by the Agent/Author Sheet Loader. The script does the same general thing as two of the files included with fx-autoconfig, but if you want the stylesheets to work in the devtools, (e.g. for context menus) you need the script from my repo. And since you don't want to load duplicate stylesheets, delete the scripts included in fx-autoconfig's JS folder.
These agent/author sheets handle some of the most common and problematic elements like tooltips, scrollbars, etc. The main purposes for using special stylesheets are 1) to use CSS syntax that is forbidden to user sheets, such as the ::part(...) pseudo-element; 2) to style native-anonymous content like default tooltips or scrollbars; or 3) to override the vanilla style rules without needing to use the !important tag. In particular, we can use the author sheet to make (or revert) general rules without affecting more specific rules in the built-in stylesheets, or being forced to deal with a bunch of style conflicts and cascading confusion.
⚠️ Other themes/loaders, including older versions of this theme, may use the file suffix .as.css for the agent sheet, instead of .ag.css. I've switched to "ag" for the sake of consistency with fx-autoconfig. If you have a userChrome.as.css file left over from something, you can just delete it and replace it with userChrome.ag.css. The agent sheet loader will ignore .as.css files.
There's another script called Browser Toolbox Stylesheet Loader which is necessary if you want the theme to apply to elements in browser toolbox windows. My theme mainly uses this to make all context menus and scrollbars in the devtools consistent with the context menus and scrollbars in the main chrome window. It doesn't load a special stylesheet like the other module, it just loads userChrome and userContent.css into the devtools.
But by itself it doesn't do anything. It only works in conjunction with modifications I made to fx-autoconfig. I won't upload the modified script loader since it's not my original work, but you can either 1) follow the instructions below to modify it yourself; or 2) just copy all the contents of your chrome folder into {your profile folder}/chrome_debugger_profile/chrome/.
The problem with copying everything to chrome_debugger_profile is that you may need to reset the debugger profile from time to time. That's why I worked out a method for dynamically loading the main profile's scripts and stylesheets into toolbox processes without modifying the debugger profile.
config.js from your Firefox installation folder, in a text editor.let cmanifest) add some new lines and paste this:function traverseToMainProfile(str) {
let dir = Cc["@mozilla.org/file/directory_service;1"]
.getService(Ci.nsIProperties)
.get(str, Ci.nsIFile);
if (!dir.exists()) {
let toAddChrome = false;
while (dir.target.includes("chrome_debugger_profile")) {
dir = dir.parent;
toAddChrome = true;
}
if (toAddChrome) dir.append("chrome");
}
return dir;
}
let cmanifest) with this:let cmanifest = traverseToMainProfile("UChrm");
config.js and exit.chrome folder, and open fs.sys.mjs from the utils folder.class FileSystem{) and hit enter to make a new line, so you should now be at line 2.static traverseToMainProfile(str) {
let dir = Services.dirsvc.get(str, Ci.nsIFile);
if (!dir.exists()) {
let toAddChrome = false;
while (dir.target.includes("chrome_debugger_profile")) {
dir = dir.parent;
toAddChrome = true;
}
if (toAddChrome) dir.append("chrome");
}
return dir;
}
Services.dirsvc.get('UChrm',Ci.nsIFile) with this: this.traverseToMainProfile('UChrm')fs.sys.mjs and exit.chrome_debugger_profile folder. Make sure you download the Browser Toolbox Stylesheet Loader so stylesheets will be loaded too.Having done this, make sure your chrome_debugger_profile folders do not have chrome folders within them, as they will confuse the stylesheet loader. It will think you have special stylesheets for the toolbox and therefore skip loading your main profile stylesheets into the toolbox. If you ever see styles failing to apply in the toolbox, delete your chrome_debugger_profile folder.
Using autoconfig places some constraints on design. We can't always write these scripts in exactly the same style that Firefox components are written, because Firefox scripts are executed in a different way. And the way the scripts are loaded encourages a procedural style. Some might prefer this from the outset for various reasons. I do use a procedural style for the shortest scripts that are least likely to change or be extended. But for the most part you'll notice a more object-oriented style in these scripts, which might seem weird. A lot of scripts have singleton classes, for example.
The main reason I use this style in spite of the subscript loader is because it makes it a lot easier to hook into the scripts from outside. My goal in doing that isn't encapsulation, it's just creating scripts that double as modules or services that other scripts can access and modify without re-instantiating them, that can be modified or debugged from the browser console. This is why they often define a script's class instance on a property of the global object, even though everything in the script references it with this.
Another reason is because, at least in my opinion, the bulk of Firefox's JavaScript component code is object-oriented, not necessarily by choice but because of other constraints on component code. For example, JSActors must use classes, by design. And custom element definitions always use classes or function factories because custom elements are object-oriented by definition.
Another goal is to make every script as "standalone" and "portable" as possible. So my intention is that each script is a single file and requires nothing else except Firefox and fx-autoconfig, the script loader. Some of the scripts are written primarily to extend duskFox (the CSS theme) so those scripts will obviously require the theme as well. But to get one of the scripts below to work, you shouldn't need to download a heap of dependencies.
Some of the scripts, like Restore pre-Proton Star Button, come in two versions — a duskFox version and a standalone version. The difference is simply whether the script includes the necessary CSS. duskFox already includes all the CSS for those scripts, because it's easier to read in stylesheet form. So if you want to modify it, you can. But we don't want to load a bunch of redundant CSS, so I made versions of these scripts that simply have the CSS removed. That means these versions are not standalone, but they're only intended for those who are using or plan to use duskFox.
Every script is either localized or localizable. That means that some scripts will use Firefox's built-in localization systems to retrieve strings (text) from language packages. In other words, buttons, labels, tooltips, and menus added by these scripts will be automatically translated into other languages. However, Firefox only has so many translations. Sometimes I can take advantage of phrases that already exist in Firefox, but in other cases the phrases I need to use are totally novel and have no corollaries in Firefox. In those cases (see this script for example), there will be an object near the top of the script labeled config or l10n where the strings are defined. So if your Firefox installation is in a language other than English, you can translate the phrases yourself and replace them there.
Initially, I tried to make these scripts compatible with as many script loaders as possible. But it dawned on me that I couldn't do that with certain scripts, and maybe shouldn't try at all. So I only design these scripts with fx-autoconfig in mind. That doesn't mean that none of them are compatible with other script loaders, but it does mean I don't know which ones are or are not, since I only test with fx-autoconfig.
For linting/formatting, I use ESLint, Prettier, and Mozilla's ESLint plugin. All of those can be installed by running npm install --save-dev in the repo's root directory.
(Click a script's name to download it)
✨ means you definitely want to download the script if you use my theme
A manager for your userscripts. This allows you to automatically update scripts that include an updateURL or downloadURL field in their script metadata. Requires the content in resources/aboutuserchrome to function. Visit about:userchrome to get started.
Registers the old-school about:config page to the URL about:cfg. Intended for use with earthlng's aboutconfig module.
That module restores the old pre-87 about:config page, but gives it a long-winded URL like chrome://userchromejs/content/aboutconfig/config.xhtml which takes a lot longer to type in and doesn't look very elegant. This script finds the URL for that module and registers it to an about: URL so it counts as a chrome UI page. We're not just faking it, this makes it a bona-fide about: page. That means you can navigate to it by just typing about:cfg in the urlbar, and also means the identity icon will show it as a secure system page rather than a local file. It even means about:cfg will show up on the about:about page! For instructions on installing earthlng's aboutconfig module for fx-autoconfig, please see the next script description below.
There's a config setting in the script if you want to change the "cfg" in about:cfg to something else. If you change the address setting to "config" this script will entirely replace about:config with the old layout. This script has only been tested with fx-autoconfig, but it may work with xiaoxiaoflood's loader. I don't think it will work with Alice0775's loader but I haven't tested it. This is fully compatible with App Menu about:config Button. (the next script down) That button will automatically navigate to about:cfg if this script is installed. I recommend editing the config.xhtml file in earthlng's module to remove line 13: title="about:config". This line sets the tab's title to about:config, which isn't necessary or desirable since we're fundamentally changing the URL to about:cfg. Without the title attribute, Firefox will automatically set the title to the tab's URL, which (with this script) is about:cfg. Another minor improvement is to add this to line 20, after the <window> element: <html:link rel="icon" href="chrome://global/skin/icons/settings.svg"/>. This will add a settings favicon to the tab instead of the default globe favicon (or empty favicon, if you don't use duskFox).
Adds an about:config shortcut button to the main app menu panel, under the built-in Settings button. It can open the built-in about:config page, or it can open the old-school about:config page with earthlng's aboutconfig module.
download ONLY the profile/chrome/utils/aboutconfig folder and place it inside your profile/chrome/resources folder. Then open config.xhtml and find & replace "userchromejs" with "userchrome" and save. Now chrome://userchrome/content/aboutconfig/config.xhtml should be the correct URL, and the script will find it there. If it's not present there or at chrome://userchromejs/content/aboutconfig/config.xhtml (the default if you only use earthlng's module without fx-autoconfig) or chrome://userchromejs/content/aboutconfig/aboutconfig.xhtml, (the default for xiaoxiaoflood's version) then the script will use the vanilla "about:config" URL instead.
If you can't get the module to work or if you just prefer Firefox's built-in page, you can change the constant on line 12 of my script to "about:config" and it'll open to the same page you'd get if you typed about:config in the address bar. If you do use earthlng's module and the script just can't find the URL because you have an unorthodox setup or something, you can type the exact URL there to fix it. Make sure the URL is within the quotes. FYI I added an icon for this button (and for all the other main app menu buttons too) in uc-app-menu.css
Makes some minor modifications to the app menu, aka the hamburger menu. It adds a restart button to the app menu. Right-clicking the button or holding Shift or Ctrl/Cmd while left-clicking it will also clear the startup cache while restarting. Additionally, it adds a separator under the "Manage Account" button in the profile/account panel. I'll continue adding more mods to this script as I think of them.
This script adds several new features to the "all tabs menu" to help it catch up to the functionality of the regular tabs bar. This is deprecated as of Fx 137, since most of the features have been implemented in Firefox now.

pending="true" which you can use to dim them. This way you know which tabs are already initialized and which will actually start up when you click them. Pretty useful if you frequently have 100+ tabs like me.
.tabbrowser-tab .tab-content{opacity:.6;}userChrome.tabs.all-tabs-menu.reverse-order that lets you reverse the order of the tabs so that newer tabs are displayed on top rather than on bottom.userChrome.ctrlTab.skip-show-all-button that lets you skip past the "List All x Tabs" button when hitting Ctrl+Tab.All the relevant CSS for this script is already included in and loaded by the script. It's designed to look consistent with my theme as well as with the latest vanilla (Proton) Firefox. If you need to change anything, see the "const css" line in here, or the end of uc-tabs-bar.css on my repo.
This script create a vertical tabs pane. It's deprecated, as Firefox has a built-in vertical tabs pane now. It's just provided for those who are remaining on old Firefox versions.

It doesn't hide the tab bar since people have different preferences on how to do that, but it sets an attribute on the root element that you can use to hide the regular tab bar while the vertical pane is open, for example :root[vertical-tabs] #TabsToolbar...
By default, the pane is resizable just like the sidebar is. And like the pane in Edge, you can press a button to collapse it, and it will hide the tab labels and become a thin strip that just shows the tabs' favicons. Hovering the collapsed pane will expand it without moving the browser content. As with the [vertical-tabs] attribute, this "unpinned" state is reflected on the root element, so you can select it like :root[vertical-tabs-unpinned]...
Like the sidebar, the state of the pane is stored between windows and recorded in preferences. There's no need to edit these preferences directly. There are a few other preferences that can be edited in about:config, but they can all be changed on the fly by opening the context menu within the pane. The new tab button and the individual tabs each have their own context menus, but right-clicking anything else will open the pane's context menu, which has options for changing these preferences.
Move Pane to Right/Left will change which side the pane (and by extension, the sidebar) is displayed on, relative to the browser content. Since the pane always mirrors the position of the sidebar, moving the pane to the right will move the sidebar to the left, and vice versa.Reverse Tab Order changes the direction of the pane so that newer tabs are displayed on top rather than on bottom.Expand Pane on Hover/Focus causes the pane to expand on hover when it's collapsed. When you collapse the pane with the unpin button, it collapses to a small width and then temporarily expands if you hover it, after a delay of 100ms. Then when your mouse leaves the pane, it collapses again, after a delay of 100ms.Configure Hover Delay and Configure Hover Out Delay options in the context menu, or in about:config.The pane itself can be turned on or off with a hotkey (Ctrl+Alt+V) or by clicking the toolbar button, which is automatically added to the tab strip and to the top of the pane. As with most toolbar buttons, the toggle button in the navbar can be moved/removed in the "Customize toolbar" menu. The hotkey can be changed by editing the config section in the script.
For languages other than English, the labels and tooltips can be modified directly in the l10n object inside the script file. All the relevant CSS for this script is already included in and loaded by the script. It's designed to look consistent with my theme as well as with the latest vanilla (Proton) Firefox. If you need to change anything, I recommend doing it in userChrome.css, since any rules you add with !important will override this stylesheet's rules. If you don't know where to begin, scroll down to the let css line in the script to see the included stylesheet.
The pane's selector is #vertical-tabs-pane. While it's open, it will have attribute [checked]. While it's unpinned, [unpinned] and while expanded, [expanded]. While it's on the left, it will have [positionstart] just like the built-in sidebar. So you can use those selectors for your own purposes the same way the built-in stylesheet does. Although they're styled a little differently, the individual tab rows are structurally just like the rows in Firefox's built-in all-tabs panel, so if you have custom styling for that panel, you can use it here with minimal changes.
In order to make the scrolling feel just like the built-in tabs bar, I used an arrowscrollbox element as the container. It has generally smooth scrolling irrespective of the pointing device, which is a nice feature for an element you expect to scroll frequently. But this means there isn't a visible scrollbar. I could make a config option in the script that switches from arrowscrollbox to a regular vbox element, which does show its scrollbar. But it would need to be tested extensively just like I did with the arrowscrollbox, so if anyone really wants this, let me know and I'll take it into consideration.
Adds a new toolbar button for devtools features. Probably the single most valuable file on this repo, in my opinion. 1) opens the content toolbox on left click; 2) opens the browser toolbox on right click; 3) toggles "Popup Auto-Hide" on middle click.
Left click will open the toolbox for the active tab, or close it if it's already open. Right click will open the elevated browser toolbox if it's not already open. If it is already open, then instead of trying to start a new process and spawning an irritating dialog, it'll just show a brief notification saying the toolbox is already open. The button also shows a badge while a toolbox window is open. Middle click will toggle the preference for popup auto-hide: ui.popup.disable_autohide. This does the same thing as the "Disable Popup Auto-Hide" option in the menu at the top right of the browser toolbox, prevents popups from closing so you can debug them.
If you want to change which mouse buttons execute which functions, search for userChrome.toolboxButton.mouseConfig in about:config. Change the 0, 1, and 2 values. 0 = left click, 1 = middle, and 2 = right. By default, when you open a browser toolbox window, the script will disable popup auto-hide, and then re-enable it when you close the toolbox. I find that I usually want popup auto-hide disabled when I'm using the toolbox, and never want it disabled when I'm not using the toolbox, so I made it automatic, instead of having to right click and then immediately middle click every time. If you don't like this automatic feature, you can turn it off by setting userChrome.toolboxButton.popupAutohide.toggle-on-toolbox-launch to false in about:config.
You can force the browser toolbox to open in multiprocess mode by holding Shift and Accel (Ctrl/Cmd) when you right click (or whatever mouse button you set browserToolbox to for userChrome.toolboxButton.mouseConfig) the button.
When you middle click, the button will show a notification telling you the current status of popup auto-hide, e.g. "Holding popups open." This is just so that people who use the feature a lot won't lose track of whether it's on or off, and won't need to open a popup and try to close it to test it. The toolbar button also changes appearance while popup auto-hide is disabled. It becomes blue like the downloads button and the icon changes into a popup icon. This change is animated, as long as the user doesn't have reduced motion enabled. All of these notifications use the native confirmation hint custom element, since it looks nice. That's the one that appears when you save a bookmark, #confirmation-hint. So you can customize them with that selector.
Implement smooth scrolling for all bookmarks popups that are tall enough to scroll. Add unique classes to their shadow parts so they can be styled selectively in CSS. Add special click functions to their scroll buttons — hovering a scroll button will scroll at a constant rate, as normal. (though faster than vanilla) But clicking a scroll button will immediately jump to the top/bottom of the list. Combined with uc-bookmarks.css, overhauls the appearance of the scroll buttons.
Adds some shortcuts for bookmarking pages. First, middle-clicking the bookmarks or library toolbar button will bookmark the current tab, or un-bookmark it if it's already bookmarked. Second, a menu item is added to the bookmarks toolbar button's popup, which bookmarks the current tab, or, if the page is already bookmarked, opens the bookmark editor popup. These are added primarily so that bookmarks can be added or removed with a single click, and can still be quickly added even if the bookmark page action is hidden for whatever reason. Third, another menu item is added to replicate the "Search bookmarks" button in the app menu's bookmarks panel. Clicking it will open the urlbar in bookmarks search mode.
⚠️ Currently broken.
Allow the creation of special keyword bookmarks with JavaScript to be executed in the browser chrome (i.e., the main window).
In case you weren't aware, Firefox has an old feature, somewhat obscure now, that lets you define keyword shortcuts for bookmarks. Once a bookmark is given a keyword, you can type the keyword into the urlbar and Firefox will offer the corresponding bookmark as a result. If the bookmark URL includes the placeholder %s, it will be replaced by whatever you typed after the keyword. You can use this to search specific webpages, but you can also use the javascript: URL protocol to run JavaScript in the current tab. That is all built into Firefox.
Normally when you add a JavaScript bookmark like javascript:location.href="https://example.com/search?q=%s" the script will run in the browser window (the tab) that's currently active. With this script, you can make a bookmark like ucjs:console.log("%{searchString}") and it will run in the main chrome window. That means you can basically execute any arbitrary code from the urlbar, with the same level of access as most of the scripts on this repo. As you can see, the placeholder %{searchString} represents the value you typed in the urlbar, just like %s does for normal bookmark keywords. I used a longer, more complex symbol for the placeholder because it's possible you might want to use the string %s in your script for other reasons.
Your bookmark code will have access to four parameters, plus the search string: result, event, element, and browser. You probably won't need any of them except event and maybe browser. If you're going to use gBrowser.selectedBrowser in your bookmark code, always replace it with browser instead. As for event, it just represents the event that triggered the result activation. So if you held down the Alt or Ctrl key as you activated the result, event.ctrlKey or event.altKey will be true, and you can use that in your bookmark to simulate behavior of normal urlbar results (e.g., opening in a new tab when Ctrl or Alt is pressed, opening in a new window when Shift is pressed, etc.). Firefox uses a couple methods to do that, but the one normally used in the urlbar is gURLBar._whereToOpen(event). That will return a value like "tab" or "window" which can be passed to the utility overlay functions like openWebLinkIn.
Beware that you shouldn't be escaping anything with URL encoding, because it isn't really parsed like a URL. However, you can use escape sequences to encode special characters that you would ordinarily need to encode in JavaScript strings, such as \n for new line or \\ for backslash. So be aware of this if you're using backslashes, since they need to be doubled up.
So putting all of this together, you can make a bookmark keyword like this:
ucjs:let where = gURLBar._whereToOpen(event);
openWebLinkIn(
  "https://www.google.com/search?q=site:" + gBrowser.currentURI.host + " %{searchString}",
  where
);
That will allow you to search Google's results for whatever website you're currently on. This is already possible with normal bookmark keywords, but when you use modifier keys to run the search in a new tab/window, it will fail, because it needs information about 1) the current tab, and 2) the new tab. Traditional bookmark keywords don't have that level of access. But that was the inspiration for this script — by executing the bookmark keyword code in the browser chrome, we can access nearly everything the average autoconfig script can access. So this will let you do the same thing but with modifier keys.
That's just a really simple example, but in theory you could paste an entire autoconfig script into a bookmark URL and run it from the urlbar. Also, keep in mind that you don't need to use search strings in your keywords. With traditional keywords, they just didn't show up in the list at all if you typed a search string but your keyword URL didn't have %s in it somewhere. With ucjs: keyword bookmarks, if you want to run some code that doesn't care about what you type, you can just omit the search string placeholder from your code altogether, and it will be ignored.
If you make a bookmark whose URL is just %{searchString} and nothing else, then this module will execute whatever you type in the urlbar as JavaScript. So, if your bookmark's keyword is just keyword, then if you were to type keyword console.log("Hello, world!") in the urlbar and hit enter, it would do exactly that. So you can use this kind of like a mini console if you want. But the normal use (and definitely the safer) is to define the JavaScript in advance in the URL, and just use the search string for actual strings.
There are some configuration settings in the script if you want to format things a bit differently. By the way, I recommend using Bookmarks Menu & Button Shortcuts if you're using bookmark keywords, since it adds the URL and keyword fields directly to the "Add/edit bookmark" panel (the one you access by clicking the star button in the urlbar). Otherwise, you need to go out of your way to add a keyword.
⚠️ Be careful when using this, of course. You always need to take care when using JavaScript bookmarks, and since this new type has access to the browser chrome, it has significantly more powers.
Place a "Clear Downloads" button in the downloads panel, right next to the "Show all downloads" button.
Adds new, optional items to the main context menu.
Search Google for <selected text> menu item with a submenu that includes all of the search engines you have installed. This is significantly faster than copying the selection, opening the urlbar, picking a search mode, pasting the selection, and hitting Enter.Adds a new hotkey (Ctrl+Alt+C by default) that copies whatever is in the urlbar, even when it's not in focus. Key and modifiers are configurable in the script file.
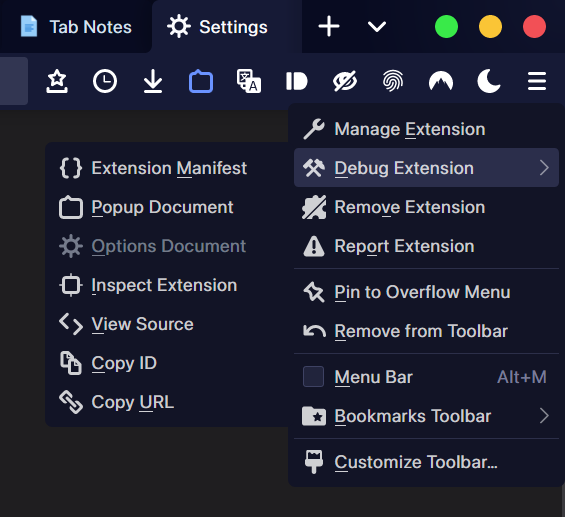
Adds a new context menu for debugging, modding, or styling Firefox extensions. Very handy for Firefox CSS themers and extension designers.
The menu appears any time the "Manage Extension" and "Remove Extension" items are available. The new "Debug Extension" menu contains several items: "Extension Manifest" opens the extension's manifest directly in a new tab. Aside from reading the manifest, from there you can also view the whole contents of the extension within Firefox by removing "/manifest.json" from the URL.
In the "View Documents" submenu there are 4 options for viewing, debugging and modding an addon's main HTML contents. "Browser Action" opens the extension's toolbar button popup URL (if it has one) in a regular browser window. The popup URL is whatever document it displays in its panel view, the popup that opens when you click the addon's toolbar button. This is the one you're most likely to want to modify with CSS.
"Page Action" opens the extension's page action popup URL in the same manner. A page action is an icon on the right side of the urlbar whose behavior is specific to the page in the active tab. "Sidebar Action" opens the extension's sidebar document, so this would let you debug Tree Style Tab for example. "Extension Options" opens the document that the extension uses for configuration, also in a regular browser window. This could be the page that displays in its submenu on about:addons, or a separate page.
"Inspect Extension" opens a devtools tab targeting the extension background. This is the same page you'd get if you opened about:debugging and clicked the "Inspect" button next to an extension. "View Source" opens the addon's .xpi archive. And, as you'd expect, "Copy ID" copies the extension's ID to your clipboard, while "Copy URL" copies the extension's base URL, so it can be used in CSS rules like @-moz-document
This script creates a toolbar button that opens a popup panel where extensions can be configured, disabled, uninstalled, etc.
Each extension gets its own button in the panel. Clicking an extension's button leads to a subview where you can jump to the extension's options, disable or enable the extension, uninstall it, configure automatic updates, disable/enable it in private browsing, view its source code in whatever program is associated with .xpi files, open the extension's homepage, or copy the extension's ID. The panel can also be opened from the App Menu, since the built-in "Add-ons and themes" button is (optionally) modified to open the panel instead of about:addons. Since v1.8, themes will also be listed in the panel. Hovering a theme will show a tooltip with a preview/screenshot of the theme, and clicking the theme will toggle it on or off. The script can be extensively configured by editing the values in static config on line 11.

✨ This script is required if you want my "dark mode" themes for various addons like uBlock Origin, Dark Reader, etc. It allows loading CSS rules in addon documents based on ID (which is static), rather than by addon URL (which is random).
Normally if you want to style an addon's docs with userContent.css, you need to use @-moz-document url("moz-extension://c1ea5f85-7682-4d41-86cf-4946657a712e/popup.html") to avoid styling unintended documents. But this isn't ideal since that URL is generated randomly when you install the addon. It's unique for every installation for every user. So if you have been using duskFox, you've been downloading my extension stylesheets even though they don't work on your installation. Well, no longer!
Now we can style an addon like this: :root[uc-extension-id="uBlock0@raymondhill.net"] body {...} and the stylesheet will work for everyone who has uBlock Origin, out of the box. That means when you use duskFox you'll get all my addon content themes too. And it also means you can use this method in your own custom-content.css file. You just need to find the extension's ID, either via my Debug Extension in Toolbar Context Menu script or by locating the extension in about:debugging#/runtime/this-firefox.
For other Firefox modders and theme developers, you can use this script to distribute your addon content themes and ensure they work on your users' installations. It will work in all places where addons can display their content, namely popups and sidebars. Just direct your users to download fx-autoconfig and this script, and then, instead of using @-moz-document, use :root[uc-extension-id="example@author"]. See one of my addon stylesheets for example.
Adds a toolbar button that implements the color picker without launching the devtools or opening any popups. That is, you can click the button and then immediately click anywhere inside the content window to copy the color of that pixel to your clipboard. Similar to the menu item in the "More Tools" and "Tools > Browser Tools" menus, only this one can be placed directly on your toolbar. The script also adds a customizable hotkey that does the same thing — by default, it's Ctrl+Shift+Y. (or Cmd+Shift+Y on macOS) The color format is determined by devtools.defaultColorUnit. For example, changing this preference to "hsl" will give you results like hsl(25, 75%, 50%).
Add a new button to Firefox's PDF.js viewer toolbar. It inverts the PDF colors to provide a dark mode.
✨ This script adds several improvements and modifications for the findbar, and (optionally) makes it much more horizontally compact and concise by removing wasted space and unnecessary words.

Make a custom context menu for the findbar that lets you permanently configure findbar-related settings. You can set Highlight All and Whole Words just like you can with the built-in checkboxes, but this context menu also lets you choose any setting for the Match Case and Match Diacritics options.
The built-in checkboxes for these settings only let you choose between states 1 and 0, true and false. There's actually a third state that enables a more useful and intuitive mode. Read the notes in the l10n section inside the script for more info on how this setting works.
Additionally, most of Firefox's built-in findbar checkboxes are only temporary. They only apply to the current browser/tab. This can be useful, but since a context menu requires more intention to reach, its actions should be more permanent. Instead of just setting the browser state, the context menu sets the user preferences just like you could in about:config.
Set up a hotkey system that allows you to close the findbar by pressing Escape or Ctrl+F while the findbar is focused. Normally, Ctrl+F only opens the findbar. With this script, Ctrl+F acts more like a toggle.
As normal, when the findbar is closed, Ctrl+F will open it. When the findbar is open but not focused, Ctrl+F will focus it and select all text in the input box. From there, pressing Ctrl+F once more will close it. If you're in 'find as you type' mode, Ctrl+F switches to regular find mode.
(Optional) Miniaturize the findbar matches label and the Match Case and Whole Words buttons. Instead of "1 of 500 matches" this one says "1/500" and floats inside the input box. Remove the checkbox labels and replace the checkboxes with recognizable icons. Together this makes the findbar drastically more compact.
This feature is enabled by default by the usingDuskfox setting in the script. It's mainly intended for people who use CSS themes that make the findbar much more compact, like my theme duskFox. If you don't use one of these themes already, you can grab the relevant code from uc-findbar.css on my repo, or if you like having a big findbar, you can just set usingDuskfox to false in the script.
For those interested in customizing this with CSS, the mini matches indicator can be styled with the selector .matches-indicator. It's the next sibling of the findbar input box. See uc-findbar.css in this repo for how I styled it. Specific methods used are documented in more detail in the script's code comments.
✨ This script is important if you use my theme or if you customize Firefox's tooltips on your own. Without it, the titlebar buttons' tooltips can't be styled.
Since bug 1730309, Firefox has tried to make the titlebar buttons (window controls) function more like native controls. In doing so, it allows the OS to draw tooltips for these buttons. So it prevents itself from showing redundant tooltips. That means we can't style the titlebar buttons' tooltips, they don't obey preferences, they disappear after 5 seconds on Windows, and they don't appear at all in fullscreen mode. Personally I would not be a fan of this change even if I didn't heavily customize Firefox's tooltips, because no matter what, OS tooltips are not going to be consistent with Firefox's tooltips, for reasons I mentioned. But in any case, we can fix this issue with JavaScript. If you were curious, it's caused by the titlebar-btn attribute.
✨ uc-sidebar.css makes the sidebar float over the content without flexing it, but that changes the way sidebar resizing works. This script is required to make the floating sidebar resizable.
It also optionally improves the hotkeys a little bit so that Ctrl+B (or Cmd+B) toggles the sidebar on/off instead of exclusively opening the bookmarks sidebar. Instead the hotkey to jump to the bookmarks sidebar has been remapped to Ctrl+Shift+B. This key combination normally toggles the bookmarks toolbar on and off, but I figured it was worth replacing, since you probably either never use the bookmarks toolbar, or keep it open it all the time. Whereas the sidebar is something you're going to want to turn off when you're done using it, since it takes up a lot of space.
Adds a pretty visual effect to tabs similar to the spotlight gradient effect on Windows 10's start menu tiles. When hovering a tab, a subtle radial gradient is applied under the mouse. Also applies to tabs in the "All tabs menu," and is fully compatible with my All Tabs Menu Expansion Pack. User configuration is towards the top of the script. Inspired by this proof of concept, and built on a modified version of this library.
Adds the same Windows 10-style effect to navbar buttons. When hovering over or near a button, a subtle radial gradient is applied to every button in the vicinity the mouse. This is compatible with Fluent Reveal Tabs so you can use both if you want. The navbar button version has more of a performance hit. I wouldn't recommend using it on weaker hardware if your setup is already pretty heavy with scripts, CSS animations/transitions, or other stateful modifications.
All this does is remap the fullscreen shortcut key from F11 to Ctrl+E, since I use F11 for other purposes.
✨ Hides the navbar in fullscreen with a smooth animation, and reveals it when the navbar is hovered or focused or when context menus, panels, etc. are opened from the navbar.
In Firefox, the navbar hides automatically in fullscreen. But it doesn't have a very smooth animation, and it doesn't handle all possible cases where you'd want the navbar to stay open. This script sets up its own logic to allow CSS transitions to cover the animation. You can use this for any toolbar, whether in fullscreen or not. duskFox just uses it for the navbar while in fullscreen, but your CSS can use it under any circumstances with popup-status="true". That is, you can use this to hide an element and reveal it when menus or panels are opened from the navbar. The CSS transitions are in uc-fullscreen.css but you can also do your own thing with this script by using selectors like box[popup-status="true"] > #navigator-toolbox > whatever
Without this script, there isn't any good way to pass information to findbars or sidebars about whether the navbar is hovered/focused or popups are open. For the floating findbar and sidebar to work seamlessly, they need to be aware of information like that so they can move up and down in fullscreen when the navbar is hidden/shown. But they're not in the same ancestral chain as the navbar or the popups' anchors, so that information needs to be added to some high-level element with a script, like #navigator-toolbox-background. By doing that, we can style almost anything in the chrome document according to [popup-status] and [urlbar-status].
✨ Hide the url bar's tracking protection icon on the new tab page, even if they are custom pages added by extensions. This is strongly recommended if you use my CSS theme.
By default, Firefox hides the tracking protection while 1) the current tab is open to the default new tab page; or 2) the user is typing into the url bar. Hiding the icon while the user is typing is unnecessary, since although pageproxystate has changed, the content principal is still the same and clicking the tracking protection icon to open the popup still works. Opening the popup while pageproxystate is invalid still loads the tracking details and options for the current content URI. But hiding the icon on the new tab page is necessary, because the tracking protection icon is hidden on about:blank.
If you use an extension to set a custom new tab page, you will see the tracking protection icon briefly disappear when opening a new tab, before reappearing as the custom new tab page loads. That is because about:blank loads before the custom new tab page loads. So the icon is hidden and unhidden in the span of a hundred milliseconds or so. This looks very ugly, so my stylesheet has always prevented the tracking protection icon from being hidden on any page, including about:blank. That way at least it doesn't disappear. But this isn't a great solution, because there are a number of pages for which the tracking protection icon does nothing. The protection handler can't handle internal pages, for example.
Previously I just disabled pointer events on the icon when it was supposed to be hidden. But I think this script is a better solution. If this script is not installed, my theme will default to those older methods I just mentioned. But if the script is installed, it will restore the built-in behavior of hiding the tracking protection icon on internal pages, only it will also hide the icon on the user's custom new tab page. The icon will still be visible if you're on a valid webpage, (web or extension content, not local or system content) even if you begin typing in the urlbar.
Allows you to refresh pages by hitting Enter in the urlbar, even if there's a hash mark # in the URL.
Due to Firefox's named anchor navigation system, you can't always refresh a page by clicking the urlbar and hitting Enter. If there's a hash mark # in the URL, Firefox interprets this as a URL fragment and tries to navigate between anchors within the document, by setting the scroll position and not reloading the document. This works great when clicking links on pages that link to other parts of the page, and when typing new fragments after the hash in the URL.
But what if you just want to reload the page? If there is no hash, then hitting Enter will always reload the page. But if there is a hash, hitting Enter will not reload the page, even though the current URL is the same as the typed URL. Bug 1766145 may resolve that problem, but in the meantime, this script will work.
With this installed, hitting Enter in the urlbar when the typed value is the same as the current browser's URL will cause a page reload. If you change the value in the urlbar at all, this won't have any effect. It only comes into play when the URL values are 100% identical. This just ensures that if you click into the urlbar and hit Enter, without doing anything else, it will always work the same — whether there's a hash in the URL or not.
The name should say it all — this just removes the "feature" that prevents you from closing pinned tabs with the Ctrl+W/Cmd+W shortcut.
I can't think of any good reason for this, it's not like your hand is likely to slip and hit Ctrl+W by accident. And freeing up the key combination isn't helpful, since every web and extension developer knows the key combination is already taken by every major browser. Blocking the hotkey on pinned tabs just wastes a prime key combination, as well as the user's time.
✨ My masterpiece, wrap all toolbar buttons after #urlbar-container in a scrollable div. It can scroll horizontally through the buttons by scrolling up/down with a mousewheel, like the tab bar. This is meant to replace the widget overflow button that appears to the right of your other toolbar buttons when you have too many to display all at once. Instead of clicking to open a dropdown that has the rest of your toolbar buttons, you can just place all of them in a little horizontal scrollbox. Better yet, you can scroll through them with mousewheel up/down, just like the tab bar. This and the toolbox button have been the most valuable for me personally.
This script has several options which can be modified in about:config. By default, it wraps all toolbar buttons that come after the urlbar. (to the right of the urlbar, normally) You can edit userChrome.toolbarSlider.wrapButtonsRelativeToUrlbar in about:config to change this: the default value is after; a value of before will wrap all buttons to the left of the urlbar; and a value of all will wrap all buttons.
You can change userChrome.toolbarSlider.width to make the container wider or smaller. If you choose 12, it'll be 12 buttons long. Of course, this number needs to be smaller than the number of buttons in the container if you want it to scroll.
When the window gets really small, the slider disappears and the toolbar buttons are placed into the normal widget overflow panel. You can disable the overflow panel entirely by setting userChrome.toolbarSlider.collapseSliderOnOverflow to false.
You can specify more buttons to exclude from the slider by adding their IDs (in quotes, separated by commas) to userChrome.toolbarSlider.excludeButtons in about:config. For example you might type ["bookmarks-menu-button", "downloads-button"] if you want those to stay outside of the slider.
You can also decide whether to exclude flexible space springs from the slider by toggling userChrome.toolbarSlider.excludeFlexibleSpace in about:config. By default, springs are excluded.
There is no visible scrollbar in the slider, since it would look pretty awkward with default scrollbar styles. Like the tab strip, you can scroll it with a mousewheel or trackpad.
✨ Restore old behavior for one-off search engine buttons. It used to be that, if you entered a search term in the url bar, clicking a search engine button would immediately execute a search with that engine. This was changed in an update so that clicking the buttons only changes the "active" engine — you still have to press enter to actually execute the search. You also used to be able to advance through your one-off search engine buttons by pressing left/right arrow keys. Until 2021 these functions could be overridden with a preference in about:config, but those settings were removed. This script restores the old functionality.
If you want to restore the one-click functionality but don't want the horizontal key navigation, go to about:config and toggle this custom setting to false: userChrome.urlbar.oneOffs.keyNavigation. The script also hides the one-off search settings button, but this can be turned off in about:config with userChrome.urlbar.oneOffs.hideSettingsButton.
This script also has some conditional functions to work together with Scrolling Search One-offs. They don't require each other at all, but they heavily improve each other both functionally and visually. Changing search engines with the arrow keys will scroll the one-offs container to keep the selected one-off button in view. And exiting the query in any way will automatically scroll back to the beginning of the one-offs container, so that it's reset for the next time you use it. The integration between the two is in the form of several subtle little quality-of-life features like that, so it's easier to just test them out together than to explain it all in words.
In vanilla Firefox, browser.tabs.loadBookmarksInTabs only affects bookmark items. When you enable this pref and left-click a bookmark (e.g., in the bookmarks toolbar or menu) it opens in a new tab instead of in the current tab. But if you left-click a history entry or a synced tab, it will still open in the current tab. So you'd have to middle click or ctrl+click to avoid losing your current tab's navigation state. This script just makes that preference apply to history and synced tabs too. It works in every place in the UI (that I'm aware of) from which bookmarks, history or synced tabs can be opened. If you find something this doesn't apply to, please post an issue. This script only changes the behavior of browser.tabs.loadBookmarksInTabs — you still need to set this pref to true if you want to see any effect.
Adds a new menu to context menus prompted by right-clicking bookmarks, history entries, etc. that allows you to open them in a container tab. This menu has now been added to Firefox, but as of v105, it only applies to single bookmarks/tabs. With the script installed, it will also appear when right-clicking a folder or a synced device.
The menu will be present in all context menus where you'd be able to open a bookmark, history entry, or synced tab, including menus, popups, panels, and even the Library/Bookmarks Manager window. However, for synced tabs, it will only be present in the sidebar, not in the profile panel, because the profile panel lacks a context menu.
Update: Firefox has implemented a similar menu for bookmarks and history items. It doesn't yet support opening all bookmarks or tabs in a folder. So for the moment, this script still has some purpose. It's been updated to avoid making a redundant menu, so if you see 2 identical menus, update your script with the version on this repo.
If you use both this script and Firefox Multi-Account Containers, turn off the redundant extension menus in about:addons > Firefox Multi-Account Containers > Options > "Enable Bookmark Menus"
Add a new context menu item that can open links in tabs without loading them.
The item will appear in all context menus that are prompted by right-clicking on links or other link-like affordances. The menu item will open the link in a new background tab, which will start unloaded or "discarded." Specifically, the context menu entry appears in the content area context menu when right-clicking a link; and in every context menu where bookmarks, history, or synced tabs can be interacted with — sidebar, menubar, toolbar, toolbar button popup, and library window.
This has one user configuration preference: userChrome.openLinkInUnloadedTab.use_link_text_as_tab_title_when_unknown. This determines what the tab's title will be when you open an unloaded tab from a link that you've never visited before. Without loading the page, Firefox has no idea what to call the tab. The script will try to find a title from your bookmarks and history, but if it's not present in either, it will simply use the URL for the title. But if this preference is set to true, instead of using the link URL for the title, it will use the link text.
Adds buttons and menu items allowing you to open a "private tab" in nearly any circumstance in which you'd be able to open a normal tab. Instead of opening a link in a private window, you can open it in a private tab.
This started as an fx-autoconfig port of Private Tab by xiaoxiaoflood. This will use a special container and prevent history storage, depending on user configuration. You can also toggle tabs back and forth between private and normal mode. This script adds two hotkeys: Ctrl+Alt+P to open a new private tab, and Ctrl+Alt+T to toggle private mode for the active tab. These hotkeys can be configured along with several other options at the top of the script file.
By default, private windows are opened to about:privatebrowsing, regardless of your homepage or new tab page preferences. This script simply removes part of a built-in function that manually sets the URL to about:privatebrowsing. So with this script installed, private windows will behave like ordinary windows in this (and only this) respect. They will still be private windows in every other way, they just won't open to a separate home page.
✨ Depending on your settings you might have noticed that typing a search engine alias (e.g. "goo" for Google) causes some special formatting to be applied to the text you input in the url bar. This is a trainwreck because the formatting is applied using the selection controller, not via CSS, meaning you can't change it in your stylesheets. It's blue by default, and certainly doesn't match duskFox very well. This script just prevents the formatting from ever happening at all.
✨ Proton removes the tab sound button and (imo) makes the tab sound tooltip look silly. This restores both, but requires some extra steps and CSS.
If you want to use my sound icon styles, see uc-tabs.css. This script requires that you either:
<your profile>/chrome/resources/script-override/ and edit the manifest file that comes with fx-autoconfig to add the following line (at the bottom):override chrome://browser/content/tabbrowser-tab.js ../resources/tabMods.uc.js
For those who are curious, this will override the tab markup template and some methods relevant to the sound & overlay icons. We can't use a normal script to do this because, by the time a script can change anything, browser.xhtml has already loaded tabbrowser-tab.js, the tab custom element has already been defined, and tabs have already been created with the wrong markup. This wasn't required in the past because .tab-icon-sound wasn't fully removed, just hidden. But as of June 06, 2021, the sound button is entirely gone in vanilla Firefox 91. So tabMods.uc.js restores the markup and class methods; restoreTabSoundButton.uc.js restores and improves the tooltip; and uc-tabs.css rebuilds the visual appearance.
.tab-icon-sound {
  margin-inline-start: -16px;
  width: 16px;
  height: 16px;
  padding: 0;
  -moz-context-properties: fill;
  fill: currentColor;
  border-radius: var(--tab-button-border-radius, 2px);
  list-style-image: none;
  background-repeat: no-repeat;
}
.tab-icon-sound[soundplaying],
.tab-icon-sound[pictureinpicture][soundplaying]:hover {
  background-image: url('data:image/svg+xml;utf8,<svg xmlns="http://www.w3.org/2000/svg" width="18px" height="18px" viewBox="0 0 18 18"><path fill="context-fill" d="M3.52,5.367c-1.332,0-2.422,1.09-2.422,2.422v2.422c0,1.332,1.09,2.422,2.422,2.422h1.516l4.102,3.633 V1.735L5.035,5.367H3.52z M12.059,9c0-0.727-0.484-1.211-1.211-1.211v2.422C11.574,10.211,12.059,9.727,12.059,9z M14.48,9 c0-1.695-1.211-3.148-2.785-3.512l-0.363,1.09C12.422,6.82,13.27,7.789,13.27,9c0,1.211-0.848,2.18-1.938,2.422l0.484,1.09 C13.27,12.148,14.48,10.695,14.48,9z M12.543,3.188l-0.484,1.09C14.238,4.883,15.691,6.82,15.691,9c0,2.18-1.453,4.117-3.512,4.601 l0.484,1.09c2.422-0.605,4.238-2.906,4.238-5.691C16.902,6.215,15.086,3.914,12.543,3.188z"/></svg>');
  background-size: 12px;
  background-position: center;
  margin-inline-start: 1px;
}
.tab-icon-sound[muted],
.tab-icon-sound[pictureinpicture][muted]:hover {
background-image: url('data:image/svg+xml;utf8,<svg xmlns="http://www.w3.org/2000/svg" width="18px" height="18px" viewBox="0 0 18 18"><path fill="context-fill" d="M3.52,5.367c-1.332,0-2.422,1.09-2.422,2.422v2.422c0,1.332,1.09,2.422,2.422,2.422h1.516l4.102,3.633V1.735L5.035,5.367H3.52z"/&more like this
meine 🌒 - A CLI file manager and system utility built with Textual. It combines intuitive command parsing with rich t…
A Light theme for both KDE and GTK based distros, pleasant to the eyes and perfect for your daily workload.
search projects, people, and tags