handpose-facemesh-demos
🎥🤟 8 minimalistic templates for tfjs mediapipe handpose and facemesh
JavaScript★ 192
Code for "DeepDRR: A Catalyst for Machine Learning in Fluoroscopy-guided Procedures". https://arxiv.org/abs/1803.08606
 arcadelab
git clone https://github.com/arcadelab/deepdrr.gitarcadelab/deepdrrDeepDRR is a GPU-based framework for efficient simulation of X-ray images—or digitally reconstructed radiographs (DRRs)—from 3D CT images and meshes. It is intended for large-scale generation of synthetic X-ray datasets for training machine learning models.
DeepDRR has been used for a variety of applications, including:
If you have other appplications that could be highlighted here, please let us know!
DeepDRR is not a differentiable renderer, but it is fast and realistic, supporting multiple overlapping volumes and meshes with different materials. For a differentiable DRR framework, we recommend ProST or DiffDRR, which follow the same physics-based simulation principles as DeepDRR.
The following example loads a CT volume from a NifTi .nii.gz file and simulates a single X-ray projection:
from deepdrr import Volume, SimpleDevice, Projector
import killeengeo as kg

device = SimpleDevice()
ct = Volume.from_nifti('/path/to/ct_image.nii.gz')

with Projector(ct, device=device) as projector:
    device.set_view(
        point=ct.center_in_world,
        direction=ct.world_from_anatomical @ kg.vector(0, 1, 0),
        up=ct.world_from_anatomical @ kg.vector(0, 0, 1),
        source_to_point_fraction=0.5,
    )

    image = projector()
A more involved example that samples many projections from a CT volume and a tool mesh is below:
from deepdrr import Volume, SimpleDevice, Projector, Mesh
import killeengeo as kg
from PIL import Image

device = SimpleDevice(
    sensor_height=384,
    sensor_width=384,
    pixel_size=0.3, # pixel size in mm
    source_to_detector_distance=1000, # distance from source to detector in mm
)
ct = Volume.from_nifti('/path/to/ct_image.nii.gz')

# Load a tool mesh from an STL file, with homogeneous titanium material, called "tool"
tool = Mesh.from_stl("/path/to/tool_mesh.stl", material="titanium", tag="tool")

# Create a projector that combines the CT volume and the tool mesh
projector = Projector(
    [ct, tool],
    device=device,
    neglog=False, # do not apply negative log transform
)

right = ct.world_from_anatomical @ kg.vector(1, 0, 0) # right direction in world coordinates
anterior = ct.world_from_anatomical @ kg.vector(0, 1, 0) # anterior direction in world coordinates
superior = ct.world_from_anatomical @ kg.vector(0, 0, 1) # superior direction in world coordinates

# Initialize the projector (allocates GPU memory, takes the most time)
projector.initialize()

for i in range(100):
    # Sample a point in world coordinates uniformly *in* a sphere
    point = kg.random.uniform(
        center=ct.center_in_world,
        radius=100, # 100 mm radius around the CT center
    )

    # Sample a direction in world coordinates within a cone around the anterior
    direction = kg.random.spherical_uniform(
        center=anterior,
        d_phi=np.pi / 6, # 30 degrees around the anterior direction
    )

    # Sample how far the source is from the patient
    source_to_point_fraction = np.random.uniform(0.5, 0.9) # Depends on application

    # Randomly sample a pose for the C-arm
    device.set_view(
        point=point,
        direction=direction,
        up=superior,
        source_to_point_fraction=source_to_point_fraction
    )

    # Place the tool in the center of the CT volume (or any other position)
    tool.place_center(ct.center_in_world)

    # Generate the X-ray image, (float32, not normalized)
    image = projector()

    # Save out the image as a float32 numpy array, with no normalization
    Image.fromarray(image).save(f"path/to/output/{i:04d}.tiff")

    # Get the segmentation of the tool in the image
    seg = projector.project_seg(tags=["tool"]) # [H, W, 1] array with 1 for tool pixels, 0 otherwise

    # Save the segmentation as a binary image
    Image.fromarray(seg.squeeze().astype(np.uint8) * 255).save(f"path/to/output/{i:04d}_seg.png")

projector.free()
The script example_projector.py gives an alternative example. Additional tutorials are in progress at deepdrr.readthedocs.io. Contributions are welcome.
Because DeepDRR is a complex package with many dependencies, we recommend installing it from source using mamba or conda. It requires a linux machine with an NVIDIA GPU and CUDA support.
sudo ubuntu-drivers install --gpgpu nvidia:535-servergit clone https://github.com/arcadelab/deepdrr.git cd deepdrr sudo ./scripts/setup_ubuntu.sh # installs apt dependencies and sets up the EGL driver conda env create -f environment.yml # installs CUDA 12 and pytorch conda activate deepdrr pip install .[cuda11x] # this should match your CUDA version, see installation notes below
DeepDRR depends on cupy which needs a version compiled for your CUDA version.
When installing DeepDRR, you can specify the CUDA version you want to use by appending the appropriate option to the pip install command:
pip install .[cuda102] # for CUDA 10.2
pip install .[cuda110] # for CUDA 11.0
pip install .[cuda111] # for CUDA 11.1
pip install .[cuda11x] # for CUDA 11.2 - 11.8
pip install .[cuda12x] # for CUDA 12.x
See https://docs.cupy.dev/en/stable/install.html for more information.
Installing from the dev branch is risky, as it is unstable.
git clone https://github.com/arcadelab/deepdrr.git
cd deepdrr
git checkout dev
sudo ./scripts/setup_ubuntu.sh
conda env create -f environment.yml
conda activate deepdrr
pip install -e .[dev,cuda12x] # this should match your CUDA version
Documentation is in progress at deepdrr.readthedocs.io.
To create the autodocs, run
sphinx-apidoc -f -o docs/source deepdrr
in the base directory. Then do cd docs and make html to build the static site locally.
Contributions for bug fixes, enhancements, and other suggestions are welcome. Please make a pull request.
DeepDRR combines machine learning models for material decomposition and scatter estimation in 3D and 2D, respectively, with analytic models for projection, attenuation, and noise injection to achieve the required performance. The pipeline is illustrated below.
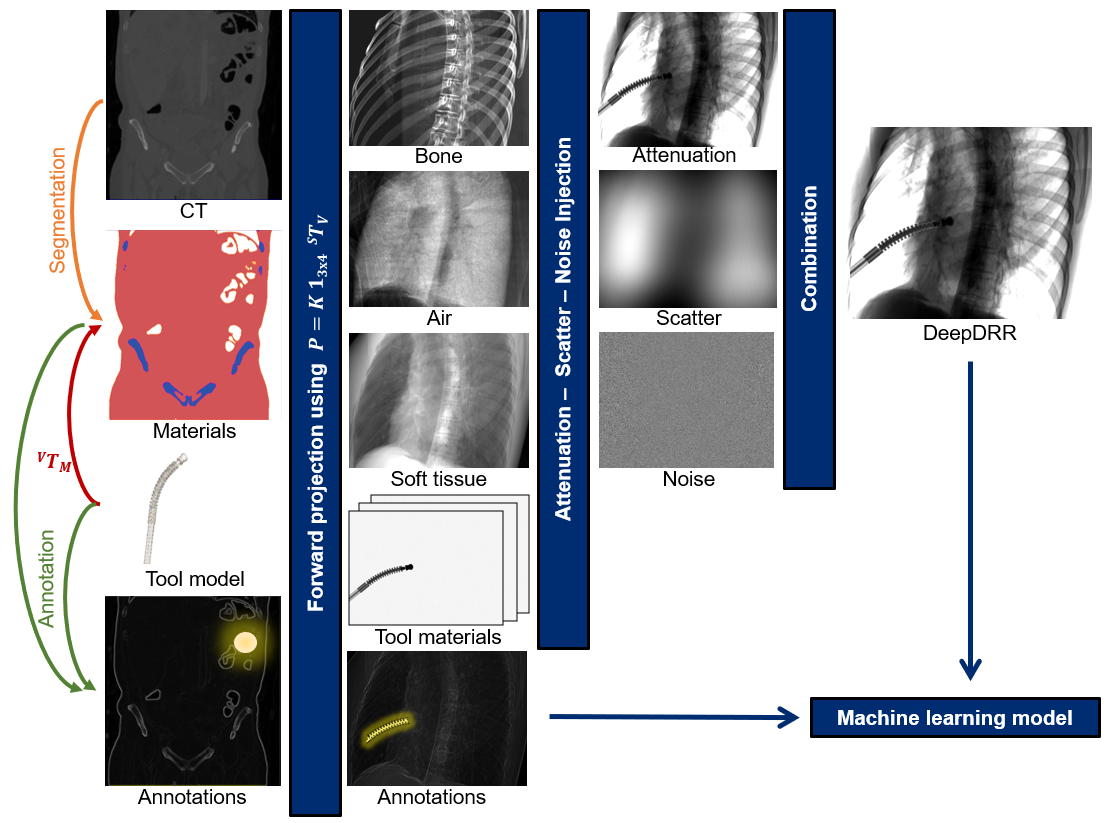
Further details can be found in our MICCAI 2018 paper "DeepDRR: A Catalyst for Machine Learning in Fluoroscopy-guided Procedures" and the subsequent Invited Journal Article in the IJCARS Special Issue of MICCAI "Enabling Machine Learning in X-ray-based Procedures via Realistic Simulation of Image Formation". The conference preprint can be accessed on arXiv here: https://arxiv.org/abs/1803.08606.
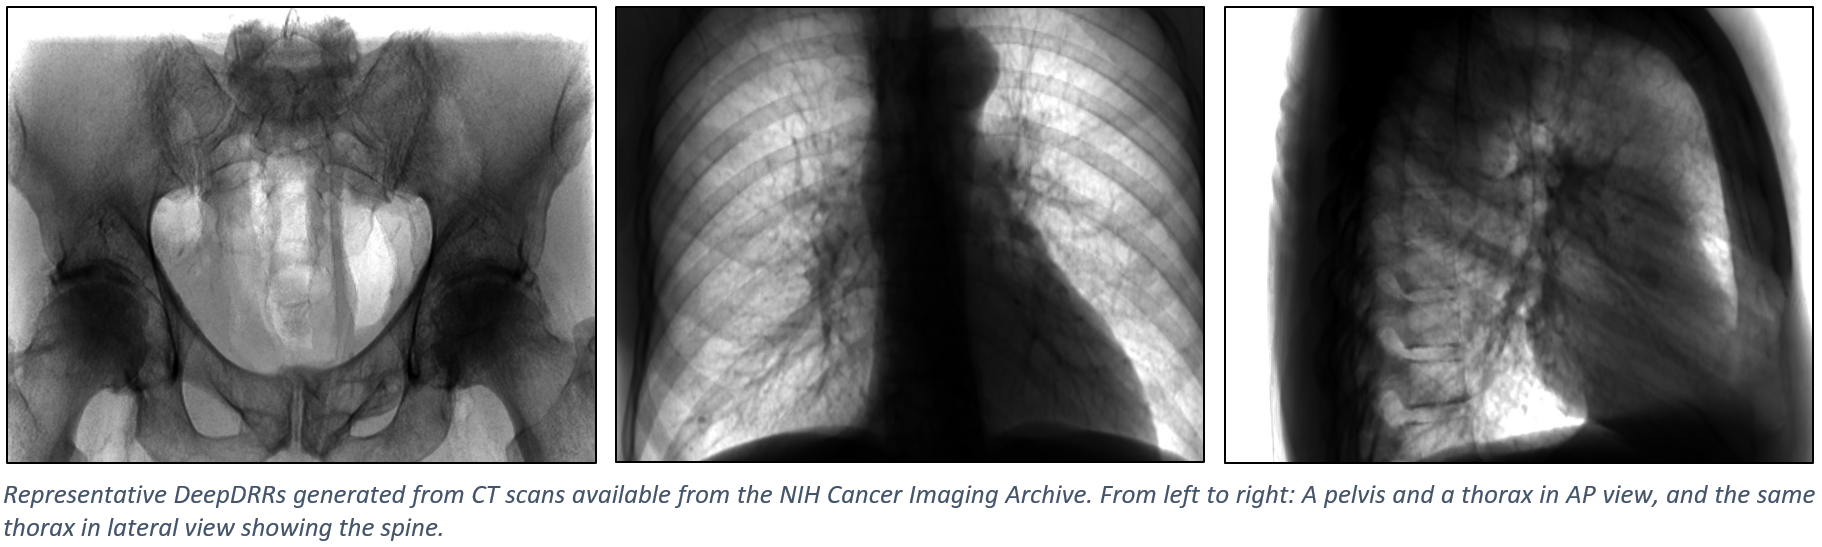
The figure below shows representative radiographs generated using DeepDRR from CT data downloaded from the NIH Cancer Imaging Archive. Please find qualitative results in the Applications section.
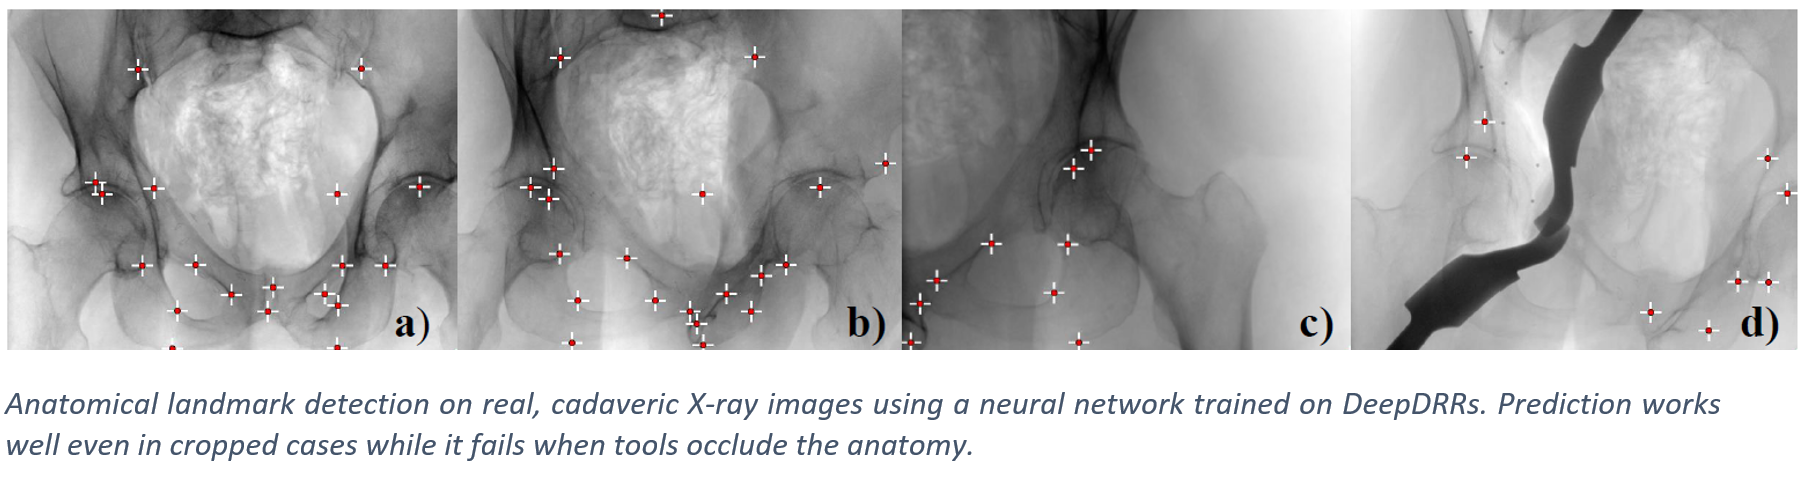
We have applied DeepDRR to anatomical landmark detection in pelvic X-ray: "X-ray-transform Invariant Anatomical Landmark Detection for Pelvic Trauma Surgery", also early-accepted at MICCAI'18: https://arxiv.org/abs/1803.08608 and now with quantitative evaluation in the IJCARS Special Issue on MICCAI'18: https://link.springer.com/article/10.1007/s11548-019-01975-5. The ConvNet for prediction was trained on DeepDRRs of 18 CT scans of the NIH Cancer Imaging Archive and then applied to ex vivo data acquired with a Siemens Cios Fusion C-arm machine equipped with a flat panel detector (Siemens Healthineers, Forchheim, Germany). Some representative results on the ex vivo data are shown below.
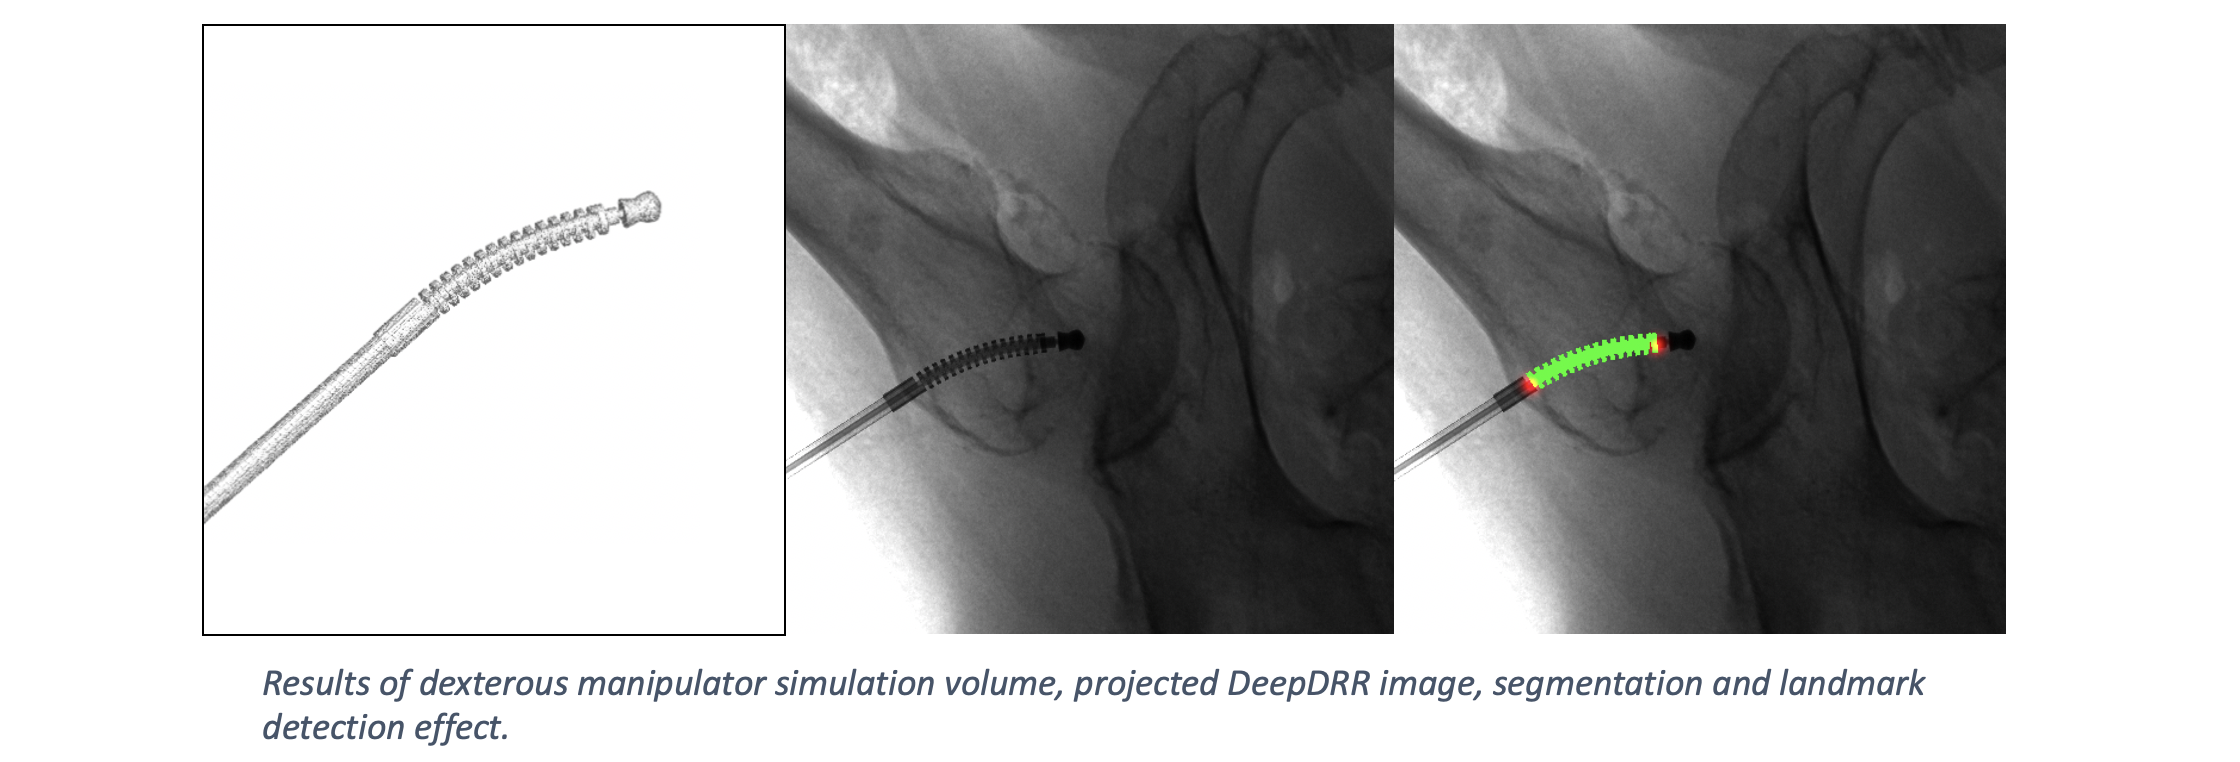
DeepDRR has also been applied to simulate X-rays of the femur during insertion of dexterous manipulaters in orthopedic surgery: "Localizing dexterous surgical tools in X-ray for image-based navigation", which has been accepted at IPCAI'19: https://arxiv.org/abs/1901.06672. Simulated images are used to train a concurrent segmentation and localization network for tool detection. We found consistent performance on both synthetic and real X-rays of ex vivo specimens. The tool model, simulation image and detection results are shown below.
This capability has not been tested in version 1.0. For tool insertion, we recommend working with Version 0.1 for the time being.
DeepDRR uses PyRender, which is no longer actively maintained. As a result, there are some known bugs when using meshes in the pipeline.
PyOpenGL==3.1.6 and numpy<2.0.Projector class for details.EGL is not available. In other contexts, this indicates that a display is needed, but not here. DeepDRR should not require a display to run. This error most likely indicates that the EGL driver is not installed correctly. Please run sudo ./scripts/setup_ubuntu.sh to install the EGL driver.We hope this proves useful for medical imaging research. If you use our work, please consider citing our work.
The 2018 MICCAI article covers the basic DeepDRR pipeline and task-based evaluation:
@inproceedings{unberath2018deepdrr,
  author       = {Unberath, Mathias and Zaech, Jan-Nico and Lee, Sing Chun and Bier, Bastian and Fotouhi, Javad and Armand, Mehran and Navab, Nassir},
  title        = {{DeepDRR--A Catalyst for Machine Learning in Fluoroscopy-guided Procedures}},
  date         = {2018},
  booktitle    = {Proc. Medical Image Computing and Computer Assisted Intervention (MICCAI)},
  publisher    = {Springer},
}
The 2019 IJCARS paper describes the integration of tool modeling and provides quantitative results:
@article{unberath2019enabling,
  author       = {Unberath, Mathias and Zaech, Jan-Nico and Gao, Cong and Bier, Bastian and Goldmann, Florian and Lee, Sing Chun and Fotouhi, Javad and Taylor, Russell and Armand, Mehran and Navab, Nassir},
  title        = {{Enabling Machine Learning in X-ray-based Procedures via Realistic Simulation of Image Formation}},
  year         = {2019},
  journal      = {International journal of computer assisted radiology and surgery (IJCARS)},
  publisher    = {Springer},
}
The 2025 MICCAI article describes the use of mesh-based rendering for efficient, large-scale simulation of X-ray images with surgical tools and ground-truth projections of many objects:
@inproceedings{killeen2025fluorosam,
  author       = {Killeen, Benjamin D. and Wang, Liam J. and Inigo, Blanca and Zhang, Han and Mehran, Armand and Taylor, Russell H. and Osgood, Greg and Unberath, Mathias},
  title        = {{FluoroSAM: A Language-promptable Foundation Model for Flexible X-ray Image Segmentation}},
  date         = {2025},
  booktitle    = {Proc. Medical Image Computing and Computer Assisted Intervention (MICCAI)},
  publisher    = {Springer},
}
For the original DeepDRR, released alongside our 2018 paper, please see the Version 0.1.
CUDA Cubic B-Spline Interpolation (CI) used in the projector:
https://github.com/DannyRuijters/CubicInterpolationCUDA
D. Ruijters, B. M. ter Haar Romeny, and P. Suetens. Efficient GPU-Based Texture Interpolation using Uniform B-Splines. Journal of Graphics Tools, vol. 13, no. 4, pp. 61-69, 2008.
The projector is a heavily modified and ported version of the implementation in CONRAD:
https://github.com/akmaier/CONRAD
A. Maier, H. G. Hofmann, M. Berger, P. Fischer, C. Schwemmer, H. Wu, K. Müller, J. Hornegger, J. H. Choi, C. Riess, A. Keil, and R. Fahrig. CONRAD—A software framework for cone-beam imaging in radiology. Medical Physics 40(11):111914-1-8. 2013.
Spectra are taken from MCGPU:
A. Badal, A. Badano, Accelerating Monte Carlo simulations of photon transport in a voxelized geometry using a massively parallel graphics processing unit. Med Phys. 2009 Nov;36(11): 4878–80.
The segmentation pipeline is based on the Vnet architecture:
https://github.com/mattmacy/vnet.pytorch
F. Milletari, N. Navab, S-A. Ahmadi. V-Net: Fully Convolutional Neural Networks for Volumetric Medical Image Segmentation. arXiv:160604797. 2016.
We gratefully acknowledge the support of the NVIDIA Corporation with the donation of the GPUs used for this research.
more like this
🎥🤟 8 minimalistic templates for tfjs mediapipe handpose and facemesh
search projects, people, and tags