chinese-hershey-font
Convert Chinese Characters to Single-Line Fonts using Computer Vision
Python★ 161
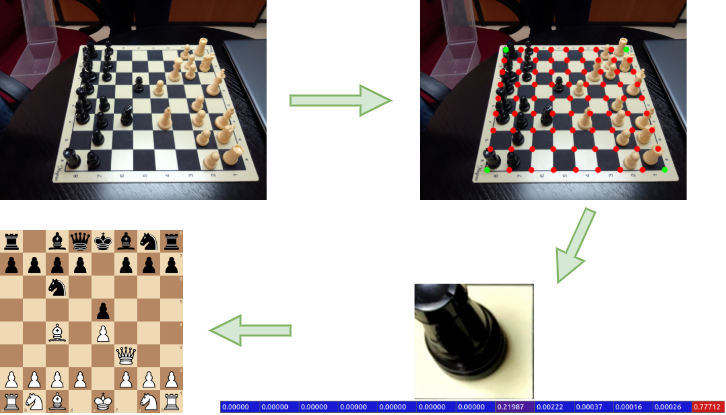
Predict live chess games into FEN notation.
 davidmallasen
git clone https://github.com/davidmallasen/LiveChess2FEN.gitdavidmallasen/LiveChess2FENLiveChess2FEN is a fully functional framework that automatically digitizes the configuration of a chessboard. It is optimized for execution on an Nvidia Jetson Nano (but it also works on any computer).
This repository contains the code used in our paper. If you find this useful, please consider citing us.
@article{mallasen2020LiveChess2FEN,
  title = {LiveChess2FEN: A Framework for Classifying Chess Pieces Based on CNNs},
  author = {Mallas{\'e}n Quintana, David and Del Barrio Garc{\'i}a, Alberto Antonio and Prieto Mat{\'i}as, Manuel},
  year = {2020},
  month = dec,
  journal = {arXiv:2012.06858 [cs]},
  eprint = {2012.06858},
  eprinttype = {arxiv},
  url = {http://arxiv.org/abs/2012.06858},
  archiveprefix = {arXiv}
}
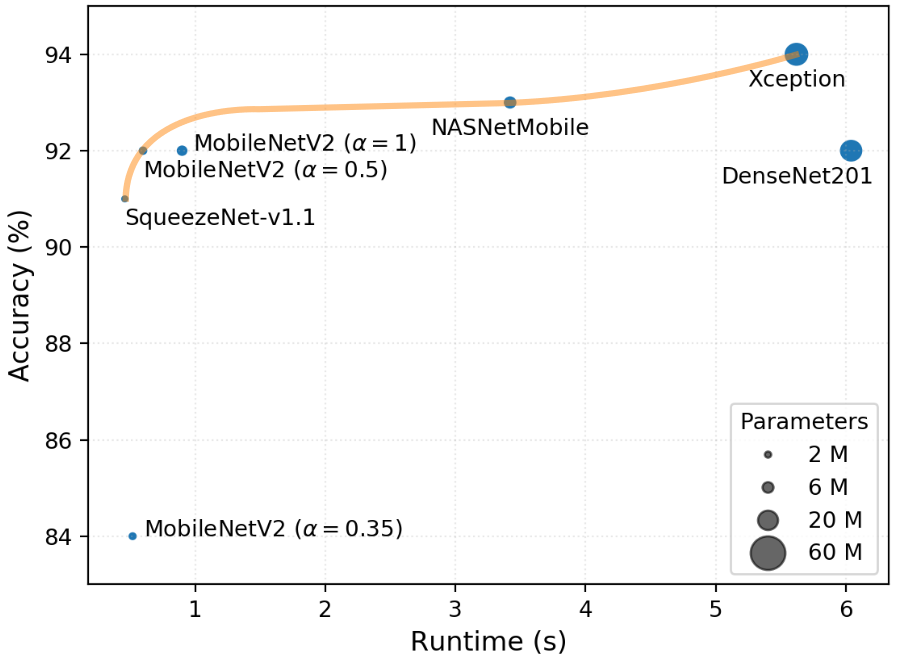
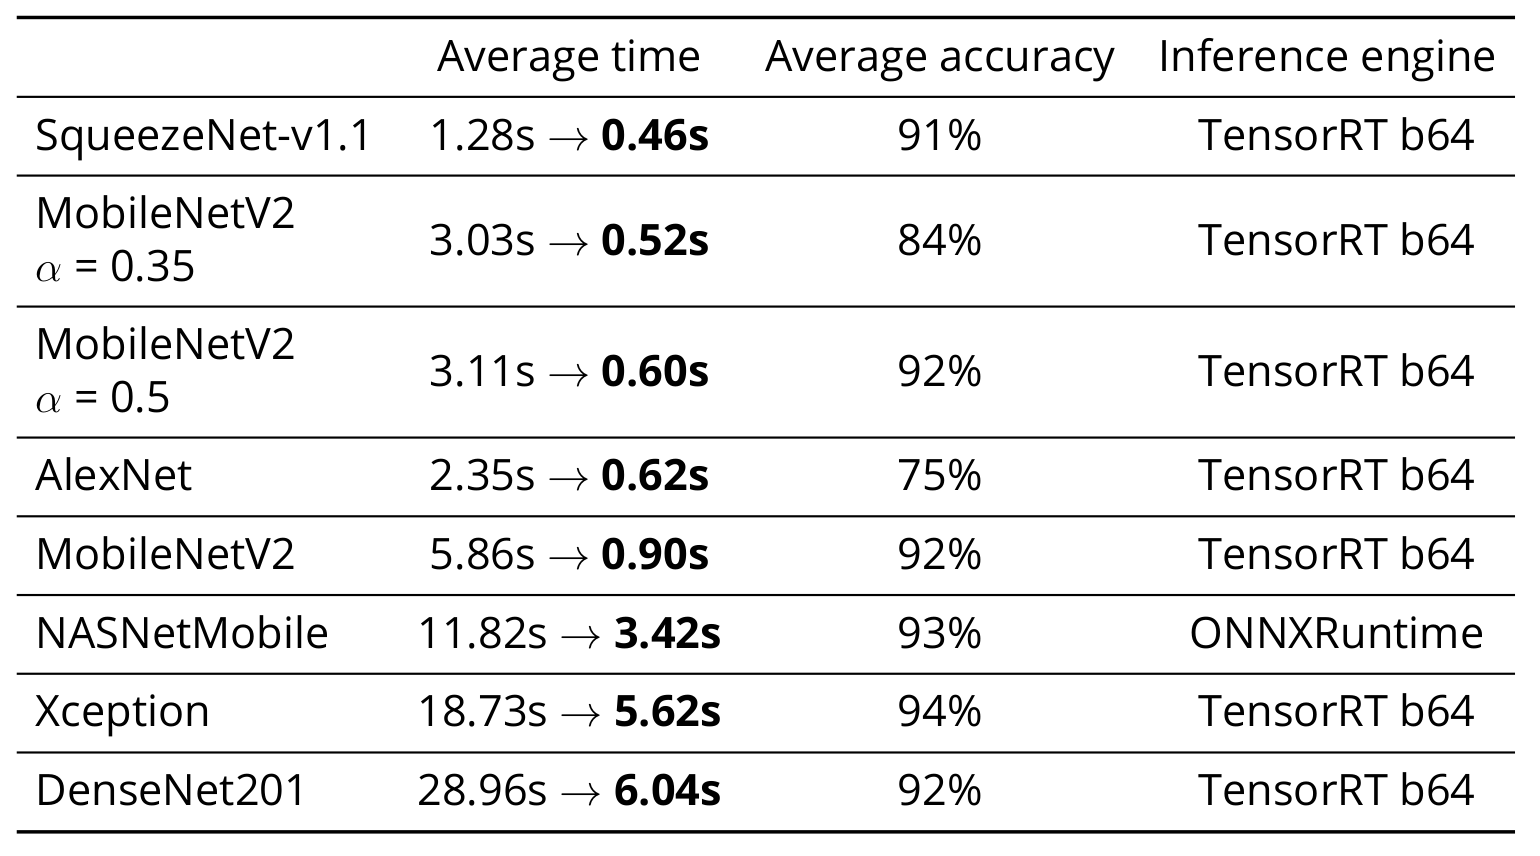
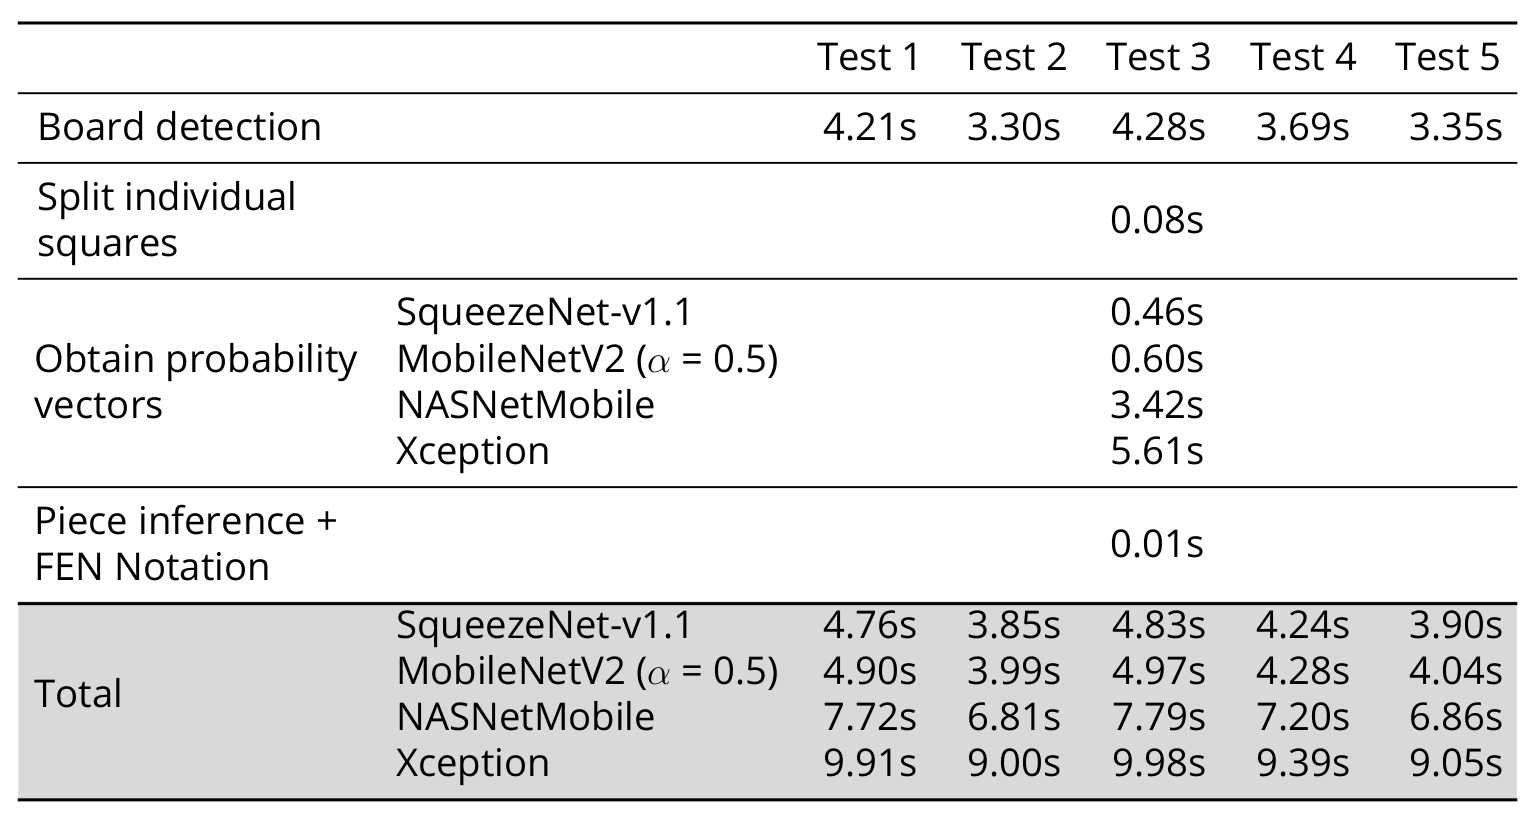
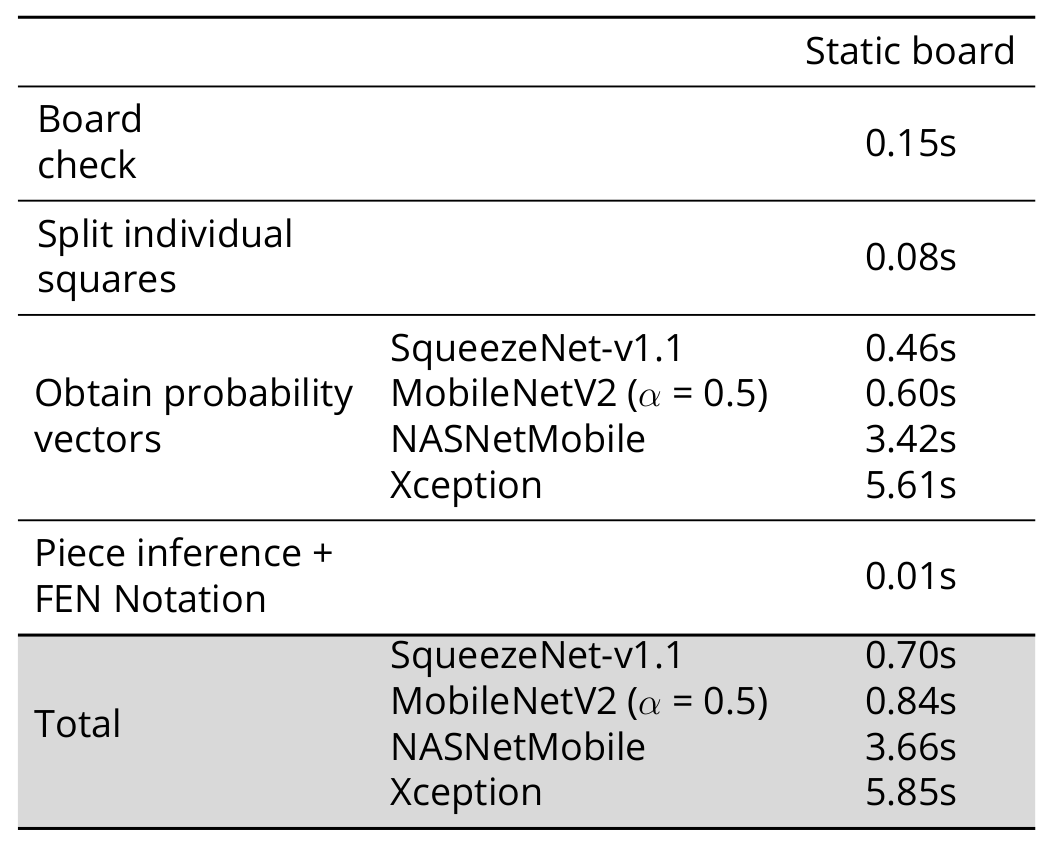
The following testing data have been obtained with the Nvidia Jetson Nano 4GB. Each time value represents how long it takes to perform an operation on a single chessboard.
See lc2fen/detectboard/laps.py -> check_board_position()
Follow the installation instructions for your specific computer. After this, you will be ready to use LiveChess2FEN by following the usage instructions. Note that you will need at least Python 3.9 installed in your system.
Instructions for JetPack 4.6 are presented below. If you run into any problems,
see the Troubleshooting section. You can find a list of the python packages required in the requirements.txt file.
Install tensorflow for Jetson Nano:
sudo apt-get update
sudo apt-get install -y python3-pip pkg-config
sudo apt-get install -y libhdf5-serial-dev hdf5-tools libhdf5-dev zlib1g-dev zip libjpeg8-dev liblapack-dev libblas-dev gfortran
sudo ln -s /usr/include/locale.h /usr/include/xlocale.h
sudo pip3 install --verbose 'protobuf<4' 'Cython<3'
sudo wget --no-check-certificate https://developer.download.nvidia.com/compute/redist/jp/v461/tensorflow/tensorflow-2.7.0+nv22.1-cp36-cp36m-linux_aarch64.whl
sudo pip3 install --verbose tensorflow-2.7.0+nv22.1-cp36-cp36m-linux_aarch64.whl
Install ONNX Runtime
Download the .whl file from here and run
sudo pip3 install onnxruntime_gpu-1.8.0-cp36-cp36m-linux_aarch64.whl
Install OpenCV 4.5 with CUDA enabled. To do so, download and execute
this script. Warning: this process will take some time and
you may need to increase the swap space with jtop.
If you plan on converting ONNX models to TensorRT, add the following lines
to the .bashrc file to access trtexec:
export PATH=$PATH:/usr/src/tensorrt/bin
Then, you can run trtexec --onnx=model.onnx --saveEngine=model.trt to convert an ONNX model to a TensorRT engine.
Install the rest of the required packages:
sudo pip3 install -r requirements.txt
You can also install jtop to monitor the usage of the Jetson Nano. To install, run
sudo pip3 install -U jetson-stats
and reboot the Jetson Nano. You can execute it by running jtop.
To upgrade CMake, download CMake 3.14.7 and run
tar -zxvf cmake-3.14.7.tar.gz
cd cmake-3.14.7
sudo apt-get install libcurl4-openssl-dev
sudo ./bootstrap
sudo make
sudo make install
cmake --version
To install protobuf download protobuf 3.17.3 and run
tar -zxvf protobuf-cpp-3.17.3.tar.gz
cd protobuf-3.17.3
./configure
make
sudo make install
sudo ldconfig
If you get the error ImportError: /usr/lib/aarch64-linux-gnu/libgomp.so.1: cannot allocate memory in static TLS block, run
export LD_PRELOAD=/usr/lib/aarch64-linux-gnu/libgomp.so.1
In order to permanently fix the error, add that line to the end of your
~/.bashrc file.
If you get the error Illegal instruction (core dumped), run
export OPENBLAS_CORETYPE=ARMV8
In order to permanently fix the error, add that line to the end of your
~/.bashrc file.
If you get the
error error: command 'aarch64-linux-gnu-gcc' failed with exit status 1, run
sudo apt-get install python3-dev
If you cannot install pycuda because it doesn't find cuda.h, run
export CPATH=$CPATH:/usr/local/cuda-10.2/targets/aarch64-linux/include
export LIBRARY_PATH=$LIBRARY_PATH:/usr/local/cuda-10.2/targets/aarch64-linux/lib
In order to permanently fix the error, add those lines to the end of your
~/.bashrc file.
In any case, if you find that there is a library missing, you can try to install it using pip or google how to install it on the Jetson Nano.
Installation instructions for Ubuntu (22.04) are presented below. Other Linux distributions should be similar.
First clone the repository and cd into it:
git clone https://github.com/davidmallasen/LiveChess2FEN.git
cd LiveChess2FEN
Create a python virtual environment, activate it and upgrade pip:
python -m venv venv
source venv/bin/activate
pip install --upgrade pip
You will have to activate the virtual environment every time you want to use LiveChess2FEN.
Install the required python packages:
pip install -r requirements_pc.txt
This should include the following packages:
Also, depending on the inference engine you want to use, install the following dependencies:
Installation instructions for a Windows computer are presented below.
First, install Python 3.10 from Microsoft Store. It is important NOT to
install Python 3.11 instead as
it would create dependency (numpy) issues when we later install onnxruntime and tensorflow==2.12.0.
Then make sure your pip is up to date by running the following command in Windows PowerShell:
pip install --upgrade pip
If you see any warning about some directory not on PATH, follow this and restart the computer to resolve it.
In order to successfully install tensorflow, you need to first enable
long paths. To do
so, open another PowerShell as administrator and run the following command:
New-ItemProperty -Path "HKLM:\SYSTEM\CurrentControlSet\Control\FileSystem" -Name "LongPathsEnabled" -Value 1 -PropertyType DWORD -Force
Now you can install all the relevant packages by running the following commands in Windows PowerShell:
pip install numpy
pip install opencv-python
pip install chess
pip install tensorflow==2.12.0
pip install onnxruntime
pip install matplotlib
pip install pyclipper
pip install scikit-learn
pip install tqdm
pip install pandas
pip install onnx
pip install tf2onnx
pip install pytest
Note: the above commands would install all the latest-possible versions of
the required packages (it was found that there might not be any
restrictions on the versions of nontensorflow packages). Alternatively, you could use the
"requirements_pc.txt" file (pip install -r requirements_pc.txt) to
install the specific versions that have been
tested to be 100% working.
Finally, in order to successfully import tensorflow, you also need to
install a Microsoft Visual C++ Redistributable package from
here.
If you are using Windows 11 (Windows 11 only has the 64-bit version), you can simply download and install
this.
Download the prediction models (the .h5, .onnx or .trt files) from the
releases
and save them to the data/models folder.
Download the contents of TestImages.zip->FullDetection from the
releases into the
data/predictions folder. You should have 5 test images and 2 .fen files.
Edit test_lc2fen.py and set the ACTIVATE_*, MODEL_PATH_*,
IMG_SIZE_*, and PRE_INPUT_* constants.
ACTIVATE_KERAS = True will select Keras with tensorflow backend as the
inference engine. The Keras engine is the slowest of the three.
ACTIVATE_ONNX = True will select ONNX Runtime as the inference engine.
It is significantly faster than Keras but almost just as accurate. It is the
recommended choice for any standard computer.
ACTIVATE_TRT = True will select TensorRT as the inference engine. It is
the fastest of the three but only available on computers with Nvidia GPUs.
Run the test_lc2fen.py script.
You can then use LiveChess2FEN by repeating steps 3 and 4 with the
lc2fen.py program instead of the test_lc2fen.py script. Run
python3 lc2fen.py -h to display the help message.
To train new models, check the cpmodels folder. That directory contains
the python scripts used to train the chess piece models. It also contains
the scripts used to manipulate both the dataset and the models.
Download the dataset from the releases
into the data/dataset directory.
Unzip the dataset into the same directory. It should be in data/dataset/ChessPieceModels/.
Use the functions in cpmodels/dataset.py to split the dataset into
training and validation sets. The training set should be in data/dataset/train/
and the validation set should be in data/dataset/validation/. You can
do this by running python and then:
from cpmodels.dataset import split_dataset
split_dataset()
exit()
Use the train_*.py scripts to train the models. The models will be
saved in cpmodels/models/.
When you want to use a trained model with LiveChess2FEN, copy the
model file into data/models/.
LiveChess2FEN supports pytest unit
testing. All tests are located in the test folder. To run the tests,
simply run:
pytest -rA -v
Contributions are very welcome! Please check the CONTRIBUTING file for more information on how to contribute to LiveChess2FEN.
You can find a non-legal quick summary here: tldrlegal AGPL
Copyright (c) 2020 David Mallasén Quintana
This program is free software: you can redistribute it and/or modify it under the terms of the GNU Affero General Public License as published by the Free Software Foundation, either version 3 of the License, or (at your option) any later version.
This program is distributed in the hope that it will be useful, but WITHOUT ANY WARRANTY; without even the implied warranty of MERCHANTABILITY or FITNESS FOR A PARTICULAR PURPOSE. See the GNU Affero General Public License for more details.
You should have received a copy of the GNU Affero General Public License along with this program. If not, see http://www.gnu.org/licenses/.
more like this
Convert Chinese Characters to Single-Line Fonts using Computer Vision
🎥🤟 8 minimalistic templates for tfjs mediapipe handpose and facemesh
search projects, people, and tags