phoenix-todo-list-tutorial
✅ Complete beginners tutorial building a todo list from scratch in Phoenix 1.7 (latest)
 dwyl
dwylgit clone https://github.com/dwyl/phoenix-todo-list-tutorial.gitdwyl/phoenix-todo-list-tutorialPhoenix Todo List Tutorial
A complete beginners step-by-step tutorial
for building a Todo List in Phoenix.
100% functional. 0% JavaScript.
Just HTML, CSS and Elixir.
Fast and maintainable.
Why? 🤷
Todo lists are familiar to most people;
we make lists all the time.
Building a Todo list from scratch
is a great way to learn Elixir/Phoenix
because the UI/UX is simple,
so we can focus on implementation.
For the team
@dwyl
this app/tutorial
is a showcase of how server side rendering
(with client side progressive enhancement)
can provide a excellent balance between
developer effectiveness (shipping features fast),
UX and accessibility.
The server rendered pages take less than 5ms to respond
so the UX is fast.
On Fly.io:
phxtodo.fly.dev
round-trip response times are sub 200ms for all interactions,
so it feels like a client-side rendered App.
What? 💭
A Todo list tutorial that shows a complete beginner how to build an app in Elixir/Phoenix from scratch.
Try it on Fly.io: phxtodo.fly.dev
Try the Fly.io version. Add a few items to the list and test the functionality.
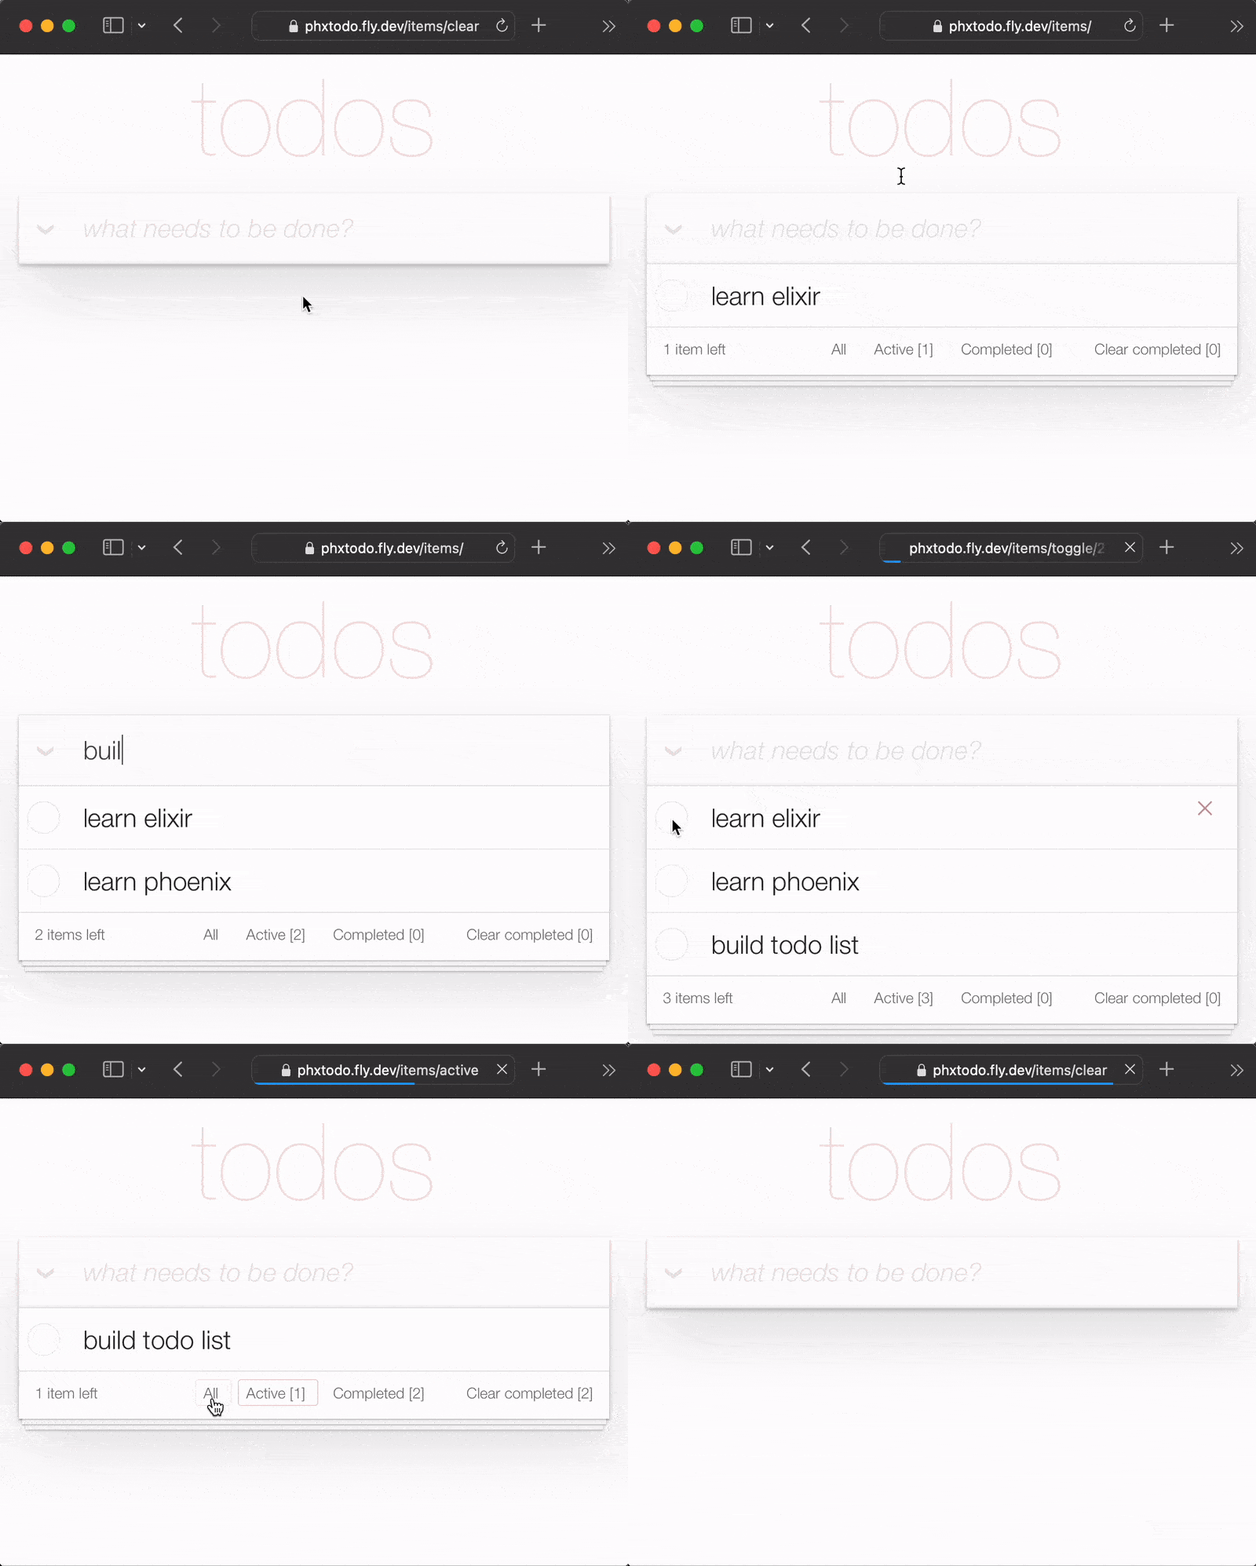
Even with a full HTTP round-trip for each interaction, the response time is fast. Pay attention to how Chrome|Firefox|Safari waits for the response from the server before re-rendering the page. The old full page refresh of yesteryear is gone. Modern browsers intelligently render just the changes! So the UX approximates "native"! Seriously, try the Fly.io app on your Phone and see!
TodoMVC
In this tutorial we are using the TodoMVC CSS to simplify our UI. This has several advantages the biggest being minimizing how much CSS we have to write! It also means we have a guide to which features need to be implemented to achieve full functionality.
Note: we love
CSSfor its incredible power/flexibility, but we know that not everyone like it. see: learn-tachyons#why The last thing we want is to waste tons of time withCSSin aPhoenixtutorial!
Who? 👤
This tutorial is for anyone who is learning to Elixir/Phoenix. No prior experience with Phoenix is assumed/expected. We have included all the steps required to build the app.
If you get stuck on any step, please open an issue on GitHub where we are happy to help you get unstuck! If you feel that any line of code can use a bit more explanation/clarity, please don't hesitate to inform us! We know what it's like to be a beginner, it can be frustrating when something does not make sense! Asking questions on GitHub helps everyone to learn!
Please give us feedback! 🙏 Star the repo if you found it helpful. ⭐
How? 👩💻
Before You Start! 💡
Before you attempt to build the Todo List, make sure you have everything you need installed on you computer. See: prerequisites
Once you have confirmed that you have Phoenix & PostgreSQL installed, try running the finished App.
0. Run The Finished App on Your localhost 💻
Before you start building your own version of the Todo List App,
run the finished version on your localhost
to confirm that it works.
Clone the project from GitHub:
git clone git@github.com:dwyl/phoenix-todo-list-tutorial.git && cd phoenix-todo-list-tutorial
Install dependencies and setup the database:
mix setup
Start the Phoenix server:
mix phx.server
Visit
localhost:4000
in your web browser.
You should see:
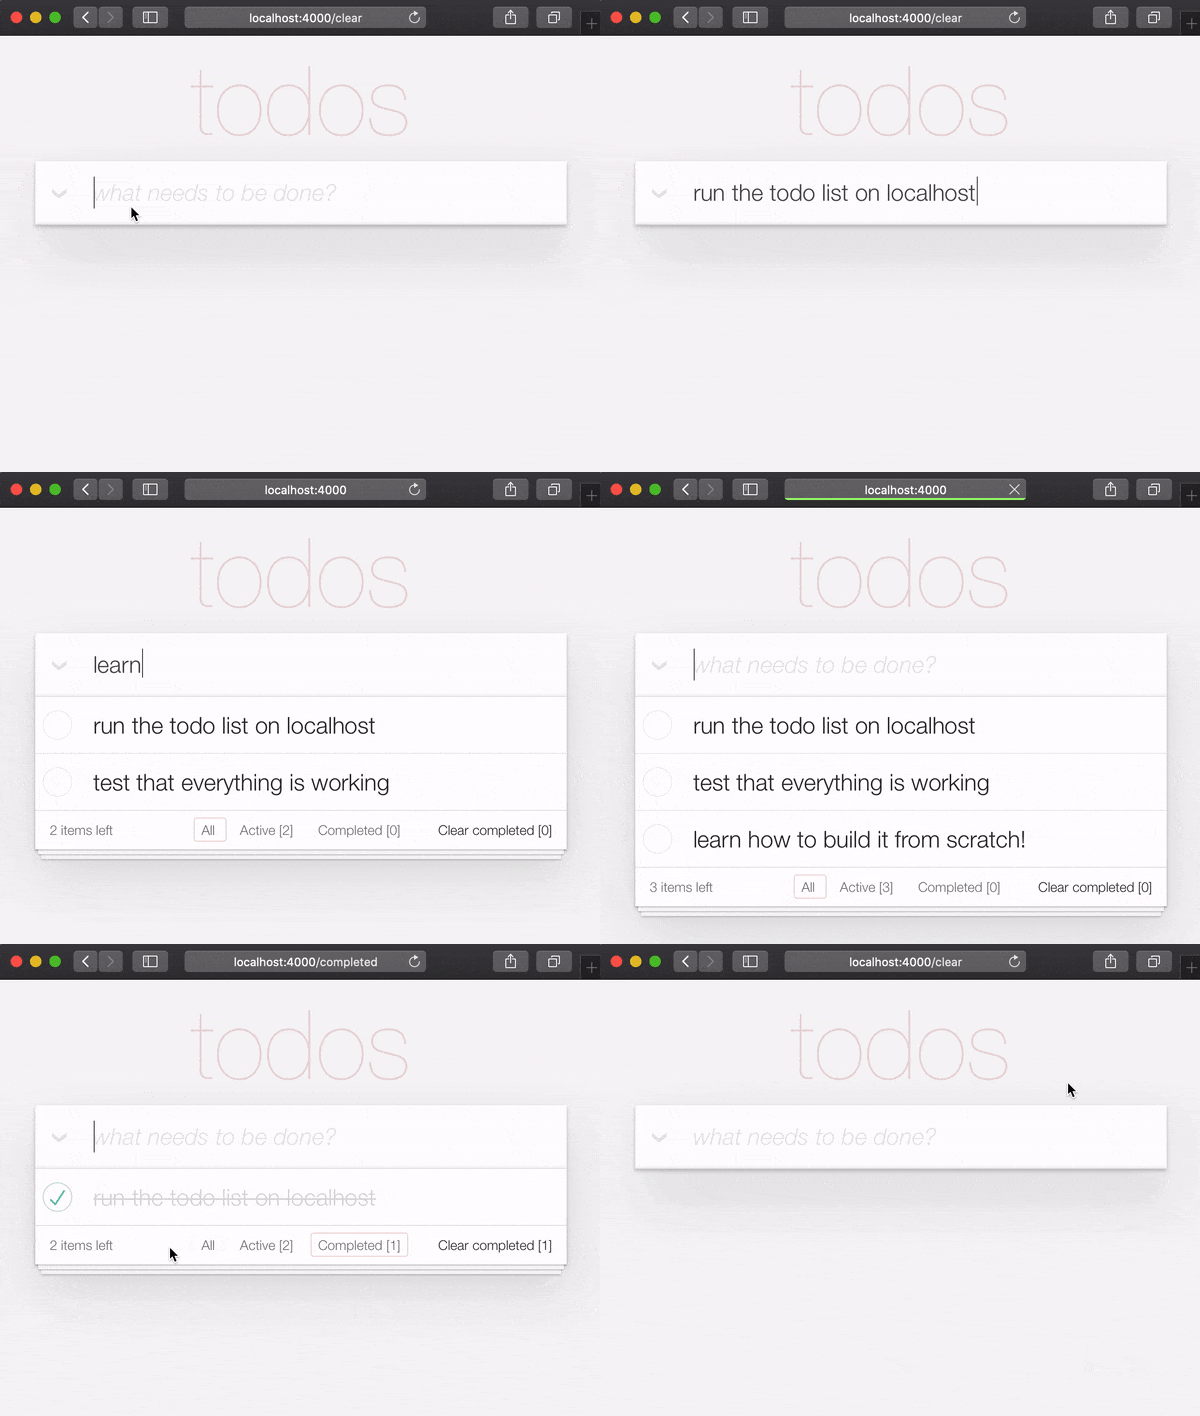
Now that you have the finished example app
running on your localhost,
let's build it from scratch
and understand all the steps.
Auth [Optional]
When running the finished example app on localhost,
if you want try the login button,
you will need to get an AUTH_API_KEY. [1 minute]
See:
Get your AUTH_API_KEY
Build it!
If you ran the finished app on your localhost
(and you really should!),
you will need to change up a directory before starting the tutorial:
cd ..
Now you are ready to build!
1. Create a New Phoenix Project 🆕
In your terminal,
create a new Phoenix app
using the following
mix
command:
mix phx.new app --no-dashboard --no-gettext --no-mailer
When prompted to install dependencies, type Y followed by Enter.
Note: those flags after the
appname are just to avoid creating files we don't need for this simple example. See: hexdocs.pm/phoenix/Mix.Tasks.Phx.New
Change into the newly created app directory (cd app)
and ensure you have everything you need:
mix setup
Start the Phoenix server:
mix phx.server
Now you can visit
localhost:4000
in your web browser.
You should see something similar to:
Shut down the Phoenix server ctrl+C.
Run the tests to ensure everything works as expected:
mix test
You should see:
Compiling 16 files (.ex)
Generated app app

17:49:40.111 [info]  Already up
...

Finished in 0.04 seconds
3 tests, 0 failures
Having established that the Phoenix App works as expected, let's move on to creating some files!
2. Create items Schema
In creating a basic Todo List we only need one schema: items.
Later we can add separate lists and tags to organise/categorise
our items but for now this is all we need.
Run the following generator command to create the items table:
mix phx.gen.html Todo Item items text:string person_id:integer status:integer
Strictly speaking we only need the text and status fields,
but since we know we want to associate items with people
(_later in the tutorial),
we are adding the field now.
You will see the following output:
* creating lib/app_web/controllers/item_controller.ex
* creating lib/app_web/controllers/item_html/edit.html.heex
* creating lib/app_web/controllers/item_html/index.html.heex
* creating lib/app_web/controllers/item_html/new.html.heex
* creating lib/app_web/controllers/item_html/show.html.heex
* creating lib/app_web/controllers/item_html.ex
* creating test/app_web/controllers/item_controller_test.exs
* creating lib/app/todo/item.ex
* creating priv/repo/migrations/20221205102303_create_items.exs
* creating lib/app/todo.ex
* injecting lib/app/todo.ex
* creating test/app/todo_test.exs
* injecting test/app/todo_test.exs
* creating test/support/fixtures/todo_fixtures.ex
* injecting test/support/fixtures/todo_fixtures.ex

Add the resource to your browser scope in lib/app_web/router.ex:

    resources "/items", ItemController


Remember to update your repository by running migrations:

    $ mix ecto.migrate
That created a bunch of files!
Some of which we don't strictly need.
We could manually create only the files we need,
but this is the "official" way of creating a CRUD App in Phoenix,
so we are using it for speed.
Note: Phoenix Contexts denoted in this example as
Todo, are "dedicated modules that expose and group related functionality." We feel they unnecessarily complicate basic Phoenix Apps with layers of "interface" and we really wish we could avoid them. But given that they are baked into the generators, and the creator of the framework likes them, we have a choice: either get on board with Contexts or manually create all the files in our Phoenix projects. Generators are a much faster way to build! Embrace them, even if you end up having todeletea few unused files along the way!
We are not going to explain each of these files at this stage in the tutorial because it's easier to understand the files as you are building the App! The purpose of each file will become clear as you progress through editing them.
2.1 Add the /items Resources to router.ex
Follow the instructions noted by the generator to
add the resources "/items", ItemController to the router.ex.
Open the lib/app_web/router.ex file
and locate the line: scope "/", AppWeb do.
Add the line to the end of the block.
e.g:
scope "/", AppWeb do
  pipe_through :browser

  get "/", PageController, :index
  resources "/items", ItemController # this is the new line
end
Your router.ex file should look like this:
router.ex#L20
Now, as the terminal suggested,
run mix ecto.migrate.
This will finish setting up the
database tables and run the
necessary migrations so
everything works properly!
2.2 Run The App!
At this point we already have a functional Todo List
(if we were willing to use the default Phoenix UI).
Try running the app on your localhost:
Run the generated migrations with mix ecto.migrate then the server with:
mix phx.server
Visit: http://localhost:4000/items/new and input some data.
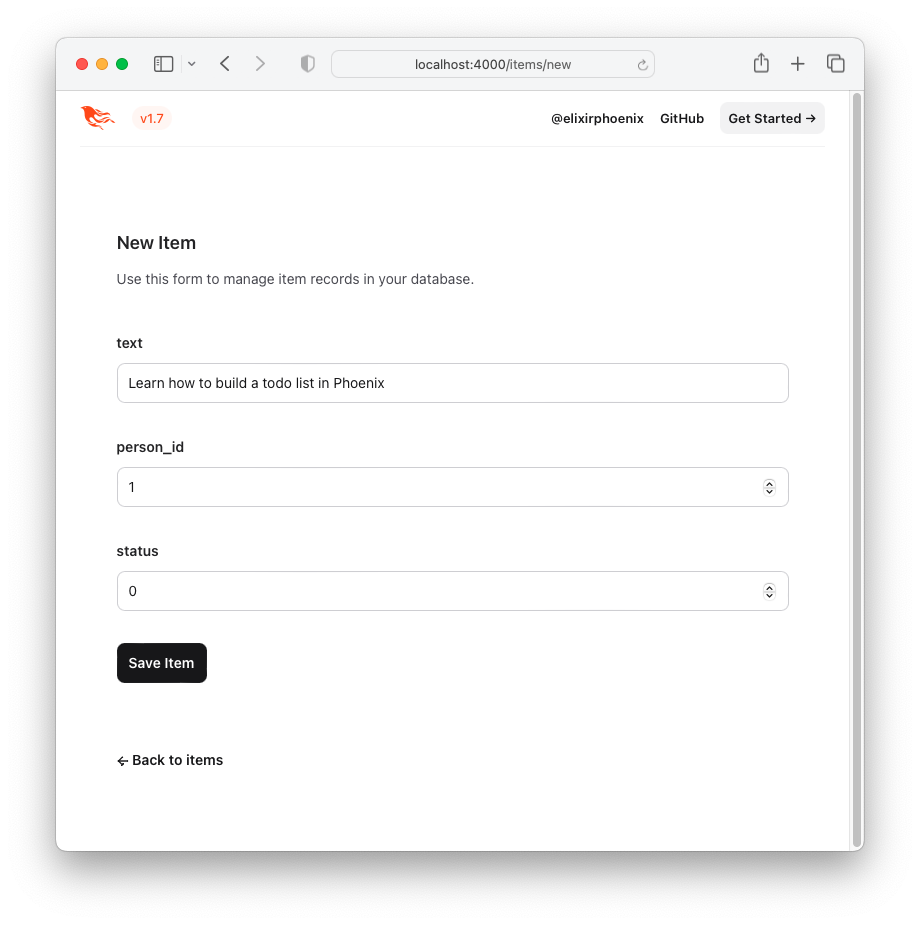
Click the "Save Item" button and you will be redirected to the "show" page: http://localhost:4000/items/1
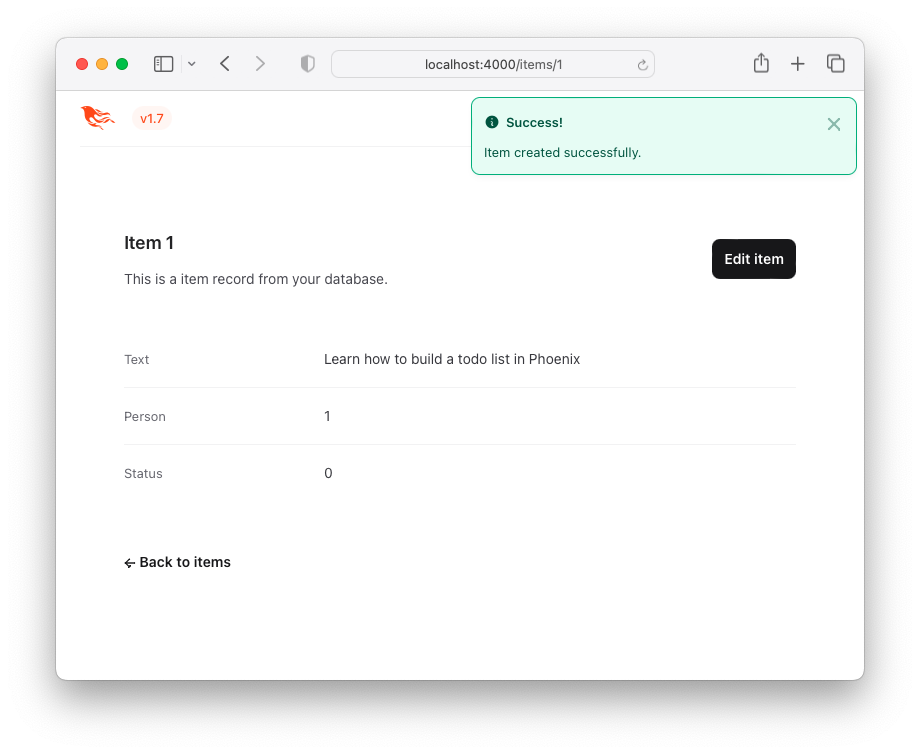
This is not an attractive User Experience (UX),
but it works!
Here is a list of items - a "Todo List".
You can visit this by clicking
the Back to items button or by
accessing the following URL
http://localhost:4000/items.
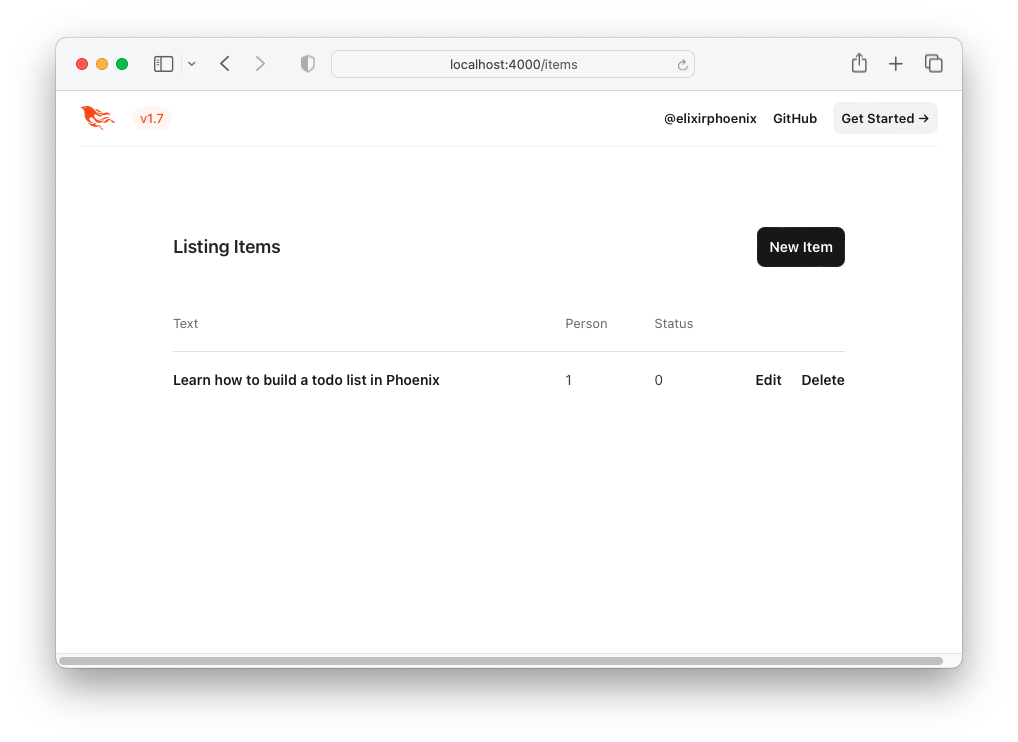
Let's improve the UX by using the TodoMVC HTML and CSS!
3. Create the TodoMVC UI/UX
To recreate the TodoMVC UI/UX,
let's borrow the HTML code directly from the example.
Visit: http://todomvc.com/examples/vanillajs add a couple of items to the list. Then, inspect the source using your browser's Dev Tools. e.g:
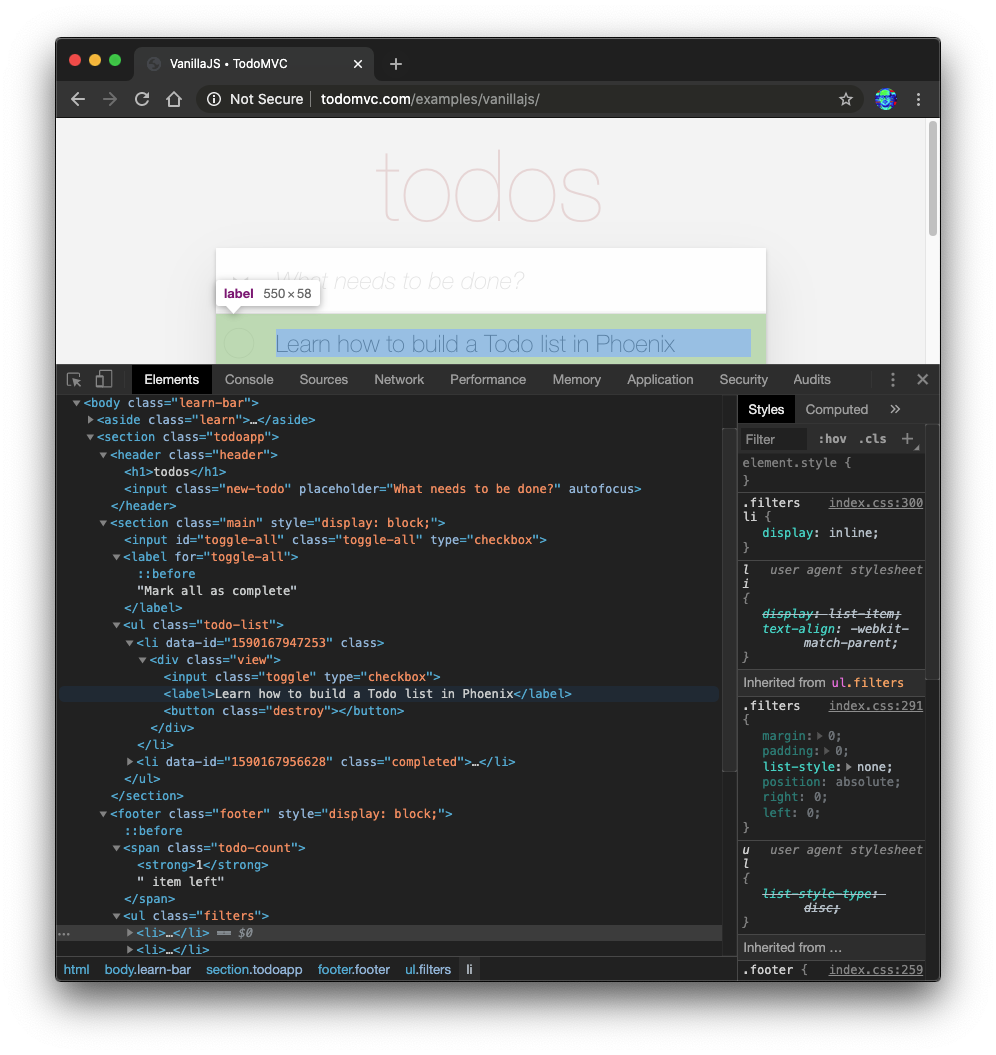
Right-click on the source you want
(e.g: <section class="todoapp">)
and select "Edit as HTML":
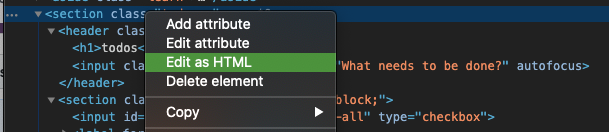
Once the HTML for the <section> is editable,
select it and copy it.
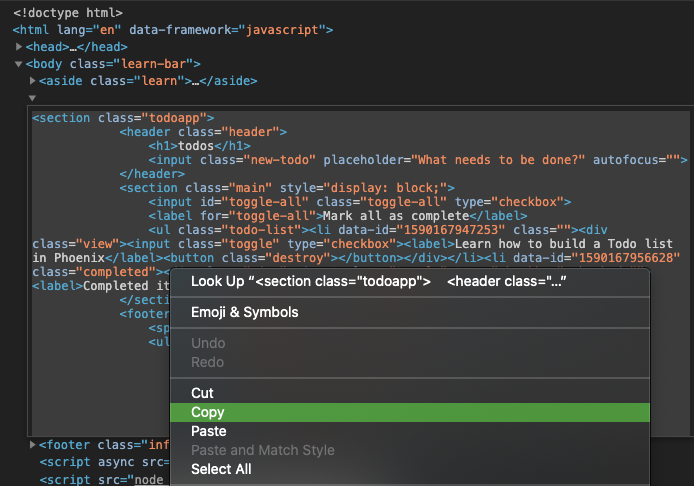
The HTML code is:
<section class="todoapp">
  <header class="header">
    <h1>todos</h1>
    <input class="new-todo" placeholder="What needs to be done?" autofocus="" />
  </header>
  <section class="main" style="display: block;">
    <input id="toggle-all" class="toggle-all" type="checkbox" />
    <label for="toggle-all">Mark all as complete</label>
    <ul class="todo-list">
      <li data-id="1590167947253" class="">
        <div class="view">
          <input class="toggle" type="checkbox" />
          <label>Learn how to build a Todo list in Phoenix</label>
          <button class="destroy"></button>
        </div>
      </li>
      <li data-id="1590167956628" class="completed">
        <div class="view">
          <input class="toggle" type="checkbox" />
          <label>Completed item</label>
          <button class="destroy"></button>
        </div>
      </li>
    </ul>
  </section>
  <footer class="footer" style="display: block;">
    <span class="todo-count"><strong>1</strong> item left</span>
    <ul class="filters">
      <li>
        <a href="#/" class="selected">All</a>
      </li>
      <li>
        <a href="#/active">Active</a>
      </li>
      <li>
        <a href="#/completed">Completed</a>
      </li>
    </ul>
    <button class="clear-completed" style="display: block;">
      Clear completed
    </button>
  </footer>
</section>
Let's convert this HTML to an Embedded Elixir
(EEx) template.
Note: the reason that we are copying this
HTMLfrom the browser's Elements inspector instead of directly from the source on GitHub:examples/vanillajs/index.htmlis that this is a "single page app", so the<ul class="todo-list"></ul>only gets populated in the browser. Copying it from the browser Dev Tools is the easiest way to get the completeHTML.
3.1 Paste the HTML into index.html.eex
Open the lib/app_web/controllers/item_html/index.html.eex file
and scroll to the bottom.
Then (without removing the code that is already there)
paste the HTML code we sourced from TodoMVC.
e.g:
/lib/app_web/controllers/item_html/index.html.eex#L27-L73
If you attempt to run the app now
and visit
http://localhost:4000/items/
You will see this (without the TodoMVC CSS):
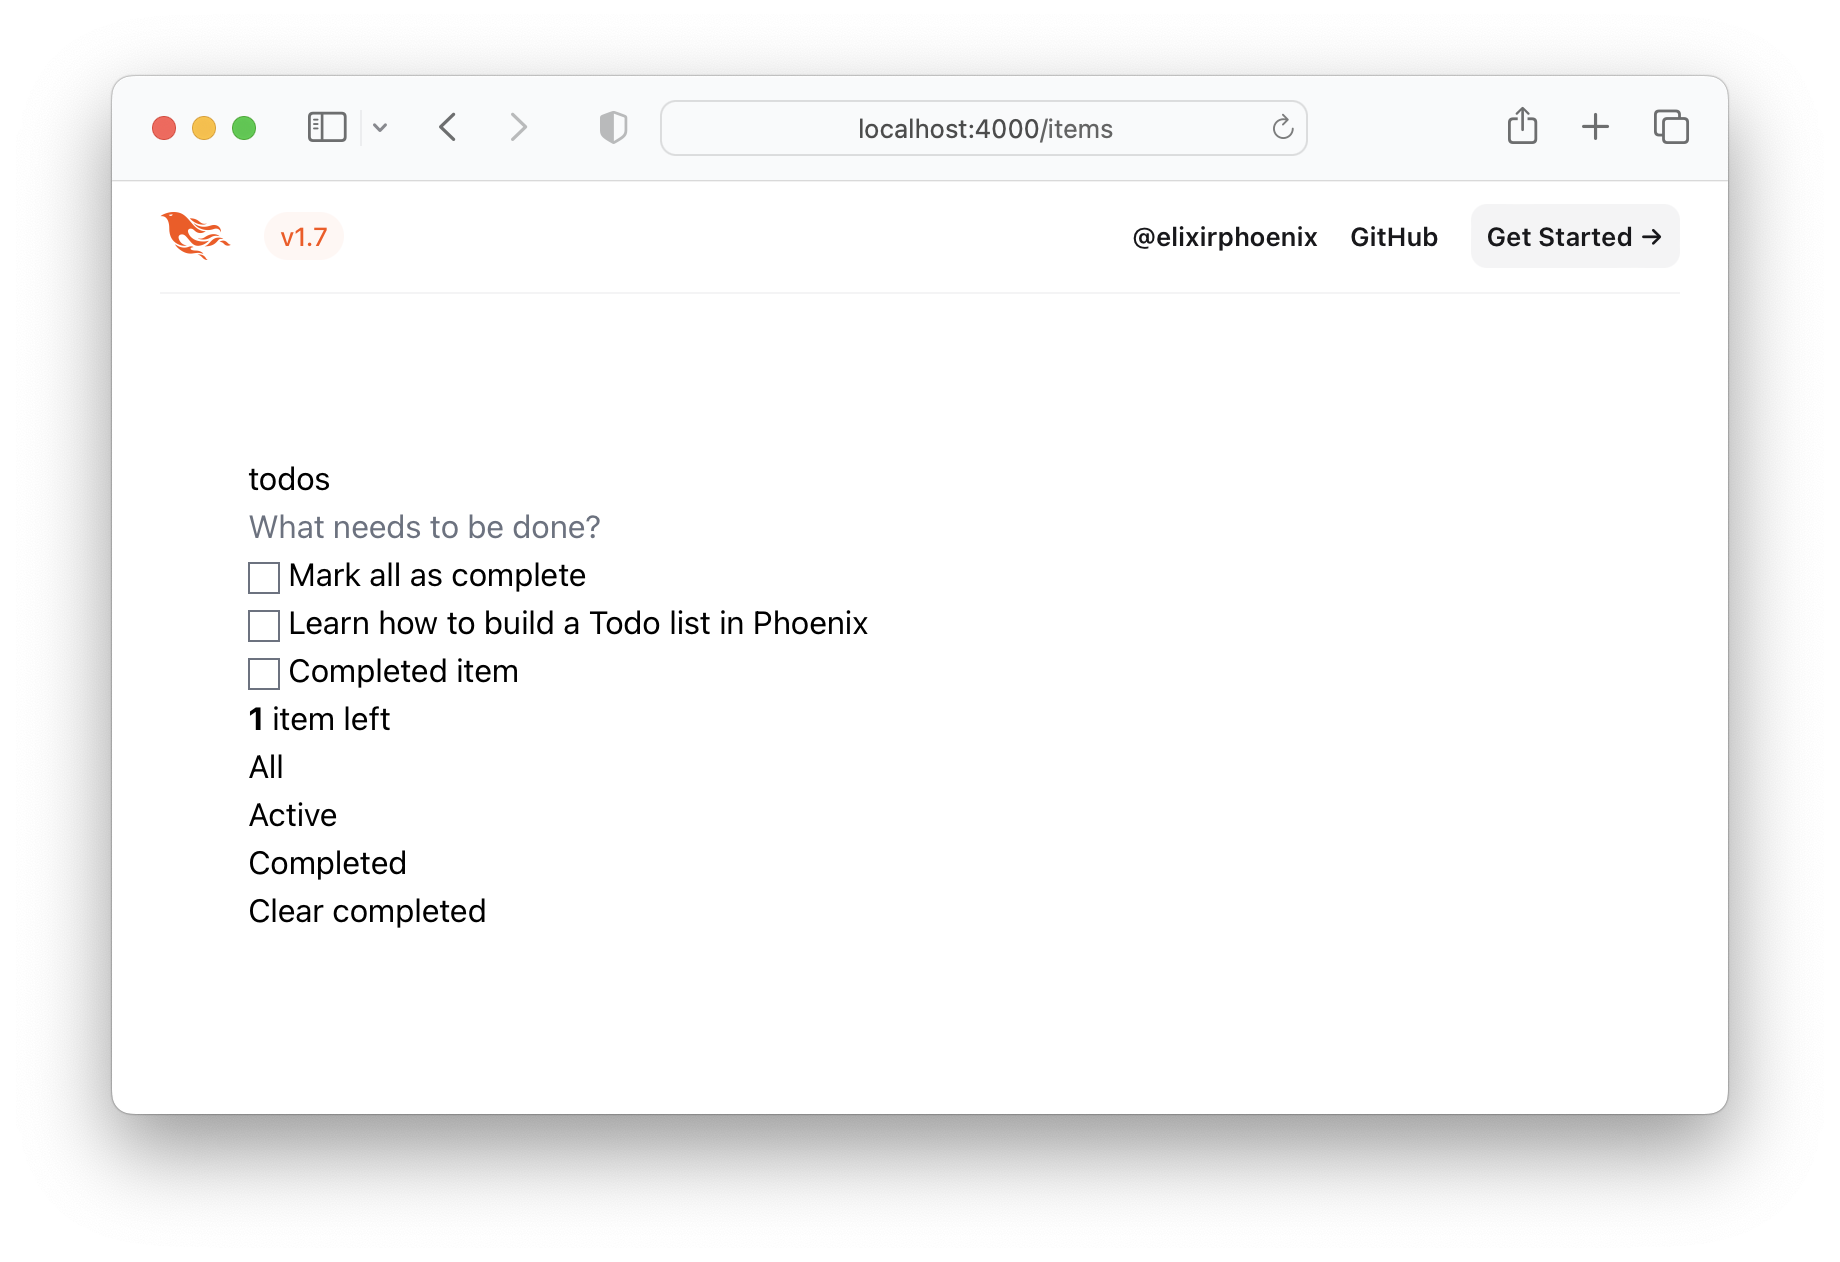
That's obviously not what we want,
so let's get the TodoMVC CSS
and save it in our project!
3.2 Save the TodoMVC CSS to /assets/css
Visit
http://todomvc.com/examples/vanillajs/node_modules/todomvc-app-css/index.css
and save the file to /assets/css/todomvc-app.css.
e.g:
/assets/css/todomvc-app.css
3.3 Import the todomvc-app.css in app.scss
Open the assets/css/app.scss file and replace it with the following:
/* This file is for your main application css. */
/* @import "./phoenix.css"; */
@import "./todomvc-app.css";
3.4 Simplify The Layout Template
Open your lib/app_web/components/layouts/app.html.heex file
and replace the contents with the following code:
<!DOCTYPE html>
<html lang="en">
  <head>
    <meta charset="utf-8"/>
    <meta http-equiv="X-UA-Compatible" content="IE=edge"/>
    <meta name="viewport" content="width=device-width, initial-scale=1.0"/>
    <title>Phoenix Todo List</title>
    <link rel="stylesheet" href={~p"/assets/app.css"}/>
    <script defer type="text/javascript" src={~p"/assets/app.js"}></script>
  </head>
  <body>
    <main role="main" class="container">
      <%= @inner_content %>
    </main>
  </body>
</html>
Before:
lib/app_web/components/layouts/app.html.eex
After:lib/app_web/components/layouts/app.html.heex
<%= @inner_content %> is where the Todo App will be rendered.
Note: the
<script>tag is included out of convention. However, we won't be writing anyJavaScriptin this tutorial. We will achieve 100% feature parity with TodoMVC, without writing a line ofJS. We don't "hate"JS, in fact we have a "sister" tutorial that builds the same App inJS: dwyl/javascript-todo-list-tutorial We just want to remind you that you don't need anyJSto build a fully functional web application with great UX!
With the layout template saved,
the TodoMVC CSS file saved to /assets/css/todomvc-app.css
and the todomvc-app.css imported in app.scss,
your /items page should now look like this:
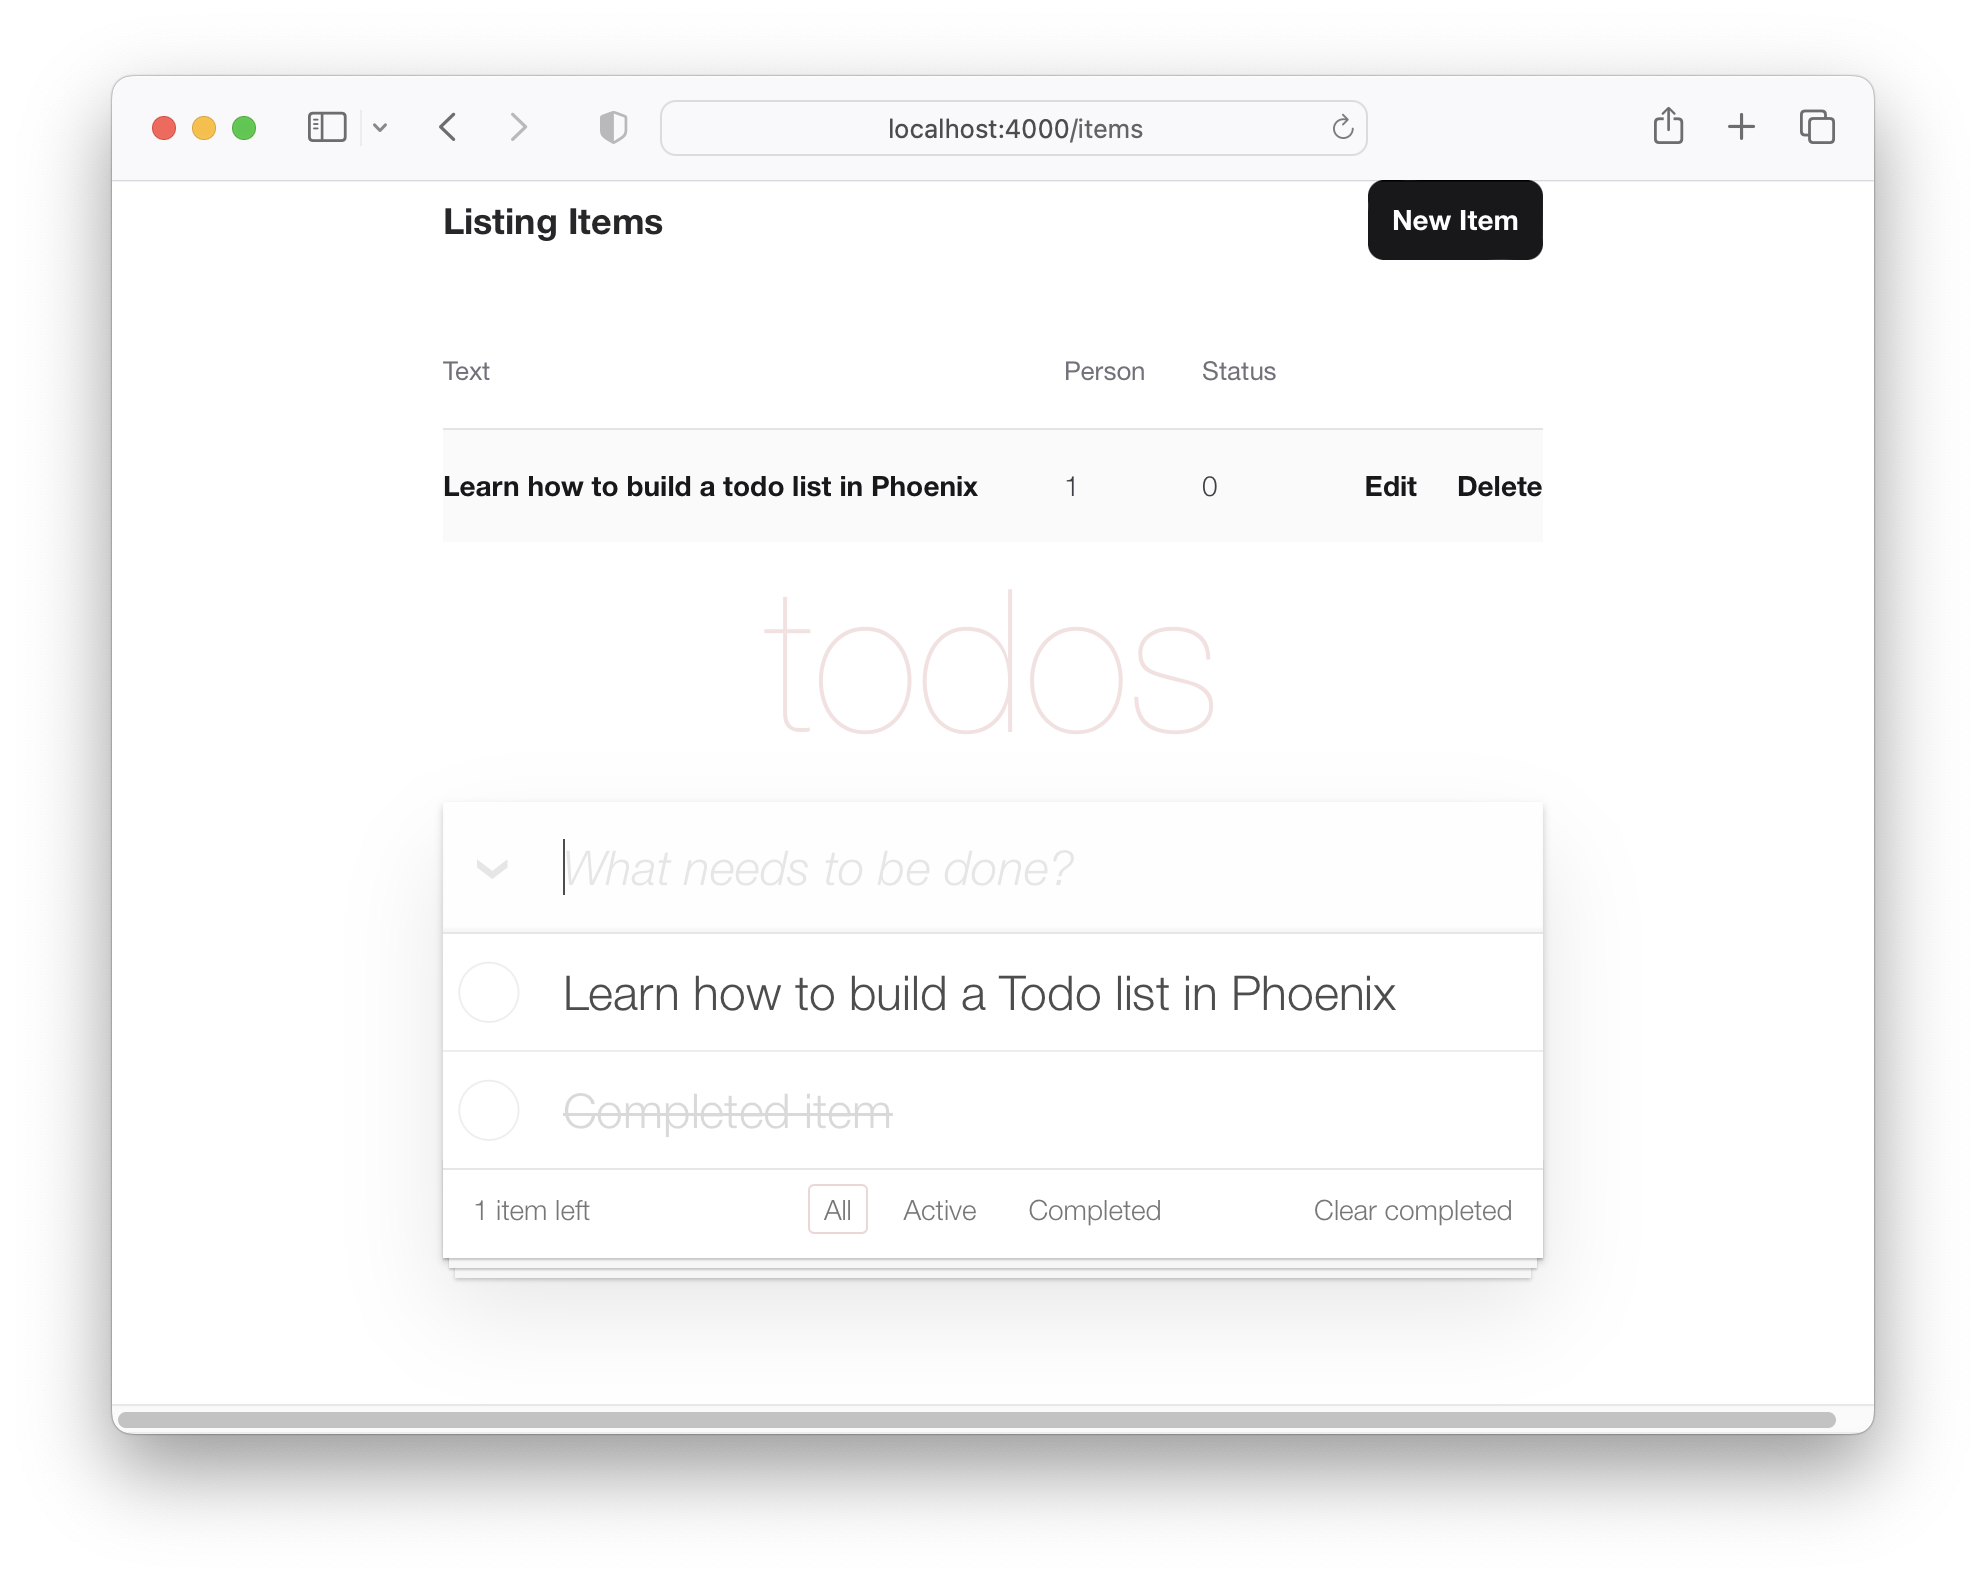
So our Todo List is starting to look like TodoMVC, but it's still just a dummy list.
4. Render Real Data in the TodoMVC Layout
In order to render out item data
in the TodoMVC template,
we are going to need to add
a few functions.
When we created the project
and generated the item model,
a controller was created
(located in lib/app_web/controllers/item_controller.ex)
and a component/view as well
(located in lib/app_web/controllers/item_html.ex).
This Component/View
is what effectively
controls the rendering of the
contents inside the
lib/app_web/controllers/item_html
directory that we tinkered with prior.
We know that we need make changes to the UI, so we are going to add a few functions in this component (which is akin to the View part of the MVC paradigm).
This is our first chance to do a bit of Test Driven Development (TDD).
Create a new file with the path test/app_web/controllers/item_html_test.exs.
Type the following code into the file:
defmodule AppWeb.ItemHTMLTest do
  use AppWeb.ConnCase, async: true
  alias AppWeb.ItemHTML

  test "complete/1 returns completed if item.status == 1" do
    assert ItemHTML.complete(%{status: 1}) == "completed"
  end

  test "complete/1 returns empty string if item.status == 0" do
    assert ItemHTML.complete(%{status: 0}) == ""
  end
end
e.g:
/test/app_web/controllers/item_html_test.exs
If you attempt to run this test file:
mix test test/app_web/controllers/item_html_test.exs
You will see the following error (because the function does not yet exist!):
** (UndefinedFunctionError) function AppWeb.ItemHTML.checked/1 is undefined or private
Open the
lib/app_web/controllers/item_html.ex file
and write the functions to make the tests pass.
This is how we implemented the functions.
Your item_html.ex file
now should look like the following.
defmodule AppWeb.ItemHTML do
  use AppWeb, :html

  embed_templates "item_html/*"

  # add class "completed" to a list item if item.status=1
  def complete(item) do
    case item.status do
      1 -> "completed"
      _ -> "" # empty string means empty class so no style applied
    end
  end
end
Re-run the tests and they should now pass:
mix test test/app_web/controllers/item_html_test.exs
You should see:
....

Finished in 0.1 seconds
4 tests, 0 failures
Now that we have created these two view functions, and our tests are passing, let's use them in our template!
Open the lib/app_web/controllers/item_html/index.html.eex file
and locate the line:
<ul class="todo-list">
Replace the contents of the <ul> with the following:
<%= for item <- @items do %>
  <li data-id={item.id} class={complete(item)}>
    <div class="view">
      <%= if item.status == 1 do %>
        <input class="toggle" type="checkbox" checked/>
      <% else %>
        <input class="toggle" type="checkbox"/>
      <% end %>
      <label><%= item.text %></label>
      <.link
        class="destroy"
        href={~p"/items/#{item}"}
        method="delete"
      >
      </.link>
    </div>
  </li>
<% end %>
e.g:
lib/app_web/controllers/item_html/index.html.heex#L43-L53
With those two files saved,
if you run the app now: mix phx.server
and visit http://localhost:4000/items.
You will see the real items you created in step 2.2 above:
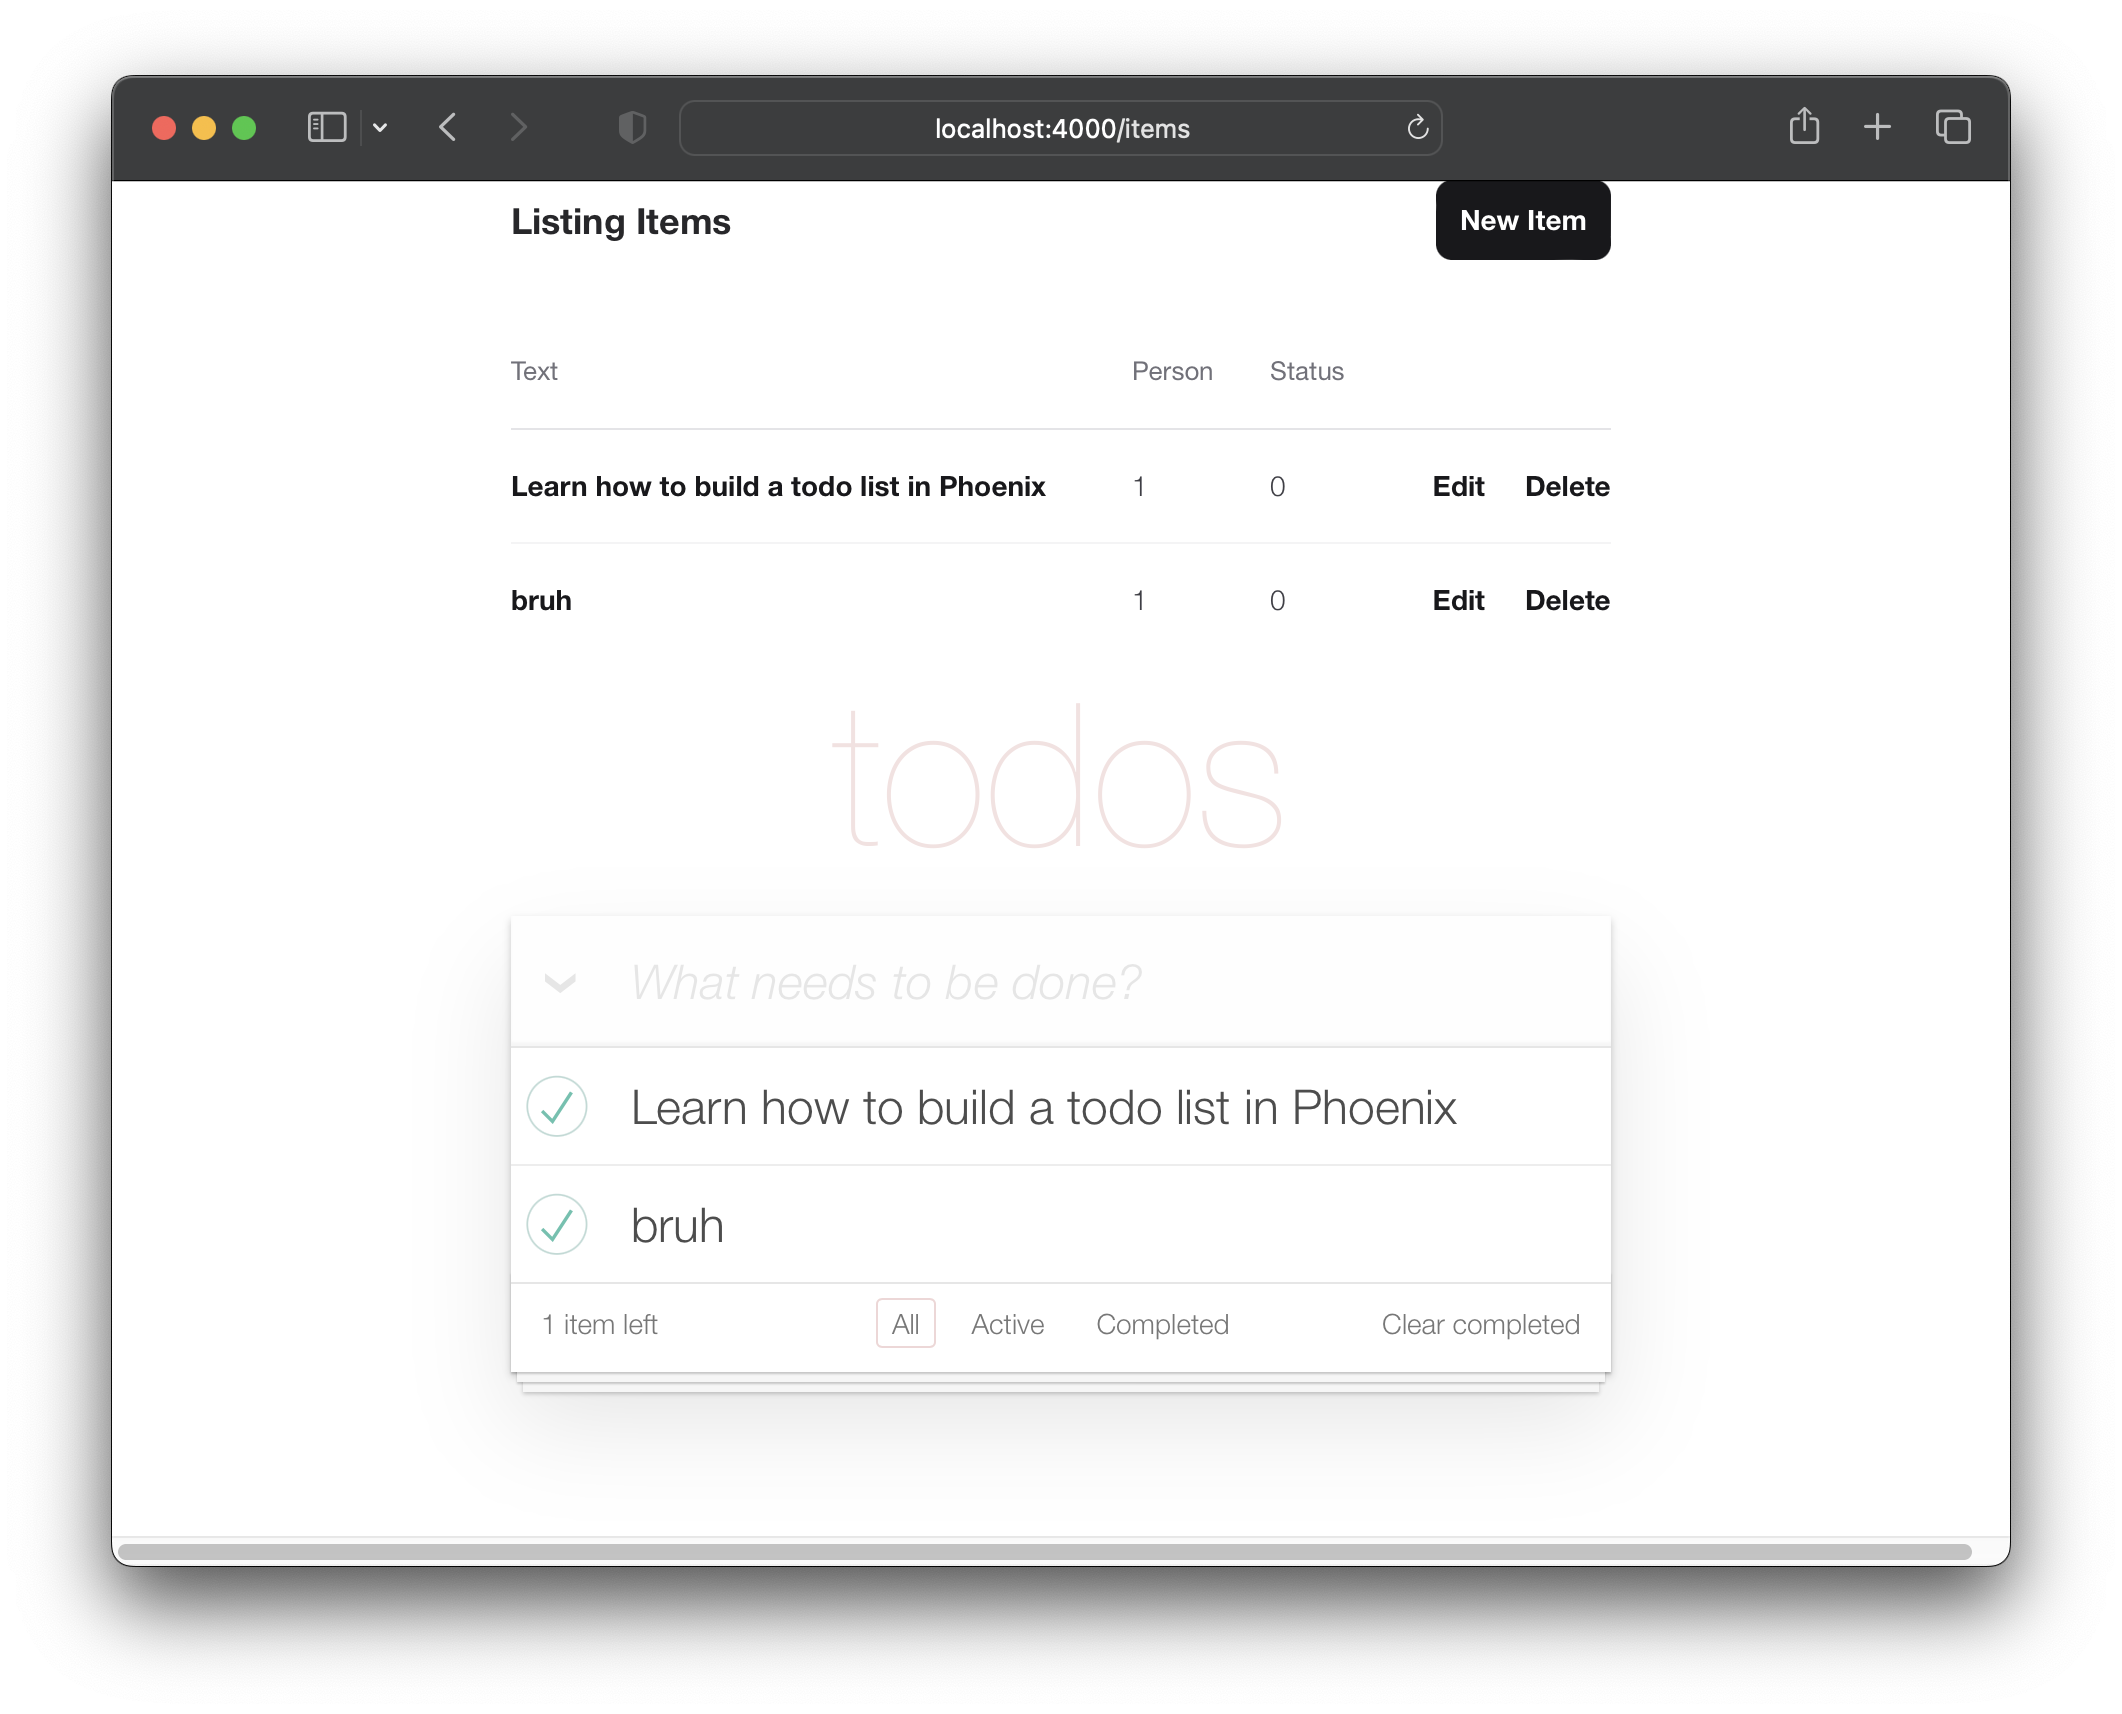
Now that we have our items rendering in the TodoMVC layout, let's work on creating new items in the "single page app" style.
5. In-line the New Item Creation Form
At present our "New Item" form is available at: http://localhost:4000/items/new (as noted in step 2 above)
We want the person to be able to create a new item
without having to navigate to a different page.
In order to achieve that goal,
we will include the
lib/app_web/controllers/item_html/new.html.heex
template (partial)
inside the
lib/app_web/controllers/item_html/index.html.heex
template. e.g:
Before we can do that, we need to tidy up the new.html.heex
template to remove the fields we don't need.
Let's open lib/app_web/controllers/item_html/new.html.heex
and simplify it to just the essential field :text:
<.simple_form :let={f} for={@changeset} action={~p"/items"}>
  <.input
    field={{f, :text}}
    type="text"
    placeholder="what needs to be done?"
  />
  <:actions>
    <.button style="display:none">Save Item</.button>
  </:actions>
</.simple_form>
Before:
/lib/app_web/controllers/item_html/new.html.heex
After:/lib/app_web/controllers/item_html/new.html.heex
We need to additionally
change the style of the <.input> tag.
With Phoenix, inside the
lib/app_web/components/core_components.ex file,
the styles are defined for pre-built components
(which is the case with <.input>).
To change this so it uses the same style as TodoMVC, locate the following line.
def input(assigns) do
Change the class attribute
with the new-todo class.
This function should look like the following.
  def input(assigns) do
    ~H"""
    <div phx-feedback-for={@name}>
      <.label for={@id}><%= @label %></.label>
      <input
        type={@type}
        name={@name}
        id={@id || @name}
        value={@value}
        class={[
          input_border(@errors),
          "new-todo"
        ]}
        {@rest}
      />
      <.error :for={msg <- @errors}><%= msg %></.error>
    </div>
    """
  end
We also need to change the actions styles
inside the simple_form.
In the same file, search for def simple_form(assigns) do
and change it so it looks like so:
  def simple_form(assigns) do
    ~H"""
    <.form :let={f} for={@for} as={@as} {@rest}>
      <div>
        <%= render_slot(@inner_block, f) %>
        <div :for={action <- @actions}>
          <%= render_slot(action, f) %>
        </div>
      </div>
    </.form>
    """
  end
If you run the Phoenix App now and visit
http://localhost:4000/items/new
you will see the single :text input field and no "Save" button:
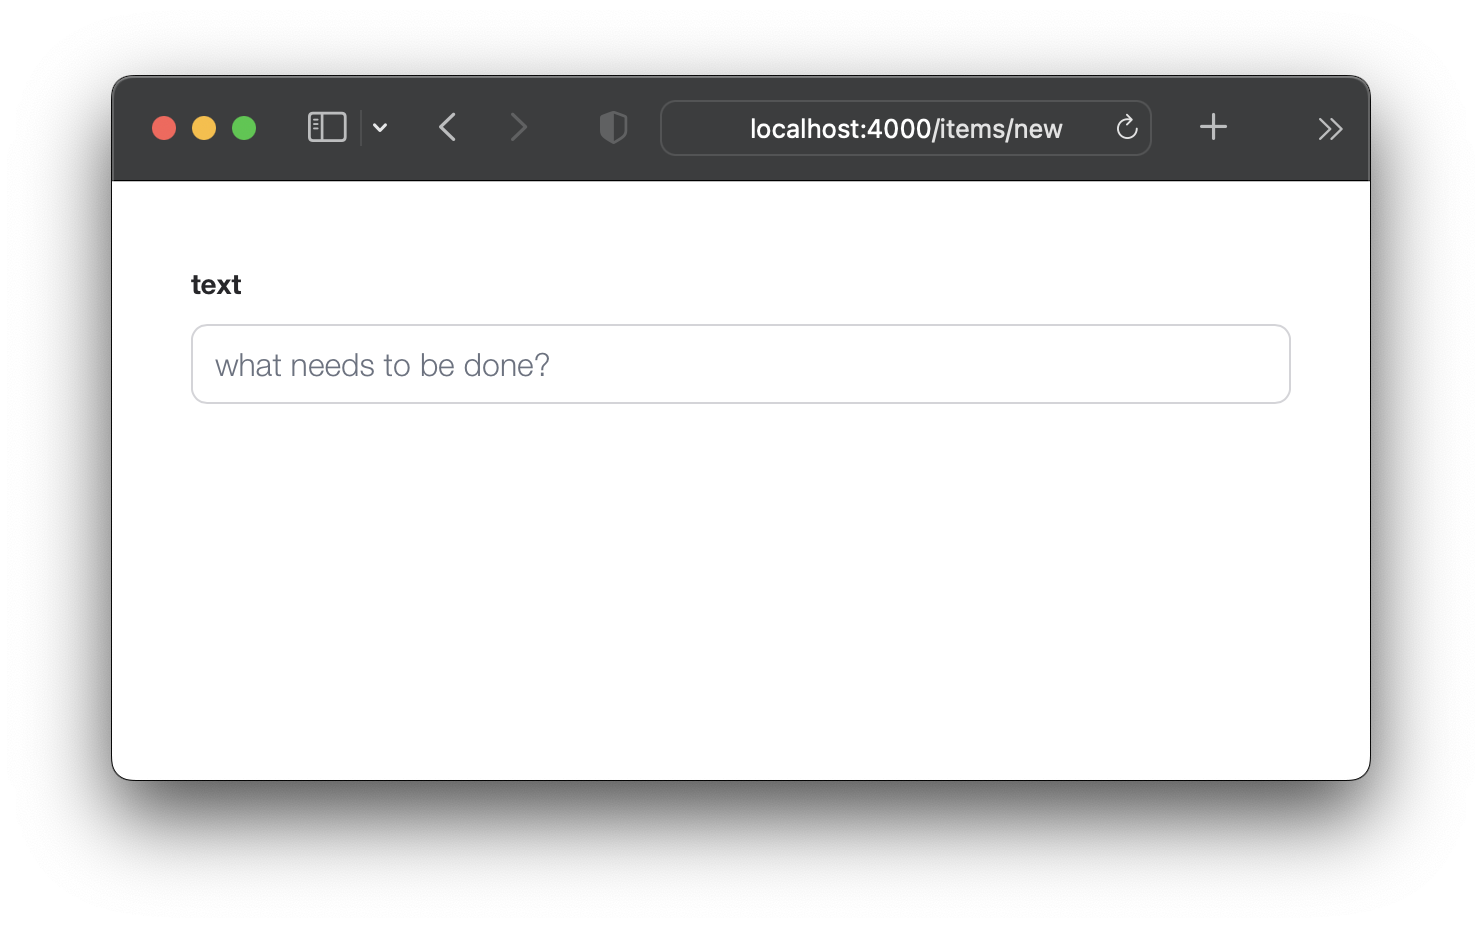
Don't worry, you can still submit the form with Enter (Return) key.
However if you attempt to submit the form now,
it won't work because we removed two of the fields required by the changeset!
Let's fix that.
5.1 Update the items Schema to Set default Values
Given that we have removed two of the fields (:person_id and :status)
from the new.html.eex,
we need to ensure there are default values for these in
the schema.
Open the lib/app/todo/item.ex file
and replace the contents with the following:
defmodule App.Todo.Item do
  use Ecto.Schema
  import Ecto.Changeset

  schema "items" do
    field :person_id, :integer, default: 0
    field :status, :integer, default: 0
    field :text, :string

    timestamps()
  end

  @doc false
  def changeset(item, attrs) do
    item
    |> cast(attrs, [:text, :person_id, :status])
    |> validate_required([:text])
  end
end
Here we are updating the "items" schema
to set a default value of 0
for both person_id and status.
And in the changeset/2 we are removing the requirement
for person_id and status.
That way our new item form
can be submitted with just the text field.
e.g:
/lib/app/todo/item.ex#L6-L7
Now that we have default values for person_id and status
if you submit the /items/new form,
it will succeed.
5.2 Update index/2 in ItemController
In order to in-line the new item form (new.html.eex)
in the index.html.eex template,
we need to update the AppWeb.ItemController.index/2
to include a Changeset.
Open the lib/app_web/controllers/item_controller.ex file
and update the index/2 function to the following:
def index(conn, _params) do
  items = Todo.list_items()
  changeset = Todo.change_item(%Item{})
  render(conn, "index.html", items: items, changeset: changeset)
end
Before:
/lib/app_web/controllers/item_controller.ex
After:
/lib/app_web/controllers/item_controller.ex#L9-L10
You will not see any change in the UI or tests after this step. Just move on to 5.3 where the "aha" moment happens.
5.3 Render The new.html.eex inside index.html.eex
Now that we have done all the preparation work,
the next step is to render the new.html.eex (partial)
inside index.html.eex template.
Open the lib/app_web/controllers/item_html/index.html.heex
file and locate the line:
<input class="new-todo" placeholder="What needs to be done?" autofocus="">
Replace it with this:
<%= new(Map.put(assigns, :action, ~p"/items/new")) %>
Let's break down what we just did.
We are embedding the new.html.heex partial
inside the index.html.heex file.
We are doing this by calling the
new/2 function inside item_controller.ex.
This function pertains to the page in the URL items/new
and renders the new.html.heex file.
Hence why we call this function to successfully embed 😄.
Before:
/lib/app_web/controllers/item_html/index.html.heex#L36
After:
/lib/app_web/controllers/item_html/index.html.heex#L36
If you run the app now and visit:
http://localhost:4000/items
You can create an item by typing your text
and submit it with the Enter (Return) key.
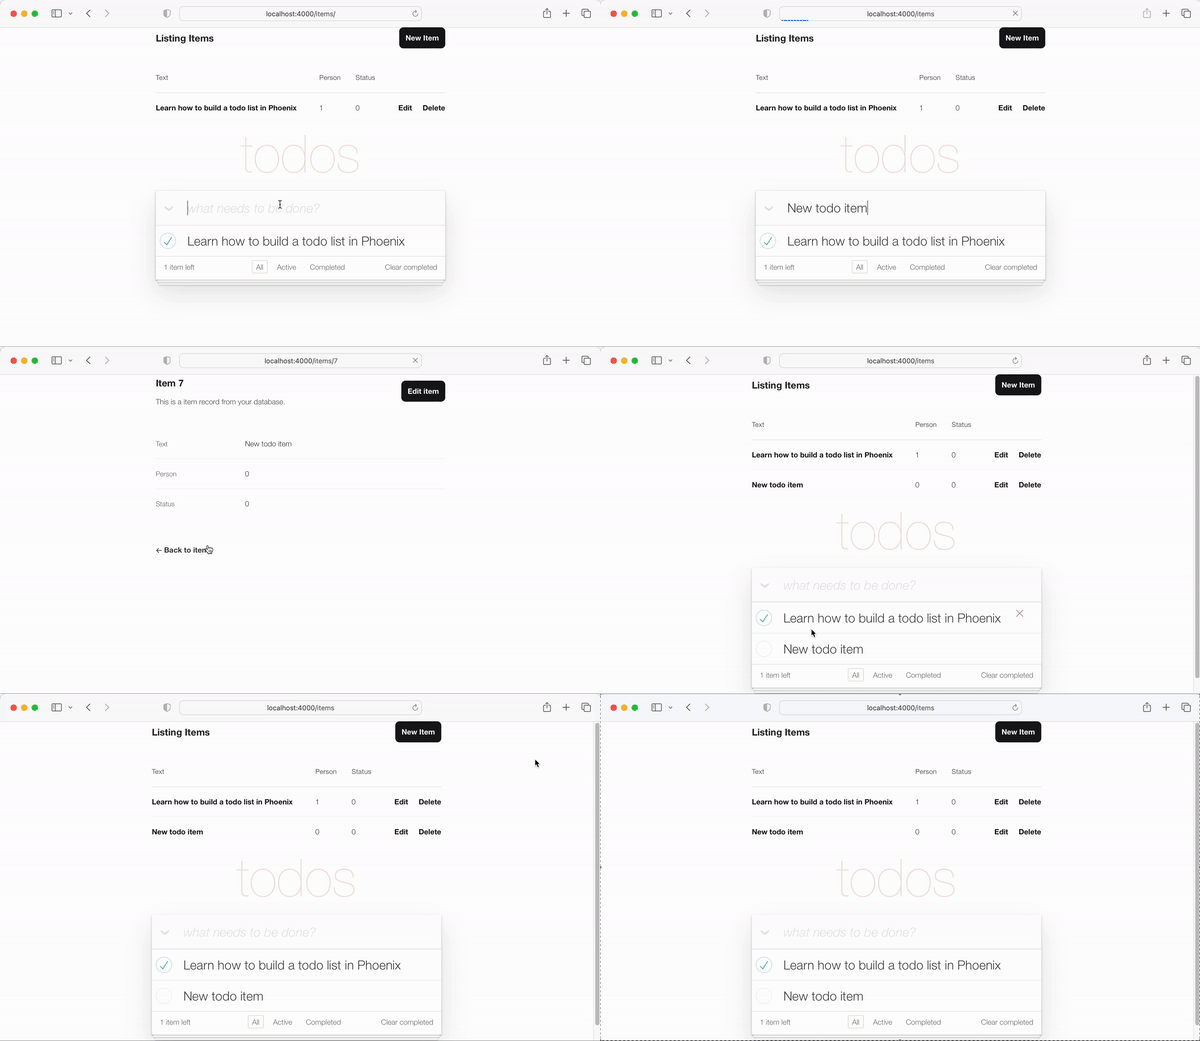
Redirecting to the "show" template
is "OK", but we can do better UX by
redirecting to back to the index.html template.
Thankfully this is as easy as updating a single line in the code.
5.4 Update the redirect in create/2
Open the lib/app_web/controllers/item_controller.ex file
and locate the create function.
Specifically the line:
|> redirect(to: ~p"/items/#{item}")
Update the line to:
|> redirect(to: ~p"/items/")
Before:
/lib/app_web/controllers/item_controller.ex#L22
After:
/lib/app_web/controllers/item_controller.ex#L23
Now when we create a new item
we are redirected to the index.html template:
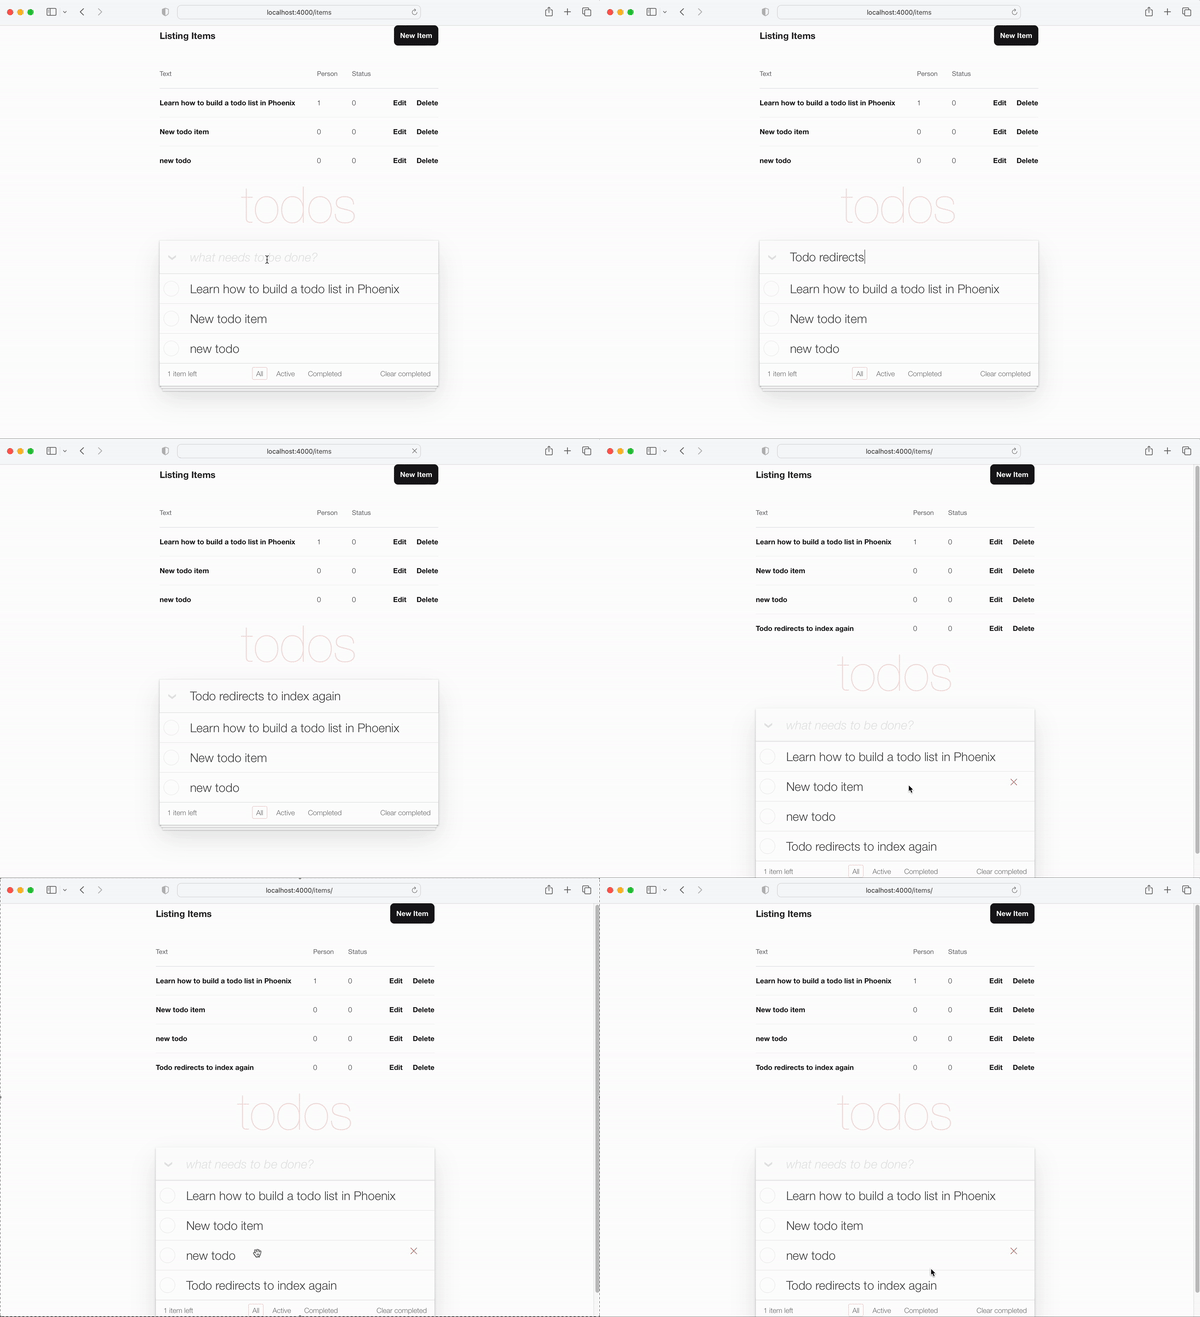
5.5 Update item_controller_test.exs to redirect to index
The changes we've made to the new.html.heex files
and the steps above have broken some of our automated tests.
We ought to fix that.
Run the tests:
mix test
You will see the following output:
Finished in 0.08 seconds (0.03s async, 0.05s sync)
23 tests, 3 failures
Open the test/app_web/controllers/item_controller_test.exs file
and locate describe "new item"
and describe "create item".
Change these two to the following.
Replace the test:
describe "new item" do
  test "renders form", %{conn: conn} do
    conn = get(conn, ~p"/items/new")
    assert html_response(conn, 200) =~ "what needs to be done?"
  end
end

describe "create item" do
  test "redirects to show when data is valid", %{conn: conn} do
    conn = post(conn, ~p"/items", item: @create_attrs)

    assert %{} = redirected_params(conn)
    assert redirected_to(conn) == ~p"/items/"
  end

  test "errors when invalid attributes are passed", %{conn: conn} do
    conn = post(conn, ~p"/items", item: @invalid_attrs)
    assert html_response(conn, 200) =~ "can't be blank"
  end
end
Updated code:
/test/app_web/controllers/item_controller_test.exs#L34-L55
If you re-run the tests mix test the will now all pass again.
......................
Finished in 0.2 seconds (0.09s async, 0.1s sync)
22 tests, 0 failures
6. Display Count of Items in UI
So far the main functionality of the TodoMVC UI is working, we can create new items and they appear in our list. In this step we are going to enhance the UI to include the count of remaining items in the bottom left corner.
Open the test/app_web/controllers/item_html_test.exs file
and create the following two tests:
test "remaining_items/1 returns count of items where item.status==0" do
  items = [
    %{text: "one", status: 0},
    %{text: "two", status: 0},
    %{text: "done", status: 1}
  ]
  assert ItemHTML.remaining_items(items) == 2
end

test "remaining_items/1 returns 0 (zero) when no items are status==0" do
  items = []
  assert ItemHTML.remaining_items(items) == 0
end
e.g:
test/app_web/controllers/item_html_test.exs#L14-L26
These tests will fail because the ItemHTML.remaining_items/1
function does not exist.
Make the tests pass by adding the following code to
the lib/app_web/controllers/item_html.ex file:
# returns integer value of items where item.status == 0 (not "done")
def remaining_items(items) do
  Enum.filter(items, fn i -> i.status == 0 end) |> Enum.count
end
e.g:
/lib/app_web/controllers/item_html#L15-L17
Now that the tests are passing,
use the remaining_items/1 in the index.html template.
Open the lib/app_web/controllers/item_html/index.html.eex file
and locate the line of code:
<span class="todo-count"><strong>1</strong> item left</span>
Replace it with this line:
<span class="todo-count"><%= remaining_items(@items) %> items left</span>
This just invokes the ItemHTML.remaining_items/1 function
with the List of @items which will return the integer count
of remaining items that have not yet been "done".
E.g:
/lib/app_web/controllers/item_html/index.html.eex#L60
At this point the (remaining) items counter
in the bottom left of the TodoMVC UI is working!
Add a new item to your list and watch the count increase:
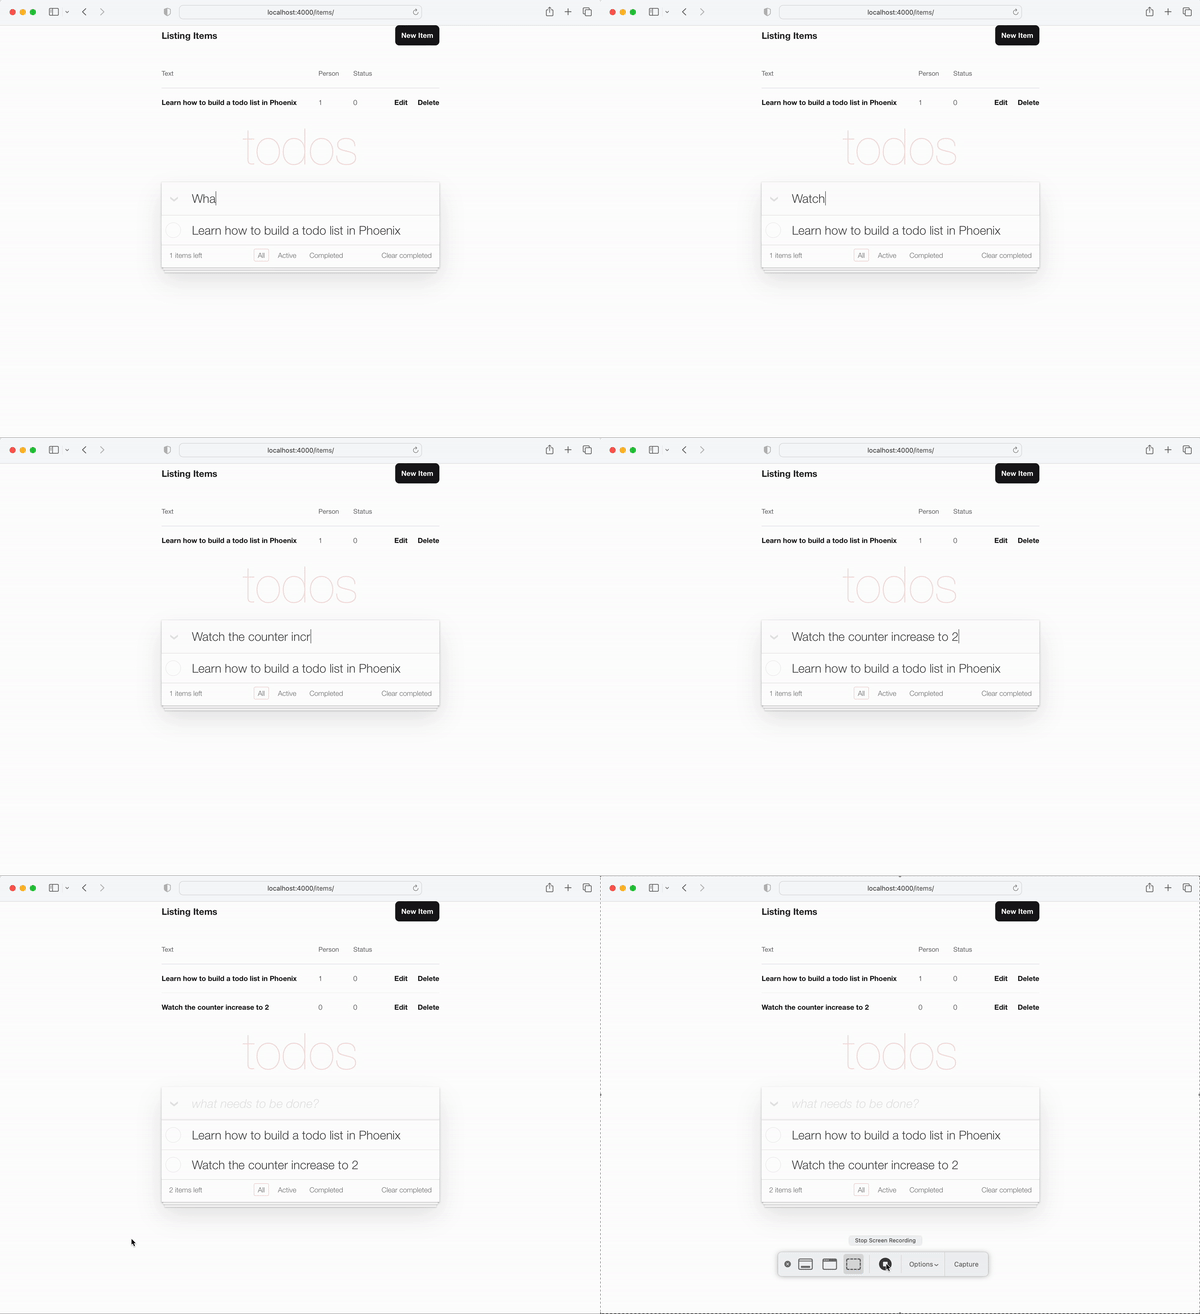
That was easy enough let's try something a bit more advanced!
Take a break and grab yourself a fresh glass of water,
the next section is going be intense!
7. Toggle a Todo Item's status to 1
One of the core functions of a Todo List is
toggling the status of an item from 0 to 1 ("complete").
In our schema a completed item
has the status of 1.
7.1 Create the Controller Tests
We are going to need two functions in our controller:
toggle_status/1toggles the status of an item e.g: 0 to 1 and 1 to 0.toggle/2the handler function for HTTP requests to toggle the status of an item.
Open the test/app_web/controllers/item_controller_test.exs file.
We are going to make some changes here
so we can add tests to the functions we
mentioned prior.
We are going to import App.Todo
inside item_controller_test.exs
and fix create and attribute constants
to create mock items.
Make sure the beginning of the
file looks like so.
defmodule AppWeb.ItemControllerTest do
  use AppWeb.ConnCase
  alias App.Todo

  import App.TodoFixtures

  @create_attrs %{person_id: 42, status: 0, text: "some text"}
  @public_create_attrs %{person_id: 0, status: 0, text: "some public text"}
  @completed_attrs %{person_id: 42, status: 1, text: "some text completed"}
  @public_completed_attrs %{person_id: 0, status: 1, text: "some public text completed"}
  @update_attrs %{person_id: 43, status: 1, text: "some updated text"}
  @invalid_attrs %{person_id: nil, status: nil, text: nil}
We are adding fixed Item attributes
to later be used in tests.
We are specifying public Items
because we will later add
authentication to this app.
After this, locate defp create_item()/1
function inside the same file.
Change it so it looks like so.
  defp create_item(_) do
    item = item_fixture(@create_attrs)
    %{item: item}
  end
We are going to be using this function
to create Item objects
to use in the tests we are going to add.
Speaking of which, let's do that!
Add the following snippet to the file.
describe "toggle updates the status of an item 0 > 1 | 1 > 0" do
  setup [:create_item]

  test "toggle_status/1 item.status 1 > 0", %{item: item} do
    assert item.status == 0
    # first toggle
    toggled_item = %{item | status: AppWeb.ItemController.toggle_status(item)}
    assert toggled_item.status == 1
    # second toggle sets status back to 0
    assert AppWeb.ItemController.toggle_status(toggled_item) == 0
  end

  test "toggle/2 updates an item.status 0 > 1", %{conn: conn, item: item} do
    assert item.status == 0
    get(conn, ~p'/items/toggle/#{item.id}')
    toggled_item = Todo.get_item!(item.id)
    assert toggled_item.status == 1
  end
end
e.g:
/test/app_web/controllers/item_controller_test.exs#L64-L82
7.2 Create the Functions to Make Tests Pass
Open the
lib/app_web/controllers/item_controller.ex
file and add the following functions to it:
  def toggle_status(item) do
    case item.status do
      1 -> 0
      0 -> 1
    end
  end

  def toggle(conn, %{"id" => id}) do
    item = Todo.get_item!(id)
    Todo.update_item(item, %{status: toggle_status(item)})
    conn
    |> redirect(to: ~p"/items")
  end
e.g:
/lib/app_web/controllers/item_controller.ex#L64-L76
The tests will still fail at this point because the route we are invoking in our test does not yet exist. Let's fix that!
7.3 Create get /items/toggle/:id Route that Invokes toggle/2
Open the lib/app_web/router.ex
and locate the line resources "/items", ItemController.
Add a new line:
get "/items/toggle/:id", ItemController, :toggle
e.g:
/lib/app_web/router.ex#L21
Now our tests will finally pass:
mix test
You should see:
22:39:42.231 [info]  Already up
...........................

Finished in 0.5 seconds
27 tests, 0 failures
7.4 Invoke the toggle/2 When a Checkbox is clicked in index.html
Now that our tests are passing,
it's time actually use all this functionality we have been building
in the UI.
Open the /lib/app_web/controllers/item_html/index.html.heex file
and locate the line:
<%= if item.status == 1 do %>
...
<% else %>
...
<% end %>
Replace it with the following:
  <%= if item.status == 1 do %>
    <.link href={~p"/items/toggle/#{item.id}"}
        class="toggle checked">
        type="checkbox"
    </.link>
  <% else %>
    <.link href={~p"/items/toggle/#{item.id}"}
        type="checkbox"
        class="toggle">
    </.link>
  <% end %>
When this link is clicked
the get /items/toggle/:id endpoint is invoked,
that in turn triggers the toggle/2 handler
we defined above.
Before:
/lib/app_web/controllers/item_html/index.html.heex#L40
After:/lib/app_web/controllers/item_html/index.html.heex#L47-L57
7.5 Add a .checked CSS to app.scss
Unfortunately, <a> tags (that are generated with <.link>)
cannot have a :checked pseudo selector,
so the default TodoMVC styles that worked on the <input> tag
will not work for the link.
So we need to add a couple of lines of CSS to our app.scss.
Open the assets/css/app.scss file and add the following lines to it:
.todo-list li .checked + label {
	background-image: url('data:image/svg+xml;utf8,%3Csvg%20xmlns%3D%22http%3A//www.w3.org/2000/svg%22%20width%3D%2240%22%20height%3D%2240%22%20viewBox%3D%22-10%20-18%20100%20135%22%3E%3Ccircle%20cx%3D%2250%22%20cy%3D%2250%22%20r%3D%2250%22%20fill%3D%22none%22%20stroke%3D%22%23bddad5%22%20stroke-width%3D%223%22/%3E%3Cpath%20fill%3D%22%235dc2af%22%20d%3D%22M72%2025L42%2071%2027%2056l-4%204%2020%2020%2034-52z%22/%3E%3C/svg%3E');
	background-repeat: no-repeat;
}
After saving the file you should have:
/assets/css/app.scss#L8
And when you view the app, the Toggle functionality is working as expected:
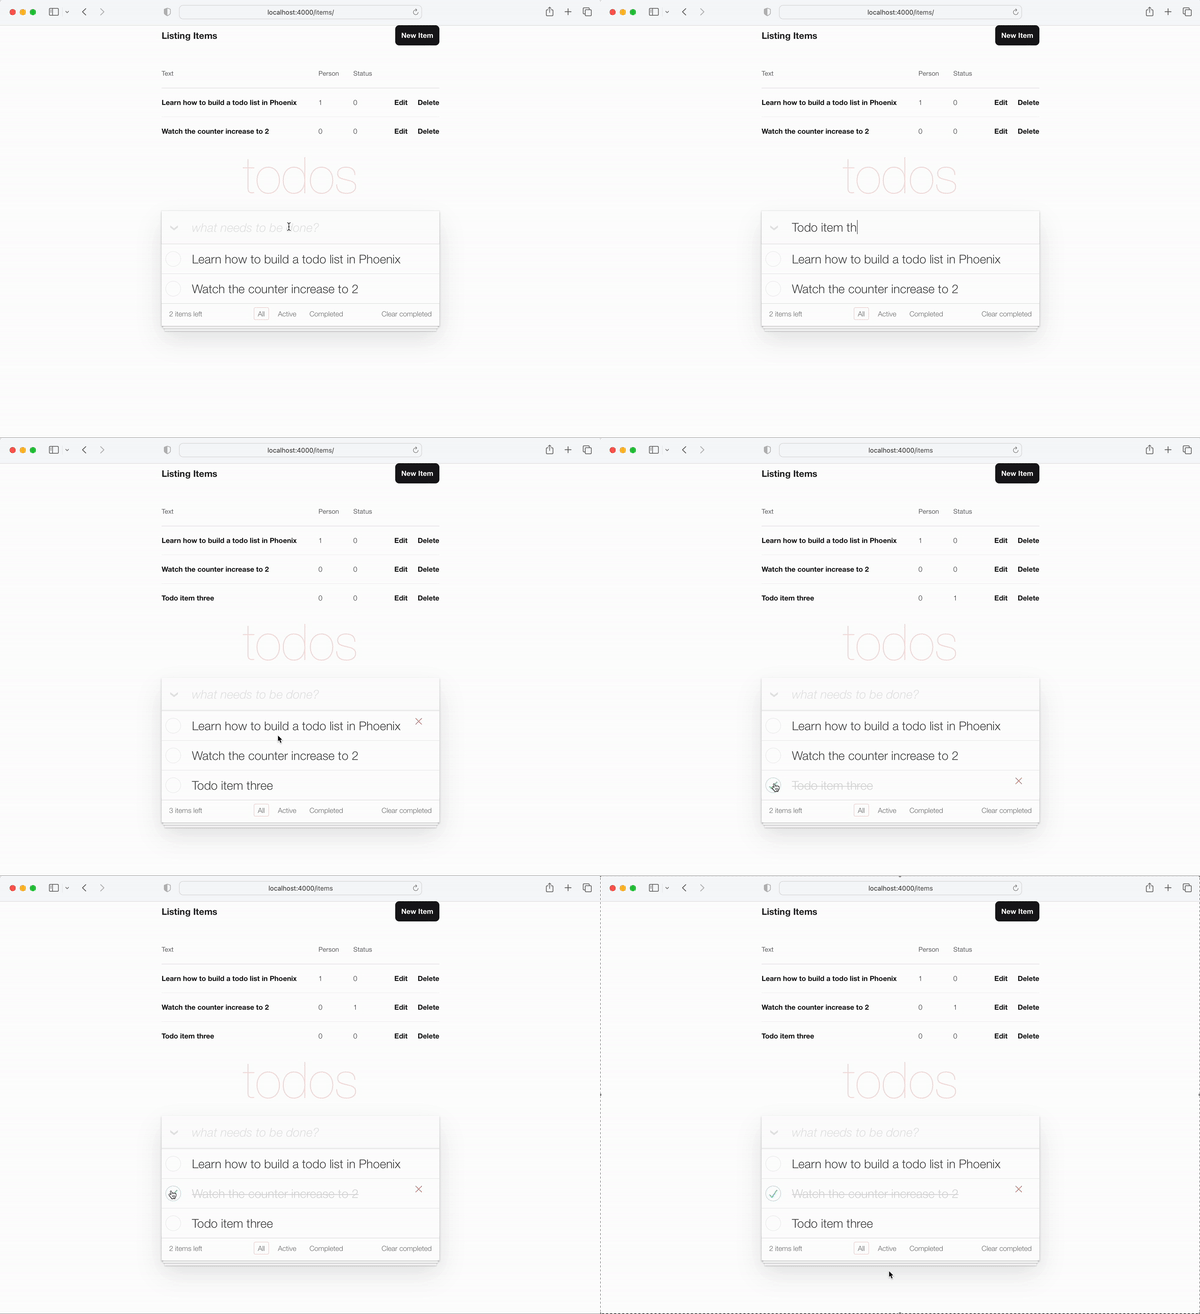
Implementation Note: we are very deliberately
not using an JavaScript in this tutorial
because we are demonstrating how to do a 100% server-side rendered App.
This always works even when JS is disabled in the browser
or the device is super old and does not have a modern web browser.
We could easily have added an onclick attribute to the <input> tag,
e.g:
<input <%= checked(item) %> type="checkbox" class="toggle"
onclick="location.href='
  <%= Routes.item_path(@conn, :toggle, item.id) %>';">
But onclick is JavaScript and we don't need to resort to JS.
The <a> (link) is a perfectly semantic non-js approach to toggling
item.status.
7.6 Maintaining correct order of todo items
If you "complete" or revert the operation,
the order of the todos might differ between
these operations.
To keep this consistent,
let's fetch all the todo items in the same order.
Inside lib/app/todo.ex,
change list_items/0 to the following.
  def list_items do
    query =
      from(
        i in Item,
        select: i,
        order_by: [asc: i.id]
      )

    Repo.all(query)
  end
By fetching the todo items and ordering them,
we guarantee the UX stays consistent!
8. Edit an Item!
The final piece of functionality we need to add to our UI is the ability to edit an item's text.
At the end of this step you will have in-line editing working:
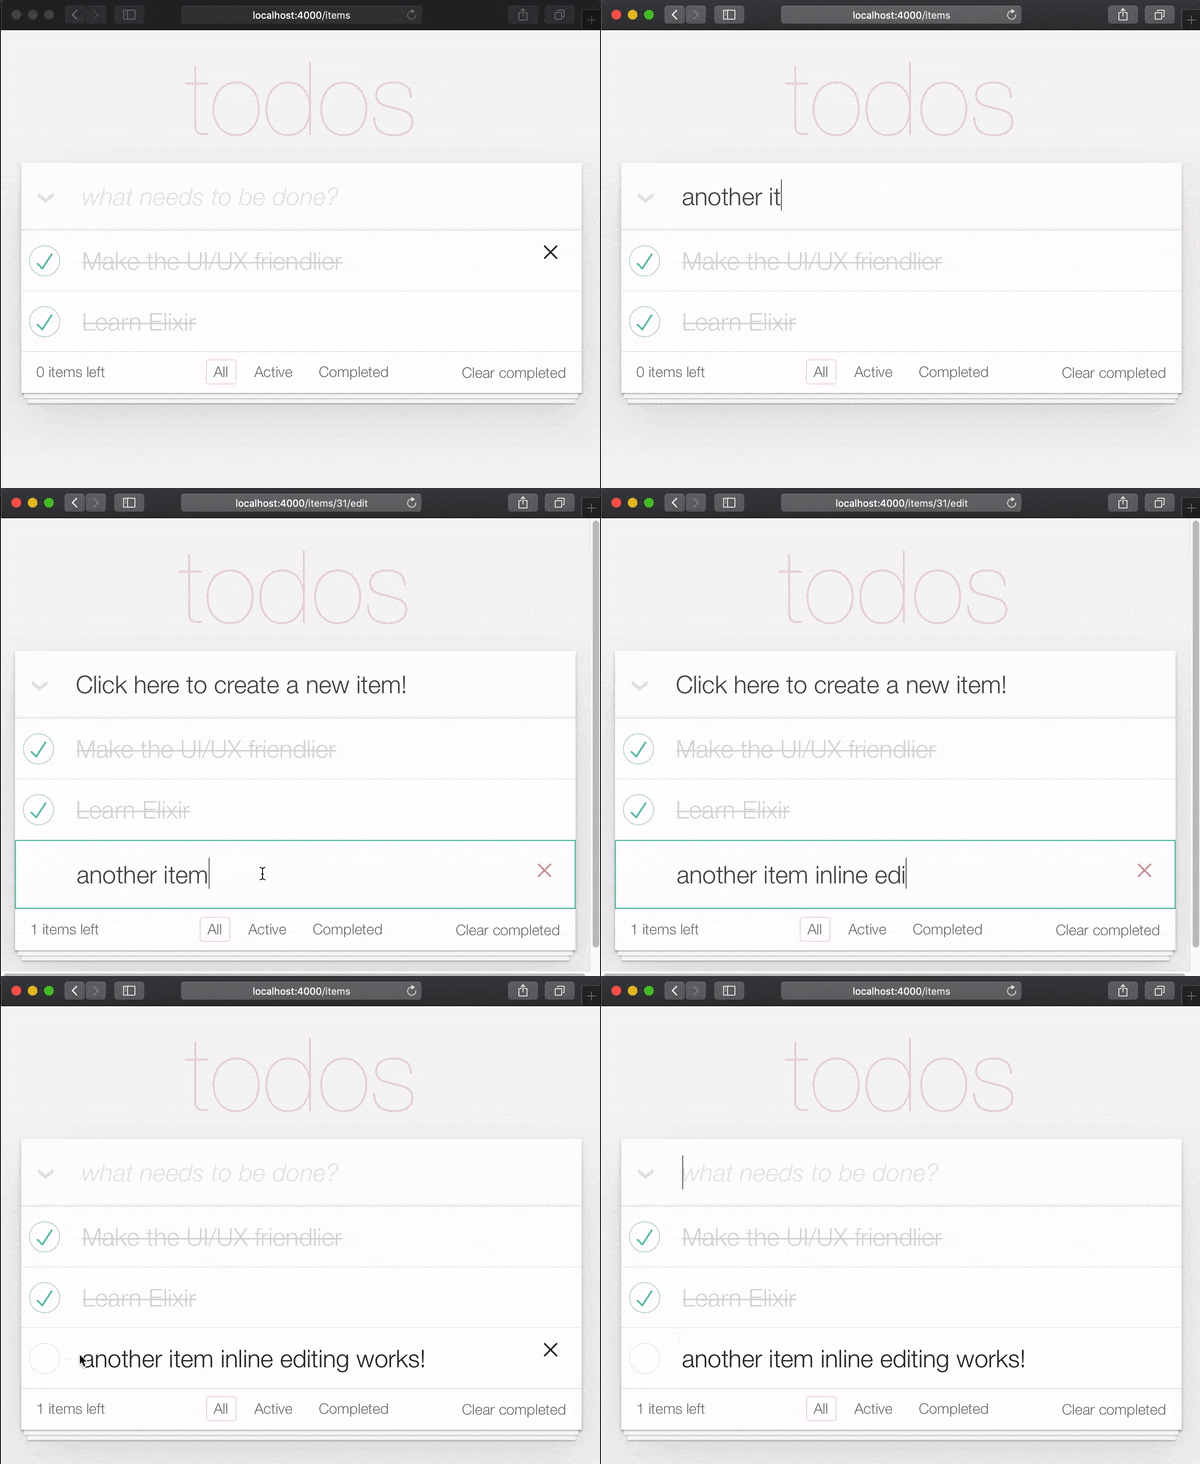
8.1 Double-Click Item Text to Edit
The reason for requiring two clicks to edit an item, is so that people don't accidentally edit an item while scrolling. So they have to deliberately click/tap twice in order to edit.
In the TodoMVC spec this is achieved
by creating an event listener for the double-click event
and replacing the <label> element with an <input>.
We are trying to avoid using JavaScript
in our server-side rendered Phoenix App (for now),
so we want to use an alternative approach.
Thankfully we can simulate the double-click event
using just HTML and CSS.
see: https://css-tricks.com/double-click-in-css
(we recommend reading that post and the Demo
to fully understand how this CSS works!)
Note: the CSS implementation is not a true double-click, a more accurate description would be "two click" because the two clicks can occur with an arbitrary delay. i.e. first click followed by 10sec wait and second click will have the same effect as two clicks in quick succession. If you want to implement true double-click, see: github.com/dwyl/javascript-todo-list-tutorial#52-double-click
Let's get on with it!
Open the
lib/app_web/controllers/item_html/index.html.heex
file and locate the line:
<%= new(Map.put(assigns, :action, ~p"/items/new")) %>
Replace it with:
<%= if @editing.id do %>
  <.link href={~p"/items"}
      method="get"
      class="new-todo">
      Click here to create a new item!
  </.link>
<% else %>
  <%= new(Map.put(assigns, :action, ~p"/items/new")) %>
<% end %>
In here, we are checking if we are editing an item,
and rendering a link instead of the form.
We do this to avoid having multiple forms on the page.
If we are not editing an item,
render the new.html.heex as before.
With this, if the user is editing an item,
he is able to "get out of editing mode"
by clicking on the link that is rendered.
e.g:
lib/app_web/controllers/item_html/index.html.heex#L30-L38
Next, still in the index.html.eex file,
locate the line:
<%= for item <- @items do %>
Replace the entire <li> tag
with the following code.
<li data-id={item.id} class={complete(item)}>
    <%= if item.status == 1 do %>
      <.link href={~p"/items/toggle/#{item.id}"}
          class="toggle checked">
          type="checkbox"
      </.link>
    <% else %>
      <.link href={~p"/items/toggle/#{item.id}"}
          type="checkbox"
          class="toggle">
      </.link>
    <% end %>

  <div class="view">
    <%= if item.id == @editing.id do %>
      <%= edit(
        Map.put(assigns, :action, ~p"/items/#{item.id}/edit")
        |> Map.put(:item, item)
      ) %>
    <% else %>
      <.link href={~p"/items/#{item}/edit"} class="dblclick">
        <label><%= item.text %></label>
      </.link>
      <span></span> <!-- used for CSS Double Click -->
    <% end %>

    <.link
      class="destroy"
      href={~p"/items/#{item}"}
      method="delete"
    >
    </.link>
  </div>
</li>
e.g:
lib/app_web/controllers/item_html/index.html.heex#L46-L79
We have done a few things here.
We changed the toggle button outside the
<div class="view> tag.
Additionally, we have changed the text
with a if else block statements.
If the user is not editing,
a link (<a>) is rendered which,
when clicked, allows the user to enter "edit" mode.
On the other hand, if the user is editing,
it renders the edit.html.heex file.
Speaking of which, let's edit edit.html.heex
so it renders what we want:
a text field that, once Enter is pressed,
edits the referring todo item.
<.simple_form :let={f} for={@changeset} method="put" action={~p"/items/#{@item}"}>
  <.input
    field={{f, :text}}
    type="text"
    placeholder="what needs to be done?"
    class="new-todo"
  />
  <:actions>
    <.button
    style="display: none;"
    type="submit">
      Save
    </.button>
  </:actions>
  <!-- submit the form using the Return/Enter key -->
</.simple_form>
8.2 Update CSS For Editing
To enable the CSS double-click effect
to enter edit mode,
we need to add the following CSS
to our assets/css/app.scss file:
.dblclick {
  position: relative; /* So z-index works later, but no surprises now */
}

.dblclick + span {
  position: absolute;
  top: -1px; /* these negative numbers are to ensure */
  left: -1px; /* that the <span> covers the <a> */
  width: 103%; /* Gotta do this instead of right: 0; */
  bottom: -1px;
  z-index: 1;
}

.dblclick + span:active {
  left: -9999px;
}

.dblclick:hover {
  z-index: 2;
}
e.g:
assets/css/app.css#L13-L32
Additionally, since our markup is slightly different to the TodoMVC markup, we need to add a bit more CSS to keep the UI consistent:
.todo-list li .toggle + div > a > label {
  background-image: url('data:image/svg+xml;utf8,%3Csvg%20xmlns%3D%22http%3A//www.w3.org/2000/svg%22%20width%3D%2240%22%20height%3D%2240%22%20viewBox%3D%22-10%20-18%20100%20135%22%3E%3Ccircle%20cx%3D%2250%22%20cy%3D%2250%22%20r%3D%2250%22%20fill%3D%22none%22%20stroke%3D%22%23ededed%22%20stroke-width%3D%223%22/%3E%3C/svg%3E');
  background-repeat: no-repeat;
  background-position: center left;
}

.todo-list li .checked + div > a > label
{
  background-image: url('data:image/svg+xml;utf8,%3Csvg%20xmlns%3D%22http%3A//www.w3.org/2000/svg%22%20width%3D%2240%22%20height%3D%2240%22%20viewBox%3D%22-10%20-18%20100%20135%22%3E%3Ccircle%20cx%3D%2250%22%20cy%3D%2250%22%20r%3D%2250%22%20fill%3D%22none%22%20stroke%3D%22%23bddad5%22%20stroke-width%3D%223%22/%3E%3Cpath%20fill%3D%22%235dc2af%22%20d%3D%22M72%2025L42%2071%2027%2056l-4%204%2020%2020%2034-52z%22/%3E%3C/svg%3E');
  background-repeat: no-repeat;
  background-position: center left;
}

.toggle {
  width: 10%;
  z-index: 3; /* keep the toggle checkmark above the rest */
}

a.new-todo {
  display: block;
  text-decoration: none;
}

.todo-list .new-todo {
  border: 1px #1abc9c solid;
}

.view a, .view a:visited {
  display: block;
  text-decoration: none;
  color: #2b2d2f;
}

.todo-list li .destroy {
  text-decoration: none;
  text-align: center;
  z-index: 3; /* keep the delete link above the text */
}
This is what your app.scss file should look like
at the end of this step:
assets/css/app.css#L34-L71
8.3 Update the ItemController.edit/2 Function
In order to enable in-line editing,
we need to modify the edit/2 function.
Open the lib/app_web/controllers/item_controller.ex file
and replace the edit/2 function with the following:
def edit(conn, params) do
  index(conn, params)
end
Additionally, given that we are asking our index/2 function
to handle editing, we need to update index/2:
def index(conn, params) do
  item = if not is_nil(params) and Map.has_key?(params, "id") do
    Todo.get_item!(params["id"])
  else
    %Item{}
  end
  items = Todo.list_items()
  changeset = Todo.change_item(item)
  render(conn, "index.html", items: items, changeset: changeset, editing: item)
end
Finally, we need to handle the form submission
to update an item (that is rendered in edit.html.heex).
When we press Enter, the update/2 handler is called
inside lib/app_web/controllers/item_controller.ex.
We want to stay on the same page after updating the item.
So,change it so it looks like this.
def update(conn, %{"id" => id, "item" => item_params}) do
  item = Todo.get_item!(id)

  case Todo.update_item(item, item_params) do
    {:ok, _item} ->
      conn
      |> redirect(to: ~p"/items/")

    {:error, %Ecto.Changeset{} = changeset} ->
      render(conn, :edit, item: item, changeset: changeset)
  end
end
Your item_controller.ex file should now look like this:
lib/app_web/controllers/item_controller.ex
8.4 Update the Tests in ItemControllerTest
In our quest to build a Single Page App, we broke a few tests! That's OK. They're easy to fix.
Open the test/app_web/controllers/item_controller_test.exs
file and locate the test with the following text.
test "renders form for editing chosen item"
and change it so it looks like the following.
  test "renders form for editing chosen item", %{conn: conn, item: item} do
    conn = get(conn, ~p"/items/#{item}/edit")
    assert html_response(conn, 200) =~ "Click here to create a new item"
  end
When we enter the "edit timer mode",
we create <a> a link to return to /items,
as we have previously implemented.
This tag has the "Click here to create a new item" text,
which is what we are asserting.
e.g:
test/app_web/controllers/item_controller_test.exs#L37-L39
Next, locate the test with the following description:
describe "update item"
Update the block to the following piece of code.
describe "update item" do
  setup [:create_item]

  test "redirects when data is valid", %{conn: conn, item: item} do
    conn = put(conn, ~p"/items/#{item}", item: @update_attrs)
    assert redirected_to(conn) == ~p"/items/"

    conn = get(conn, ~p"/items/")
    assert html_response(conn, 200) =~ "some updated text"
  end

  test "errors when invalid attributes are passed", %{conn: conn, item: item} do
    conn = put(conn, ~p"/items/#{item}", item: @invalid_attrs)
    assert html_response(conn, 200) =~ "can't be blank"
  end
end
e.g:
test/app_web/controllers/item_controller_test.exs#L67-L80
We've updated the paths the application redirects to
after updating an item.
Since we are building a single-page application,
that path pertains to the /items/ URL path.
If you run the tests now, they should pass again:
mix test

23:08:01.785 [info]  Already up
...........................

Finished in 0.5 seconds
27 tests, 0 failures

Randomized with seed 956565
8.5 Remove Old Template from index.html
Now that we have the toggle and edit features working,
we can finally remove the default Phoenix (table) layout
from the lib/app_web/controllers/item_html/index.html.heex template.

Open the lib/app_web/controllers/item_html/index.html.eex file
and remove all code before the line:
<section class="todoapp">
more like this
taskbutler
Create and add progress bars, Office365 Files and Dropbox Paper papers by labels and link them to your Todoist tasks.