wordclock_esp8266
Software for a Wordclock based on ESP8266 and Neopixel LEDs with PONG, TETRIS, SNAKE game modes
C++★ 50
Fetch water usage data from Cyble meters for ESP8266 / ESP32 - MQTT Home Assistant & ESPHome External Component
 genestealer
git clone https://github.com/genestealer/everblu-meters-esp8266-improved.gitgenestealer/everblu-meters-esp8266-improved


Read Itron/Actaris EverBlu Cyble Enhanced RF water and gas meters (RADIAN protocol, Sontex/Itron) on 433 MHz using an ESP8266 or ESP32 and a CC1101 transceiver, then publish readings to Home Assistant.
Two independent deployment targets share the same core radio/protocol logic:
Supports both water meters (readings in litres) and gas meters (readings in cubic metres).
Table of Contents
The ESPHome integration is stable and is the recommended way to get started. It ships as a versioned external component in ESPHOME-release that tracks the same code as the main firmware, and it is tested on both ESP8266 and ESP32 with water and gas meters (the same sensors and calibration logic apply). Configuration stays simple: drop in the component, set meter_code, meter_type and gdo2_pin, and you are done.
Start here:
A couple of things to know before you flash:
esp32.framework.type: arduino); ESP-IDF is not supported for this component.Warning
Breaking change in v3.0.0: GDO2 hardware FIFO management is now enabled by default. You must wire CC1101 GDO2 and set gdo2_pin: (or opt out with disable_gdo2_fifo_management: true). See the Hardware section and ESPHOME/README.md.
The firmware is developed and tested against the Itron EverBlu Cyble Enhanced. Based on the regulatory paperwork for this meter family, it is likely to work with these related models too, although they are untested:
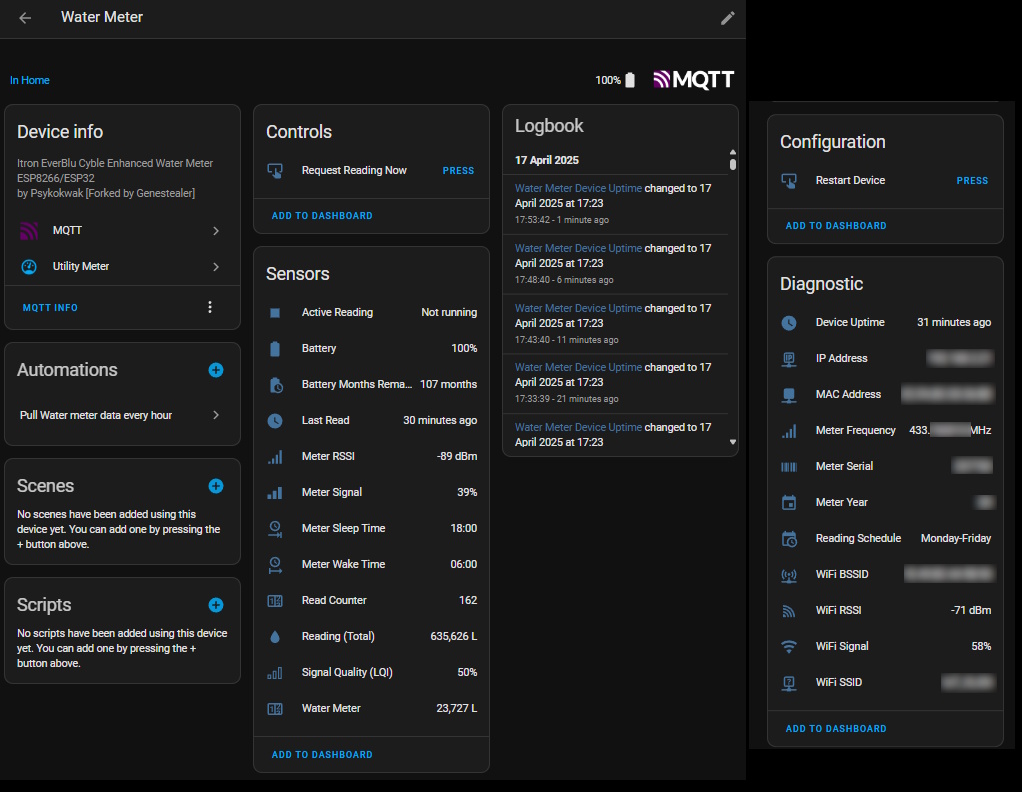
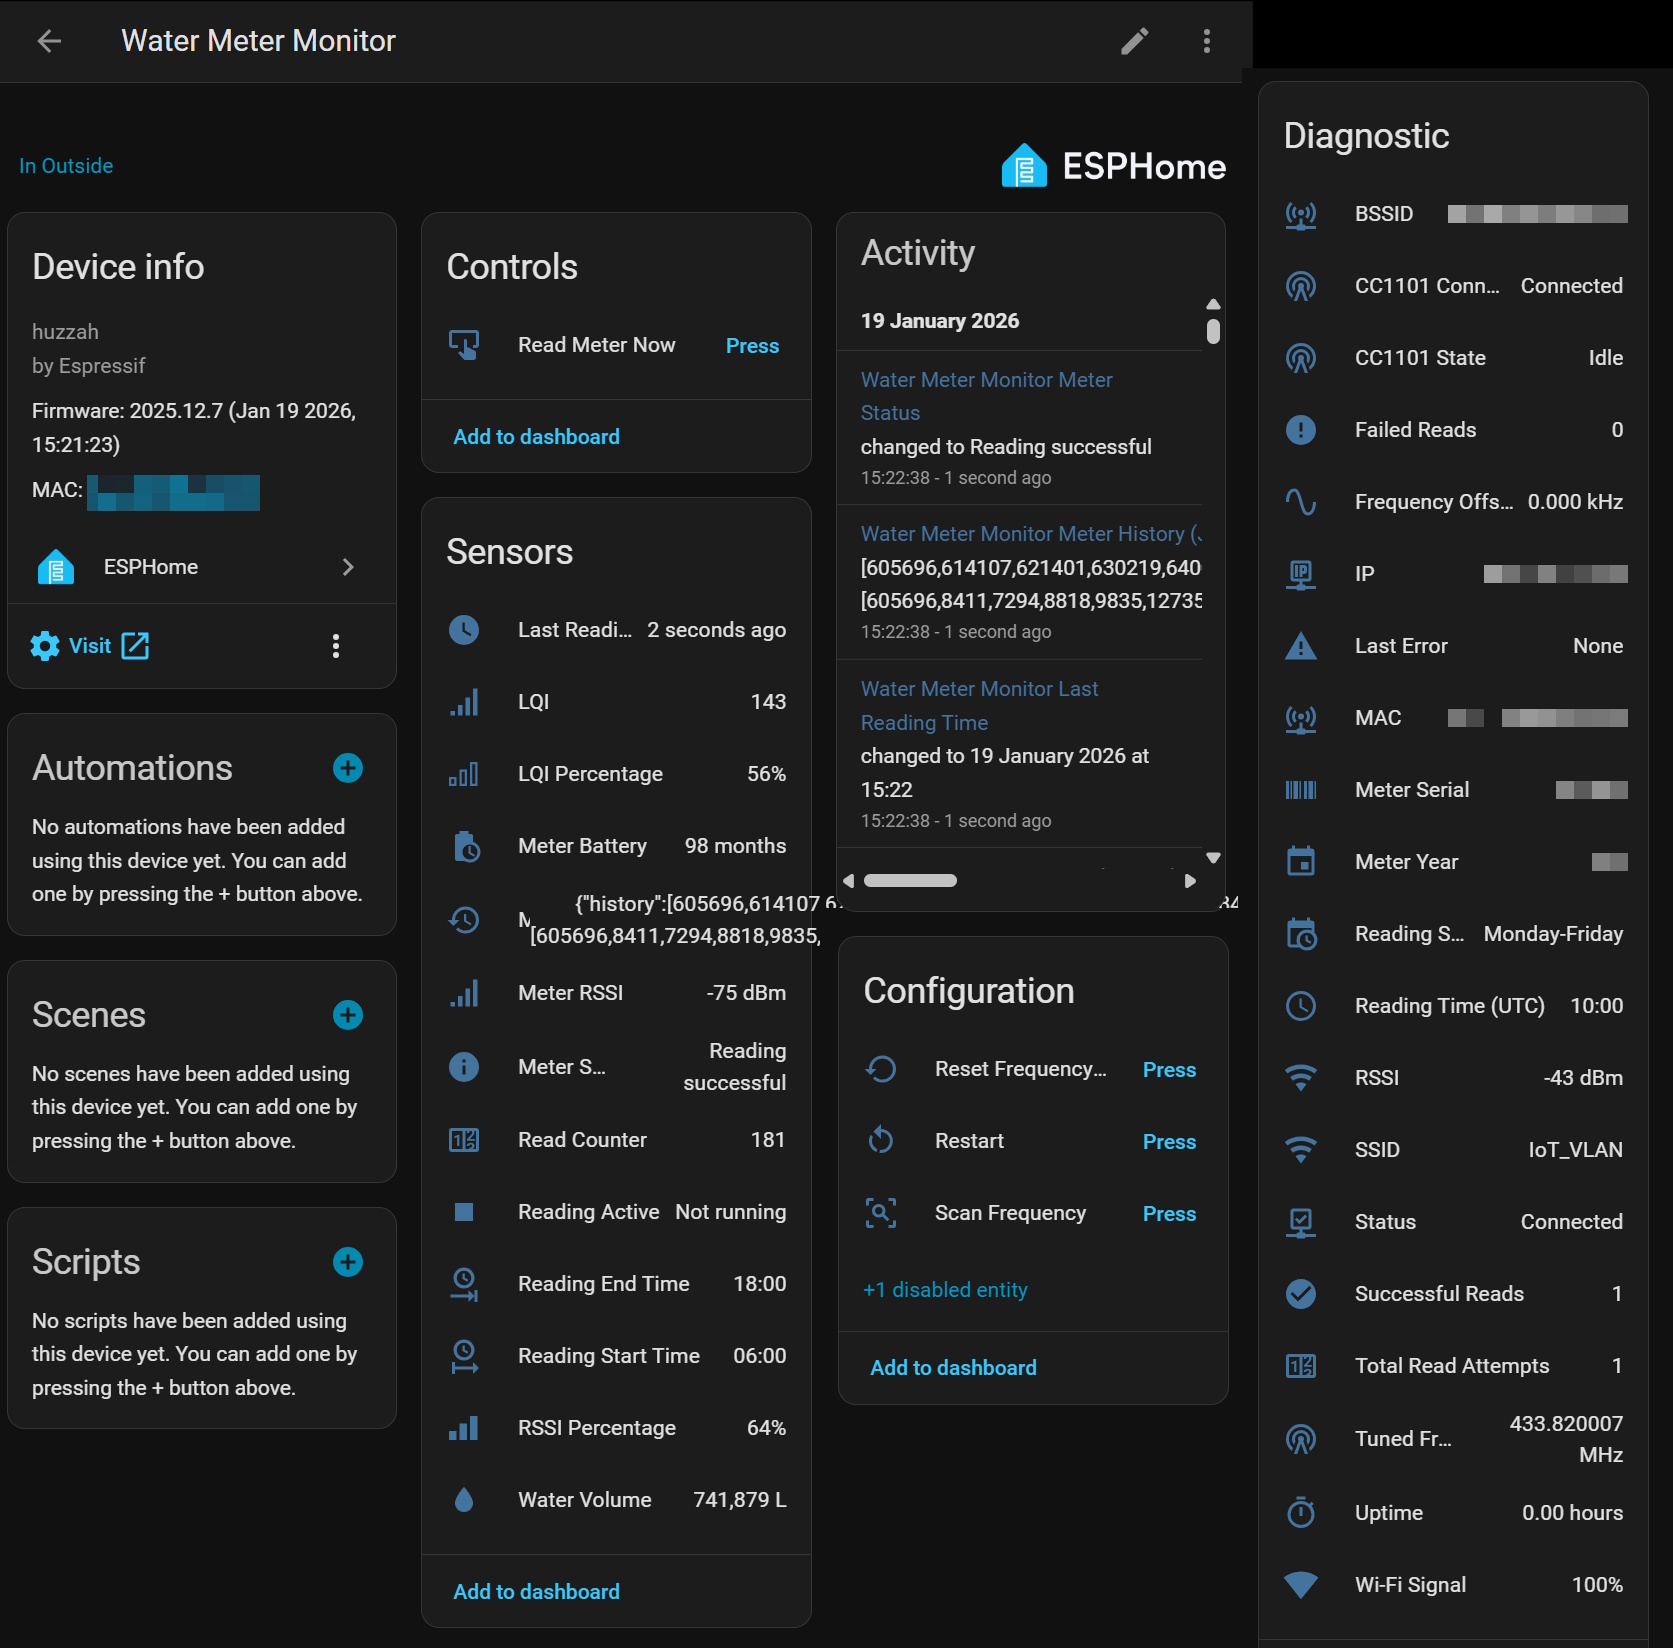
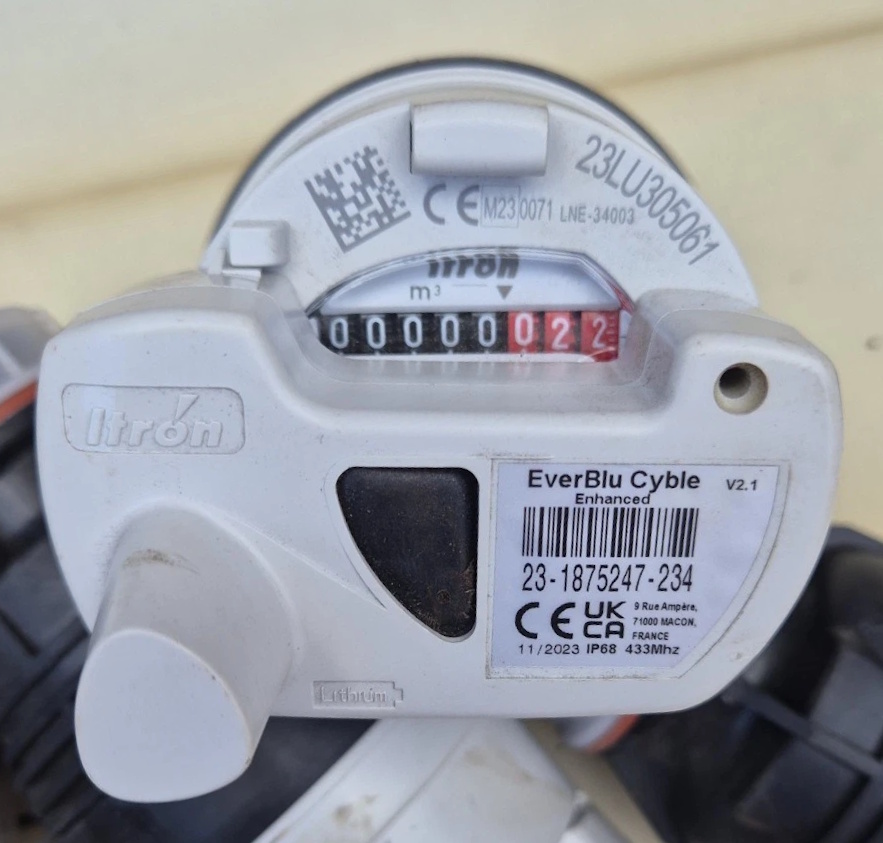
A quick overview of what the firmware does:
The firmware implements multiple layers of validation to ensure data integrity:
Custom Serial Decoding: RADIAN protocol uses a proprietary serial encoding with 1 start bit + 8 data bits (LSB first) + 3 stop bits per byte. Each bit is oversampled 4x for noise immunity (logical '1' = 0xF0, logical '0' = 0x0F). The decoder verifies bit-level transitions, counts consecutive samples, validates start/stop bits, and extracts clean data bytes. This is NOT standard Manchester encoding-it's custom serial framing that must be decoded in software.
CRC-16/KERMIT Checksum: Each RADIAN frame includes a 16-bit checksum (polynomial 0x8408, init 0x0000). Technically this is a Frame Check Sequence (FCS), not a true CRC, but it's highly effective at catching transmission errors and corrupted frames. The checksum is computed over the full 124-byte frame (bytes [0..121], including the length byte) and compared against the trailer in the last two bytes [122-123]. The firmware rejects any frame that fails this check.
Frame Structure Validation:
Temporal Validation:
Signal Quality Filtering:
Reading Plausibility (History Cross-Check):
Result: Data is only published after passing every check above, so corrupted or partial frames are discarded rather than reported to Home Assistant.
You can integrate with Home Assistant in one of two ways. Both share the same core codebase: the CC1101 radio handling, RADIAN protocol decoding, frequency calibration and frame validation are identical, so choose whichever suits your setup.
Best for: Users who prefer ESPHome's YAML configuration and native Home Assistant integration.
Examples: use the ready-made ESPHome configs:
Full documentation: ESPHOME/ESPHOME_INTEGRATION_GUIDE.md
Best for: Users who want direct control, custom builds, or already use MQTT extensively.
Quick start: Edit include/private.h and build with PlatformIO (see below).
See the Hardware section below for full wiring tables and pictures.
include/private.h (copy from include/private.example.h):
ENABLE_HA_DISCOVERY - set to 0 to disable Home Assistant discovery topic publishing (homeassistant/...) and keep raw MQTT topics onlyMETER_CODE (full under-barcode code with dashes)METER_TYPE - set to "water" (default) or "gas" depending on your meter typeGDO2 - required by default (v3.0.0+): GPIO connected to CC1101 GDO2 (hardware FIFO management). To opt out and use legacy SPI polling, define DISABLE_GDO2_FIFO_MANAGEMENT instead. The firmware will not compile until you do one or the other.MAX_RETRIES - maximum reading retry attempts before cooldown (optional, default is 5)AUTO_SCAN_ON_FAILURE_ENABLED - set to 1 to automatically run a frequency scan once after MAX_RETRIES is reached (recovers from carrier-frequency drift unattended); default is 0 (disabled)ADAPTIVE_THRESHOLD - how many successful reads before adjusting frequency (optional, default is 1 = adjust after each read)WIFI_SERIAL_MONITOR_ENABLED - set to 1 to enable WiFi serial monitor for remote debugging (default is 0 for security)platformio.ini: select env:huzzah (ESP8266 HUZZAH) or env:esp32dev (ESP32 DevKit).This project supports both water meters and gas meters. The main differences are:
| Meter Type | Unit of Measurement | Device Class | Icon |
|---|---|---|---|
| Water (default) | Litres (L) | water |
mdi:water |
| Gas | Cubic metres (m³) | gas |
mdi:meter-gas |
To configure your meter type, set METER_TYPE in include/private.h:
#define METER_TYPE "water"  // For water meters
// OR
#define METER_TYPE "gas"    // For gas meters
For gas meters, this firmware assumes an internal count in litre-equivalents and converts those values to cubic metres (m³) before publishing to Home Assistant. If your gas meter uses a different base unit or scaling, you may need to adjust the meter configuration or conversion logic accordingly.
The conversion uses a configurable gas volume divisor that can be set in include/private.h:
// Default: 100 (equivalent to 0.01 m³ per unit)
#define GAS_VOLUME_DIVISOR 100
Important: The correct divisor depends on your meter's pulse weight configuration:
100: 0.01 m³ per unit (typical for modern EverBlu Cyble gas modules)1000: 0.001 m³ per unit (0.1 L per unit, less common)Through empirical testing with an actual EverBlu Cyble gas meter, we discovered that many gas modules are configured with a pulse weight of 0.01 m³ per unit, not the 0.001 m³ that might be expected from a naive "litres to cubic metres" conversion.
Real-world example:
The gap of ~11 m³ is consistent with the assumption that the EverBlu module was installed after the meter had already recorded some consumption. Without access to the meter's installation records or multiple data points, we cannot definitively confirm the exact pulse weight; however, 0.01 m³/unit proved more plausible through trial and error comparison with the actual mechanical meter register.
If your readings seem incorrect: Verify your specific meter's pulse weight (often printed on the device label) and adjust GAS_VOLUME_DIVISOR accordingly.
env:huzzahenv:d1_minienv:d1_mini_proenv:nodemcuv2env:esp32deveverblu/cyble/{PARSED_SERIAL}/... on your broker/Home Assistant.Once your device is running and connected to Wi-Fi, you can update it wirelessly:
In platformio.ini, find your board's -ota environment (e.g., [env:huzzah-ota]).
Update the IP address to match your device's IP:
upload_port = 192.168.2.21  ; Change to your device's IP
monitor_port = socket://192.168.2.21:23  ; Change to match upload_port
Select the OTA environment in PlatformIO:
env:huzzah-otaenv:d1_mini-otaenv:d1_mini_pro-otaenv:nodemcuv2-otaenv:esp32dev-otaClick PlatformIO: Upload and Monitor as before.
The firmware will be uploaded over your Wi-Fi network.
Note: You can find your device's IP address in the serial monitor output at startup, or check your router's DHCP client list, or look at the
everblu/cyble/{PARSED_SERIAL}/wifi_ipMQTT topic in Home Assistant.
The firmware runs on any ESP8266 or ESP32 paired with a CC1101 433 MHz transceiver. Any such combination works, as long as the wiring is correct.
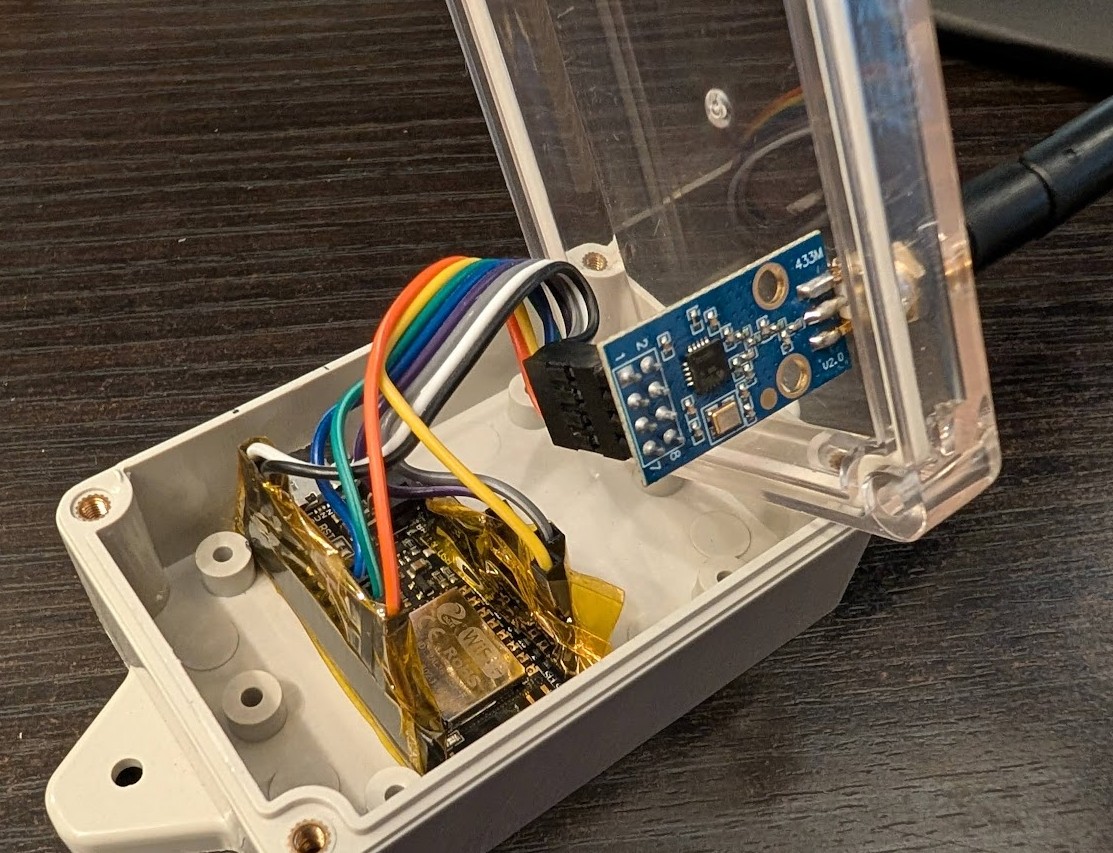
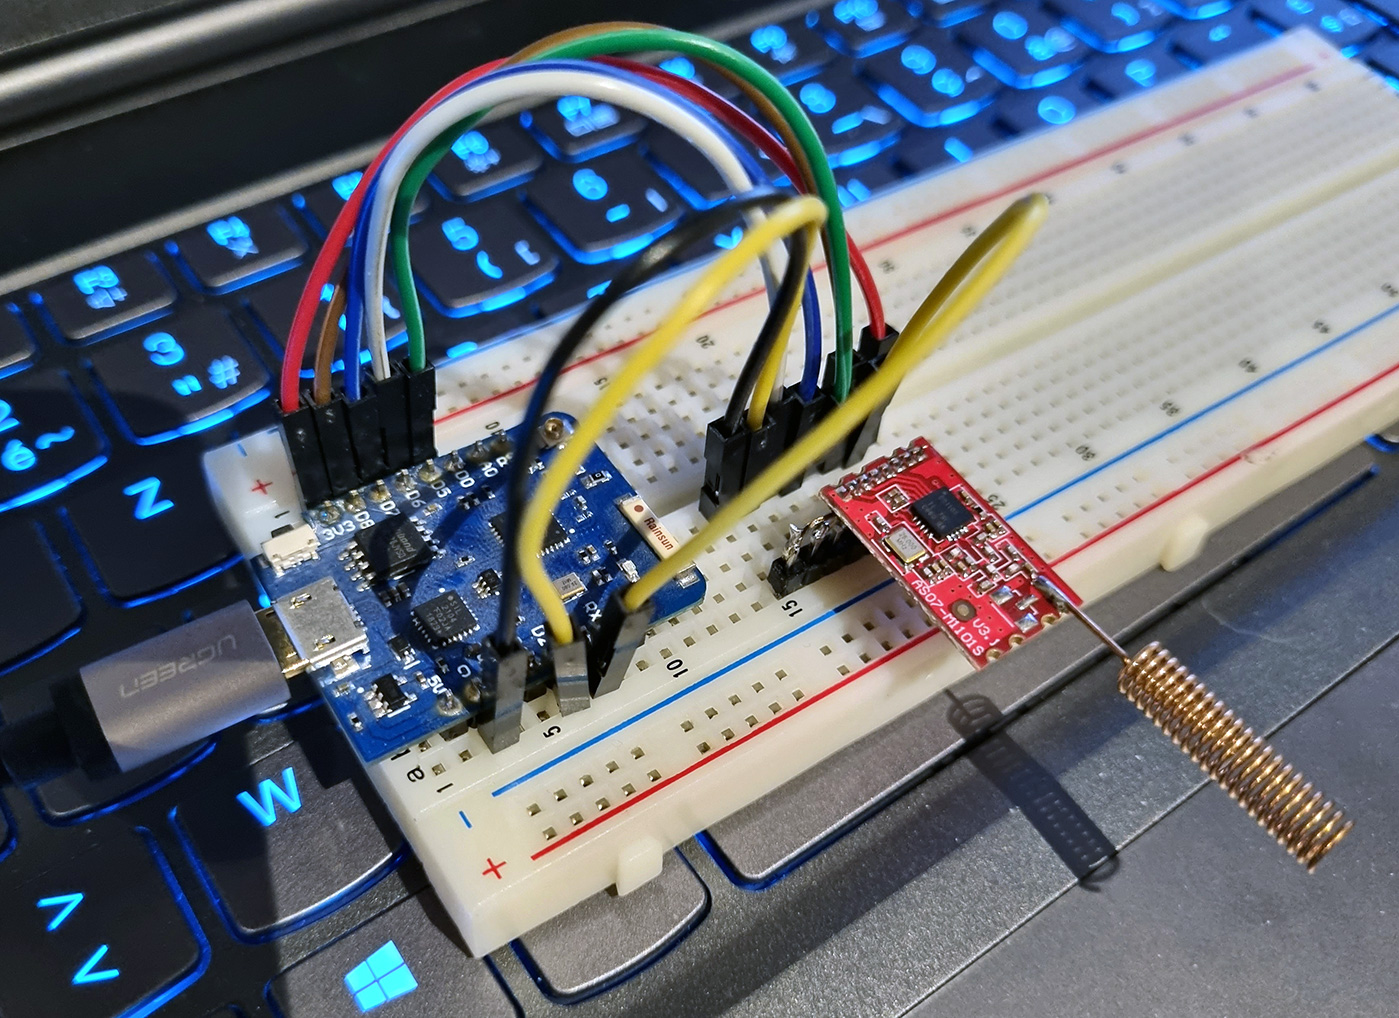
The project talks to the CC1101 over the ESP8266/ESP32 hardware SPI pins. The wiring diagrams below cover the common ESP8266 boards and the ESP32 DevKit.
For ESP8266 (All Boards):
private.h)DISABLE_GDO2_FIFO_MANAGEMENT to fall back to SPI polling.private.h file if needed.#define GDO2 <pin> in private.h (MQTT firmware) or gdo2_pin in YAML (ESPHome). The driver dynamically reconfigures GDO2 per phase: TX (prevents TXFIFO_UNDERFLOW) and RX (skips unnecessary SPI reads and improves scheduler efficiency). To keep the legacy SPI-polling behaviour instead, explicitly opt out: define DISABLE_GDO2_FIFO_MANAGEMENT in private.h, or set disable_gdo2_fifo_management: true in ESPHome. The MQTT firmware will not compile, and the ESPHome config will not validate, until you either wire/configure GDO2 or opt out. Use any free GPIO that does not collide with the SPI bus or GDO0. See docs/GDO2_FIFO_MANAGEMENT.md.Pin wiring for the Wemos D1 Mini, Adafruit Feather HUZZAH ESP8266, and ESP32 DevKit:
| CC1101 Pin | Function | ESP8266 GPIO | Wemos D1 Mini | HUZZAH ESP8266 | ESP32 GPIO | ESP32 DevKit | Notes |
|---|---|---|---|---|---|---|---|
| VCC | Power | 3.3V | 3V3 | 3V | 3.3V | 3V3 | Important: Use 3.3V only! |
| GND | Ground | GND | G | GND | GND | GND | Common ground |
| SCK | SPI Clock | GPIO 14 | D5 | #14 | GPIO 18 | SCK | Hardware SPI clock |
| MISO | SPI Data In | GPIO 12 | D6 | #12 | GPIO 19 | MISO | Also labelled as GDO1 on some CC1101 modules |
| MOSI | SPI Data Out | GPIO 13 | D7 | #13 | GPIO 23 | MOSI | Hardware SPI MOSI |
| CSN/CS | Chip Select | GPIO 15 | D8 | #15 | GPIO 25 | GPIO 25 | SPI chip select (ESP32: GPIO 25 avoids the GPIO 5 strapping pin) |
| GDO0 | Data Ready | GPIO 5 | D1 | #5 | GPIO 4 | GPIO 4 | Digital interrupt pin (configurable in private.h) |
| GDO2 | FIFO Threshold (required) | GPIO 4 | D2 | #4 | GPIO 27 | GPIO 27 | Required by default (v3.0.0+). Hardware FIFO threshold signal. Set via private.h (#define GDO2) / gdo2_pin in ESPHome, or opt out with DISABLE_GDO2_FIFO_MANAGEMENT / disable_gdo2_fifo_management: true |
The EU declaration of conformity for the Cyble RF family (Cyble NRF, Cyble NRF HT, Cyble OMS wM-Bus 434) specifies operation in the 434 MHz ISM band with ≤ 10 mW radiated power. The CC1101 settings used in this project stay within that envelope, but ensure your antenna choice and deployment follow local regulations.
CC1101 → Wemos D1 Mini
VCC    → 3V3
GND    → G
SCK    → D5 (GPIO 14)
MISO   → D6 (GPIO 12)
MOSI   → D7 (GPIO 13)
CSN    → D8 (GPIO 15)
GDO0   → D1 (GPIO 5)
GDO2   → D2 (GPIO 4)  ← required by default, set #define GDO2 in private.h (or opt out)
CC1101 → HUZZAH ESP8266
VCC    → 3V
GND    → GND
SCK    → #14 (GPIO 14)
MISO   → #12 (GPIO 12)
MOSI   → #13 (GPIO 13)
CSN    → #15 (GPIO 15)
GDO0   → #5  (GPIO 5)
GDO2   → #4  (GPIO 4)  ← required by default, set #define GDO2 in private.h (or opt out)
CC1101 → ESP32 DevKit
VCC    → 3V3
GND    → GND
SCK    → SCK (GPIO 18 on most DevKit boards)
MISO   → MISO (GPIO 19)
MOSI   → MOSI (GPIO 23)
CSN    → GPIO 25 (recommended; avoids the GPIO 5 strapping pin)
GDO0   → GPIO 4 (or GPIO 27)  ← set this in include/private.h as GDO0
GDO2   → GPIO 27 (or another free GPIO)  ← required by default, set #define GDO2 in private.h (or opt out)
Notes for ESP32
SS (GPIO 5) is a strapping pin and logs a boot-time warning, though it still works.#define GDO0 <pin> in include/private.h.#define GDO2 <pin> to enable hardware FIFO threshold management (required by default since v3.0.0); to keep legacy SPI polling instead, define DISABLE_GDO2_FIFO_MANAGEMENT.To make wiring dead-simple on the HUZZAH, here’s the exact silkscreen text next to each pin we use and what it connects to on the CC1101:
Power
SPI signals
CC1101 interrupt (data ready)
private.h)Notes
On the Adafruit Feather HUZZAH ESP8266, GPIO #0 has a red LED attached and is also a boot-strap pin used to enter the ROM bootloader. Important implications:
Because of the above, do not use GPIO #0 for CC1101 GDO0. This project defaults to using GPIO #5 for GDO0 on HUZZAH, which is safe and avoids accidental bootloader entry. You can still use GPIO #0 for simple LED indication in your own code, but avoid wiring CC1101 signals to it.
Also note other ESP8266 boot-strap pins on HUZZAH:
Some modules are not labelled on the PCB. Below is the pinout for one:
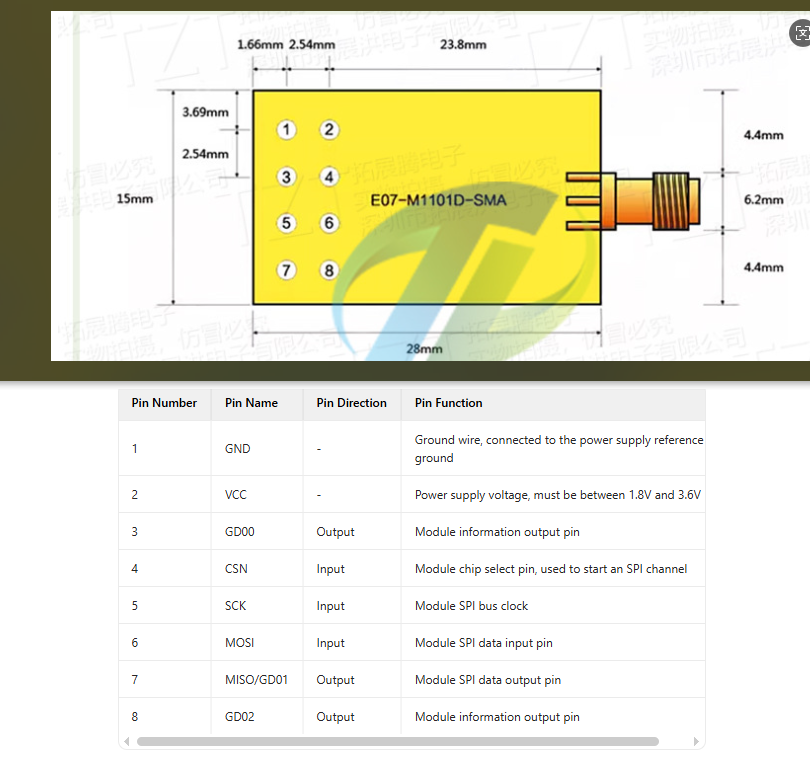
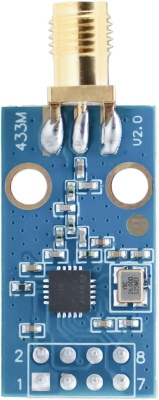
In standalone mode, the firmware integrates with Home Assistant through MQTT AutoDiscovery, so entities appear automatically once the device connects to your broker.
The following MQTT topics are used to integrate the device with Home Assistant via AutoDiscovery:
| Sensor | MQTT Topic | Description |
|---|---|---|
Liters |
everblu/cyble/liters |
Total water usage in litres. |
Battery |
everblu/cyble/battery |
Remaining battery life in months. |
Counter |
everblu/cyble/counter |
Number of times the meter has been read (wraps around 255→1). |
RSSI |
everblu/cyble/rssi |
Raw RSSI value of the meter's signal. |
RSSI (dBm) |
everblu/cyble/rssi_dbm |
RSSI value converted to dBm. |
RSSI (%) |
everblu/cyble/rssi_percentage |
RSSI value converted to a percentage. See the note below. |
Time Start |
everblu/cyble/time_start |
Time when the meter wakes up, formatted as HH:MM. |
Time End |
everblu/cyble/time_end |
Time when the meter goes to sleep, formatted as HH:MM. |
Timestamp |
everblu/cyble/timestamp |
ISO 8601 timestamp of the last reading. |
Wi-Fi IP |
everblu/cyble/wifi_ip |
IP address of the device. |
Wi-Fi RSSI |
everblu/cyble/wifi_rssi |
Wi-Fi signal strength in dBm. |
Wi-Fi Signal (%) |
everblu/cyble/wifi_signal_percentage |
Wi-Fi signal strength as a percentage. |
MAC Address |
everblu/cyble/mac_address |
MAC address of the device. |
SSID |
everblu/cyble/ssid |
Wi-Fi SSID the device is connected to. |
BSSID |
everblu/cyble/bssid |
Wi-Fi BSSID the device is connected to. |
Uptime |
everblu/cyble/uptime |
Device uptime in ISO 8601 format. |
Note on
RSSI (%). The percentage is a display convenience, not a calibrated measurement. It maps the -120 to -40 dBm range onto 0-100% so Home Assistant can show a signal bar; the endpoints were chosen to span roughly "unusable" to "right next to the meter" and have no physical meaning. Judge link quality from the dBm and LQI values instead. The same scale is used by the ESPHomerssi_percentagesensor and by the device log.
When several ESP devices share one MQTT broker, the firmware appends the meter serial number to the MQTT Client ID so that each client is unique. This avoids connection conflicts and keeps Home Assistant availability tracking accurate.
Example: With SECRET_MQTT_CLIENT_ID = "EverblueCyble" and METER_CODE = "23-1234567-234", the parsed serial is 1234567 and the final Client ID becomes "EverblueCyble-1234567".
Recommended: Create a Home Assistant Utility Meter helper to preserve historical data across platform or meter changes.
Why? If you switch between MQTT and ESPHome, change meter serial numbers, or replace hardware, a utility meter helper acts as a stable interface. You simply update the source sensor in the helper configuration, and all your historical data, dashboards, and automations remain intact.
Setup:
sensor.water_volume)Benefits:
Example YAML (if configuring manually):
utility_meter:
  master_water_meter:
    source: sensor.water_volume
    name: Master Water Meter
When you change platforms or meters, simply update the source to point to the new sensor - your history remains unbroken.
Migrating from MQTT to ESPHome (or replacing hardware)? A utility meter helper protects future data, but it does not move the history that already accumulated on your old sensor onto the new one. To merge the past readings from the old entity into the new entity (both raw states and long-term statistics for the Energy dashboard), use the HA Merge Sensor History custom component. It imports the older history in front of the new sensor in a single atomic, idempotent transaction, so your consumption graphs and lifetime totals stay continuous across the switch. Back up your recorder database first.
Thanks to rommess for sharing this tip in discussion #129.
Both MQTT and ESPHome modes expose a history sensor containing up to 13 months of historical readings stored in the meter itself. This data is retrieved directly from the meter and provided in JSON format.
Example JSON payload:
{
  "history": [667441, 684214, 700917, 712720, 721549, 728836, 736957, 744959, 752026, 759559, 770165, 779789, 792364],
  "monthly_usage": [16773, 16703, 11803, 8829, 7287, 8121, 8002, 7067, 7533, 10606, 9624, 12575],
  "current_month_usage": 7276,
  "months_available": 13
}
Fields:
history: Array of up to 13 monthly readings (oldest to newest) in litres or m³monthly_usage: Array of monthly consumption values (differences between successive history snapshots)current_month_usage: Current month's consumption so farmonths_available: Number of months of data available (typically 13)Use Cases:
Accessing the data:
everblu/cyble/{PARSED_SERIAL}/historysensor.{device}_historyTip: Parse this JSON in Home Assistant using a template sensor to extract individual months or calculate averages.
Install Required Tools
Prepare Configuration Files
include/private.example.h to include/private.h.private.h:
Wi-Fi and MQTT credentials. If your MQTT setup does not require a username and password, comment out those lines using //.
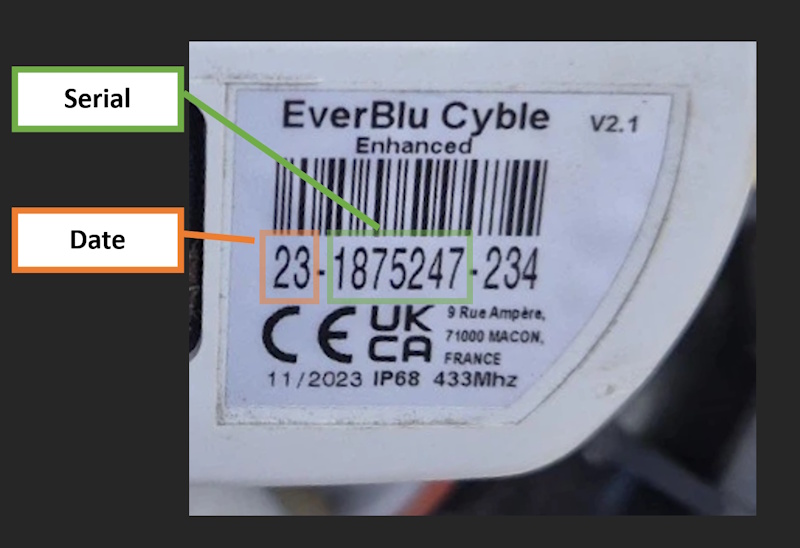
Meter Code - Copy the code under the barcode (ignore the manufacturing date):
YY-SSSSSSS-NNN (example: 23-1875247-234)METER_CODE to the same value with dashes - suffix -NNN is optionalYY)SSSSSSS) and used in topics/entity prefixesNNN), if present, are ignored by the radio protocolExample:
// Label text: 23-1875247-234  (with suffix, 12 digits)
#define METER_CODE "23-1875247-234"

// Same meter, without suffix (9 digits - also valid)
#define METER_CODE "23-1875247"

// Label with leading zeros in serial: 23-0123456-234
#define METER_CODE "23-0123456-234"
Wi-Fi PHY Mode: To enable 802.11g Wi-Fi PHY mode, set ENABLE_WIFI_PHY_MODE_11G to 1 in the private.h file. By default, it is set to 0 (disabled).
Radio debug: control verbose CC1101/RADIAN debug output with DEBUG_CC1101 in private.h.
#define DEBUG_CC1101 1 enables verbose radio debugging (default in the example file).#define DEBUG_CC1101 0 disables verbose radio debugging.Select Your Board Environment
env:huzzah - Adafruit HUZZAH ESP8266 (USB upload)env:huzzah-ota - Adafruit HUZZAH ESP8266 (OTA upload)env:d1_mini - WeMos D1 Mini (USB upload)env:d1_mini-ota - WeMos D1 Mini (OTA upload)env:d1_mini_pro - WeMos D1 Mini Pro (USB upload)env:d1_mini_pro-ota - WeMos D1 Mini Pro (OTA upload)env:nodemcuv2 - NodeMCU v2 (USB upload)env:nodemcuv2-ota - NodeMCU v2 (OTA upload)env:esp32dev - ESP32 DevKit (USB upload)env:esp32dev-ota - ESP32 DevKit (OTA upload)-ota)-ota environment and update the IP address in platformio.iniPerform Frequency Discovery (First-Time Setup)
AUTO_SCAN_ENABLED is set to 1 (default).#define AUTO_SCAN_ENABLED 0 to your include/private.h.FREQUENCY value in private.h if needed (the automatic scan stores the offset, so manual adjustment is usually not required).CLEAR_EEPROM_ON_BOOT to 1 for a single boot cycle, re-enable AUTO_SCAN_ENABLED, or press the Deep Frequency Scan button (mdi:radar) exposed in Home Assistant to trigger a full ±150 kHz fine-step sweep on demand. A faster Fast Frequency Scan button (mdi:magnify-scan) is also available for a quicker ±150 kHz coarse-step recalibration. Note: Both on-demand scan buttons can block for 1–2 minutes during which Wi-Fi/MQTT may temporarily disconnect and reconnect. This is expected, and Home Assistant will reconnect automatically once the scan completes.MAX_RETRIES reached) and the firmware enters its cooldown period, it can run a frequency scan once to check for meter carrier-frequency (crystal) drift. This is controlled by AUTO_SCAN_ON_FAILURE_ENABLED (default 0, opt-in). Set #define AUTO_SCAN_ON_FAILURE_ENABLED 1 in include/private.h to enable it; it runs at most once per failure streak (reset after the next successful read).Build and Upload
env:huzzah).Verify Meter Data
Automatic Meter Query
This project uses GitHub Actions for automated building, testing, and code quality checks. Every push and pull request triggers builds and quality checks to ensure code quality and compatibility.
The CI workflows include:
You can view the build and quality status at the top of this README or in the Actions tab.
The Reading Schedule feature allows you to configure the days when the meter should be queried.
By default, the schedule is set to Monday-Friday.
You can change this in the private.h file by modifying the DEFAULT_READING_SCHEDULE.
Available options:
"Monday-Friday": Queries the meter only on weekdays."Monday-Saturday": Queries the meter from Monday to Saturday."Monday-Sunday": Queries the meter every day."Monday", "Tuesday", "Wednesday", "Thursday", "Friday", "Saturday", "Sunday": Queries the meter only on that day.Example configuration in private.h:
#define DEFAULT_READING_SCHEDULE "Monday-Saturday"
Meters often have a local wake window (Time Start/End). The firmware keeps its clock in UTC and applies a simple offset:
Configuration (in include/private.h):
// Minutes from UTC. Examples: 0 (UTC), 60 (UTC+1), -300 (UTC-5)
#define TIMEZONE_OFFSET_MINUTES 0
Behaviour:
MQTT topics exposed:
everblu/cyble/reading_time: scheduled time in UTC (HH:MM)In serial logs at startup you’ll see:
By default, the standalone MQTT firmware publishes Home Assistant discovery topics under homeassistant/... so entities are created automatically.
If you only want raw MQTT topics and do not use Home Assistant discovery, set this in include/private.h:
#define ENABLE_HA_DISCOVERY 0
Default behaviour (if not defined) is enabled:
#define ENABLE_HA_DISCOVERY 1
With discovery disabled, telemetry and command topics under everblu/cyble/... continue to work normally.
If discovery was enabled previously, retained homeassistant/... config topics may remain on the broker until you clear them (or switch to a different discovery prefix), so existing Home Assistant entities may not disappear immediately.
Most users can skip this section: the firmware auto-calibrates, and on first boot it runs a wide scan if no frequency offset is stored.
The firmware auto-calibrates the CC1101 frequency. The base frequency is configured at compile time in private.h.
FREQUENCY in private.h (e.g., #define FREQUENCY 433.82).FREQUENCY is not defined, it defaults to 433.82 MHz (RADIAN centre frequency for EverBlu). A warning is logged.// Optional: base frequency in MHz // If not defined, defaults to 433.82 MHz #define FREQUENCY 433.82
Ways to find the best frequency:
The effective frequency is printed at startup:
> Frequency (effective): 433.820000 MHz
To handle CC1101 crystal tolerance, the firmware can adapt over time:
Clear EEPROM when you change hardware or meter:
In include/private.h, set:
#define CLEAR_EEPROM_ON_BOOT 1
Upload, let it boot once (wide scan runs), then set it back to:
#define CLEAR_EEPROM_ON_BOOT 0
See ADAPTIVE_FREQUENCY_FEATURES.md for deeper technical notes.
Symptoms:
*** NEAR-FIELD SATURATION DETECTED (RSSI=−31 dBm) ***7C 11 00 45 20 0A header visible in logs)Cause:
The CC1101's front-end amplifier has a limited input range. When the device is placed immediately next to the meter the received signal exceeds that range, the input stage clips, and the demodulated bit stream is corrupted. This produces CRC failures even with an excellent RSSI reading. It is the opposite of a weak-signal problem.
Solution:
Move the device at least 1–2 m away from the meter. At normal installation distance the RSSI should be around −60 to −85 dBm, well within the linear range. If the device must be permanently mounted close to the meter, set RX_ATTENUATION_DB in include/private.h to engage the CC1101 front-end LNA gain limiter:
// Values: 0 (default), 6, 12, 18 (dB)
#define RX_ATTENUATION_DB 6
Start with 6 and increase if CRC failures persist at close range. At normal distance keep this at 0.
Symptoms:
Solution: Enable hex dump debugging to see the raw 200-byte decoded frame:
ESPHome: Add debug_cc1101: true to your YAML config
MQTT: Set #define DEBUG_CC1101 1 in include/private.h
This outputs detailed byte-by-byte data to help identify:
Complete guide: docs/TROUBLESHOOTING_CORRUPTED_READINGS.md
This is a PlatformIO tooling dependency that esptool.py uses to build the ESP32 bootloader and partition images. It is not part of this project and is not committed to the repo. PlatformIO usually installs it automatically, but on some Windows setups it can be missing.
Try the following in order:
Upgrade PlatformIO core and the Espressif32 platform (from PlatformIO Home → Platforms → Updates), or using the PIO terminal:
& "$env:USERPROFILE\.platformio\penv\Scripts\platformio.exe" upgrade
& "$env:USERPROFILE\.platformio\penv\Scripts\platformio.exe" platform update espressif32
If it still fails, install the package into PlatformIO’s embedded Python (use the PlatformIO terminal to ensure the right interpreter is used):
& "$env:USERPROFILE\.platformio\penv\Scripts\python.exe" -m pip install --disable-pip-version-check --no-warn-script-location intelhex
Re-run the ESP32 build explicitly through PlatformIO’s bundled executable:
& "$env:USERPROFILE\.platformio\penv\Scripts\platformio.exe" run --environment esp32dev
Notes
intelhex.pio is not recognised in PowerShell, use the full executable path above instead of pio run ....The code now conditionally includes headers based on the target (ESP8266 vs ESP32).
If you still see includes like ESP8266WiFi.h during an ESP32 build, ensure you selected the esp32dev environment and not an ESP8266 one.
Your transceiver module may not be calibrated correctly. Adjust the frequency slightly lower or higher and try again, or use an RTL-SDR to measure the required offset and rerun the frequency discovery.
Tip
Your meter may be configured to listen for requests only during business hours to conserve energy. If you are unable to communicate with the meter, try again during business hours (8:00–16:00), Monday to Friday. As a rule of thumb, set up your device during business hours to avoid confusion and unnecessary troubleshooting. This is particularly relevant in the UK.
Ignore the leading 0 and provide the serial number in the configuration without it.
A CC1101 433 MHz module with an external wire-coil antenna typically reaches 300 to 500 m, and SMA boards with high-gain antennas can extend that further. In practice, keep the radio close enough to the meter for a reliable link rather than chasing maximum range.
Important
The meter includes a built-in read counter that increments each time it's queried. When your water/gas company performs wireless readings, they expect this counter to match their scheduled read count. This is not an MQTT or ESP issue - it's how the RADIAN protocol and meter hardware work.
If you regularly read your meter yourself:
/counter).Note: Most utilities won't notice or care, but it's good to be aware of this if they mention unexpected counter values during their wireless reading attempts.
This project builds on reverse engineering efforts by:
The original software (and much of the foundational work) was initially developed on the La Maison Simon wiki (archived; site no longer active), later published on GitHub by @neutrinus in the everblu-meters repository, and subsequently forked by psykokwak.
Their original projects did not include an open-source licence. If you reuse or modify their specific code, please review their repositories and respect any stated limitations or intentions.
Radio Licensing: The 433 MHz ISM band is licence-exempt in UK/EU for low-power (<10 mW) use under ETSI EN 300-220.
Communications Law: Under UK Wireless Telegraphy Act 2006 Section 48, intercepting radio communications not intended for you may be unlawful, even if it's your own meter. The transmission is technically between the meter and utility.
Encryption: Most EverBlu Cyble Enhanced meters transmit unencrypted RADIAN protocol data, making DIY decoding technically feasible.
Recommendation: This project is for personal use on your own property only. Consider obtaining utility permission. Never use on meters you don't own. Proceed at your own risk.
For detailed legal analysis, protocol history, and encryption details, see LEGAL_NOTICE.md
more like this
Software for a Wordclock based on ESP8266 and Neopixel LEDs with PONG, TETRIS, SNAKE game modes
Arduino library and MATLAB/Simulink API for the AutomationShield Arduino expansion boards for control engineering educa…
search projects, people, and tags