xylocopa
A to-do list that runs your Claude Code agents — capture anywhere, dispatch in parallel, review from your phone.
Python★ 51
A Home Assistant, native app for desktop/laptop devices.
 joshuar
git clone https://github.com/joshuar/go-hass-agent.gitjoshuar/go-hass-agent
A Home Assistant, native app integration for desktop/laptop devices.
Go Hass Agent is an application to expose sensors, controls, and events from a device to Home Assistant. You can think of it as something similar to the Home Assistant companion app for mobile devices, but for your desktop, server, Raspberry Pi, Arduino, toaster, whatever. If it can run Go and Linux, it can run Go Hass Agent!
Out of the box, Go Hass Agent will report lots of details about the system it is running on. You can extend it with additional sensors and controls by hooking it up to MQTT. You can extend it even further with your own custom sensors and controls with scripts/programs.
You can then use these sensors, controls, or events in any automations and dashboards, just like the companion app or any other “thing” you've added into Home Assistant.
As examples of some of the things that can be done with the data published by this app:
Note
The following list shows all potential sensors the agent can report. In some cases, the actual sensors reported may be less due to lack of support in the system configuration or missing hardware.
[sensors.desktop.app].[sensors.desktop.preferences].[sensors.media].[sensors.batteries].[sensors.memory.usage].ignored_mounts in preferences (string prefix match).cap_sys_rawio,cap_sys_admin,cap_mknod,cap_dac_override=+ep.[sensors.disk.*rates*] (usage for usage or rates for all others).Connection State (connected/disconnected/activating/deactivating) per connection. Updated when state changes. Requires D-Bus and NetworkManager.
[sensors.network.connections].Connected Wi-Fi Network Details (requires D-Bus and NetworkManager.):
[sensors.network.connections].Device/Link State
[sensors.network.links].Bytes Received/Sent (in B). Updated ~every 5s.
[sensors.network.rates].Bytes Received/Sent Rate (transfer rate, in B/s). Updated ~every 5 seconds. Via ProcFS.
[sensors.network.rates].[sensors.cpu.load_averages].[sensors.cpu.usage].[sensors.cpu.frequencies].[sensors.power.profile].systemd-logind.[sensors.power.state].xscreensaver or systemd-logind support.[sensors.power.screen_lock].systemd-logind.[sensors.system.users].cap_setgid,cap_setuid=+ep.input group.fwupd running on the system.[sensors.system.info].[sensors.system.abrt_problems]./sys/class/hwmon file system.[sensors.system.hardware_sensors].Note
Only available when configured with MQTT
[controls.media.*] (audio or video).[controls.power.screen_lock_controls].systemd-logind (and D-Bus) support.[controls.power.power_controls].[controls.power.inhibit_controls].[controls.system.dbus_commands].Requires a system configured with systemd-logind.
Event structures:
event_type: session_started # or session_stopped
data:
  desktop: "" # blank or a desktop name, like KDE.
  remote: true # true if remote (i.e., ssh) login.
  remote_host: "::1" # remote host or blank.
  remote_user: "" # remote user or blank.
  service: "" # blank or the service that handled the action (e.g., ssh).
  type: "tty" # blank or type of session.
  user: myuser # username.
Preferences: [sensors.system.users].
Requires a system configured with systemd-oomd enabled.
Event structure:
event_type: oom_event
data:
  process: systoomd_swap_test # process that was killed by systemd-oomd.
  pid: 909764 # pid of process.
Preferences: [sensors.memory.oom].
Sensors:
[sensors.agent.version].[sensors.agent.external_ip].[sensors.agent.connection_latency].Currently, only Linux is supported. Though the code is designed to be extensible to other operating systems. See development information in the docs for details on how to extend for other operating systems.
Head over to the releases page and download the appropriate package for your operating system and/or distribution:
.rpm..deb..tar.zst.Packages (and binaries) are available for amd64, arm (v6 and v7) and arm64 architectures.
Install go-hass-agent via Homebrew:
brew install go-hass-agent
For distributions not listed above, you can try the binary, or build it yourself from source (see development docs).
Package signatures can be verified with
cosign. To verify a package, you'll need
to download cosign.pub public key and the .sig file (downloaded
from releases) that matches
the package you want to verify. To verify a package, a command similar to the
following for the rpm package can be used:
cosign verify-blob --key cosign.pub --bundle go-hass-agent-*.rpm.sig go-hass-agent-*.rpm
Container images are available on ghcr.io. The container image is multi-platform and supports amd64, arm (v6 and v7) and arm64 architectures. Note that it is recommended to use an image tagged with the latest release version over the latest container image, which might be unstable.
This project follows semantic versioning. Given a version
number MAJOR.MINOR.PATCH, the gist of it is:
MAJOR number change means there
breaking changes from the previous release that
may require manual intervention before/after upgrading.MINOR number change means significant changes and new features have been
added, but not breaking changes.PATCH number change indicate minor changes and bug fixes.Go Hass Agent is distribution, and desktop-environment agnostic. It runs in the background gathering and submitting sensor/event/command data to Home Assistant. It exposes a limited web UI (accessible via http://localhost:8223) used for some initial setup and optional configuration options.
On first-run, Go Hass Agent attempts to open a browser tab to a page for registering the agent with Home Assistant. If this does not happen (or you are running the agent remotely on a server), open a browser tab and navigate to http://localhost:8223 (or the address of the device running the agent). You should be redirected to the registration form where you will need to enter details to allow Go Hass Agent to register with Home Assistant:
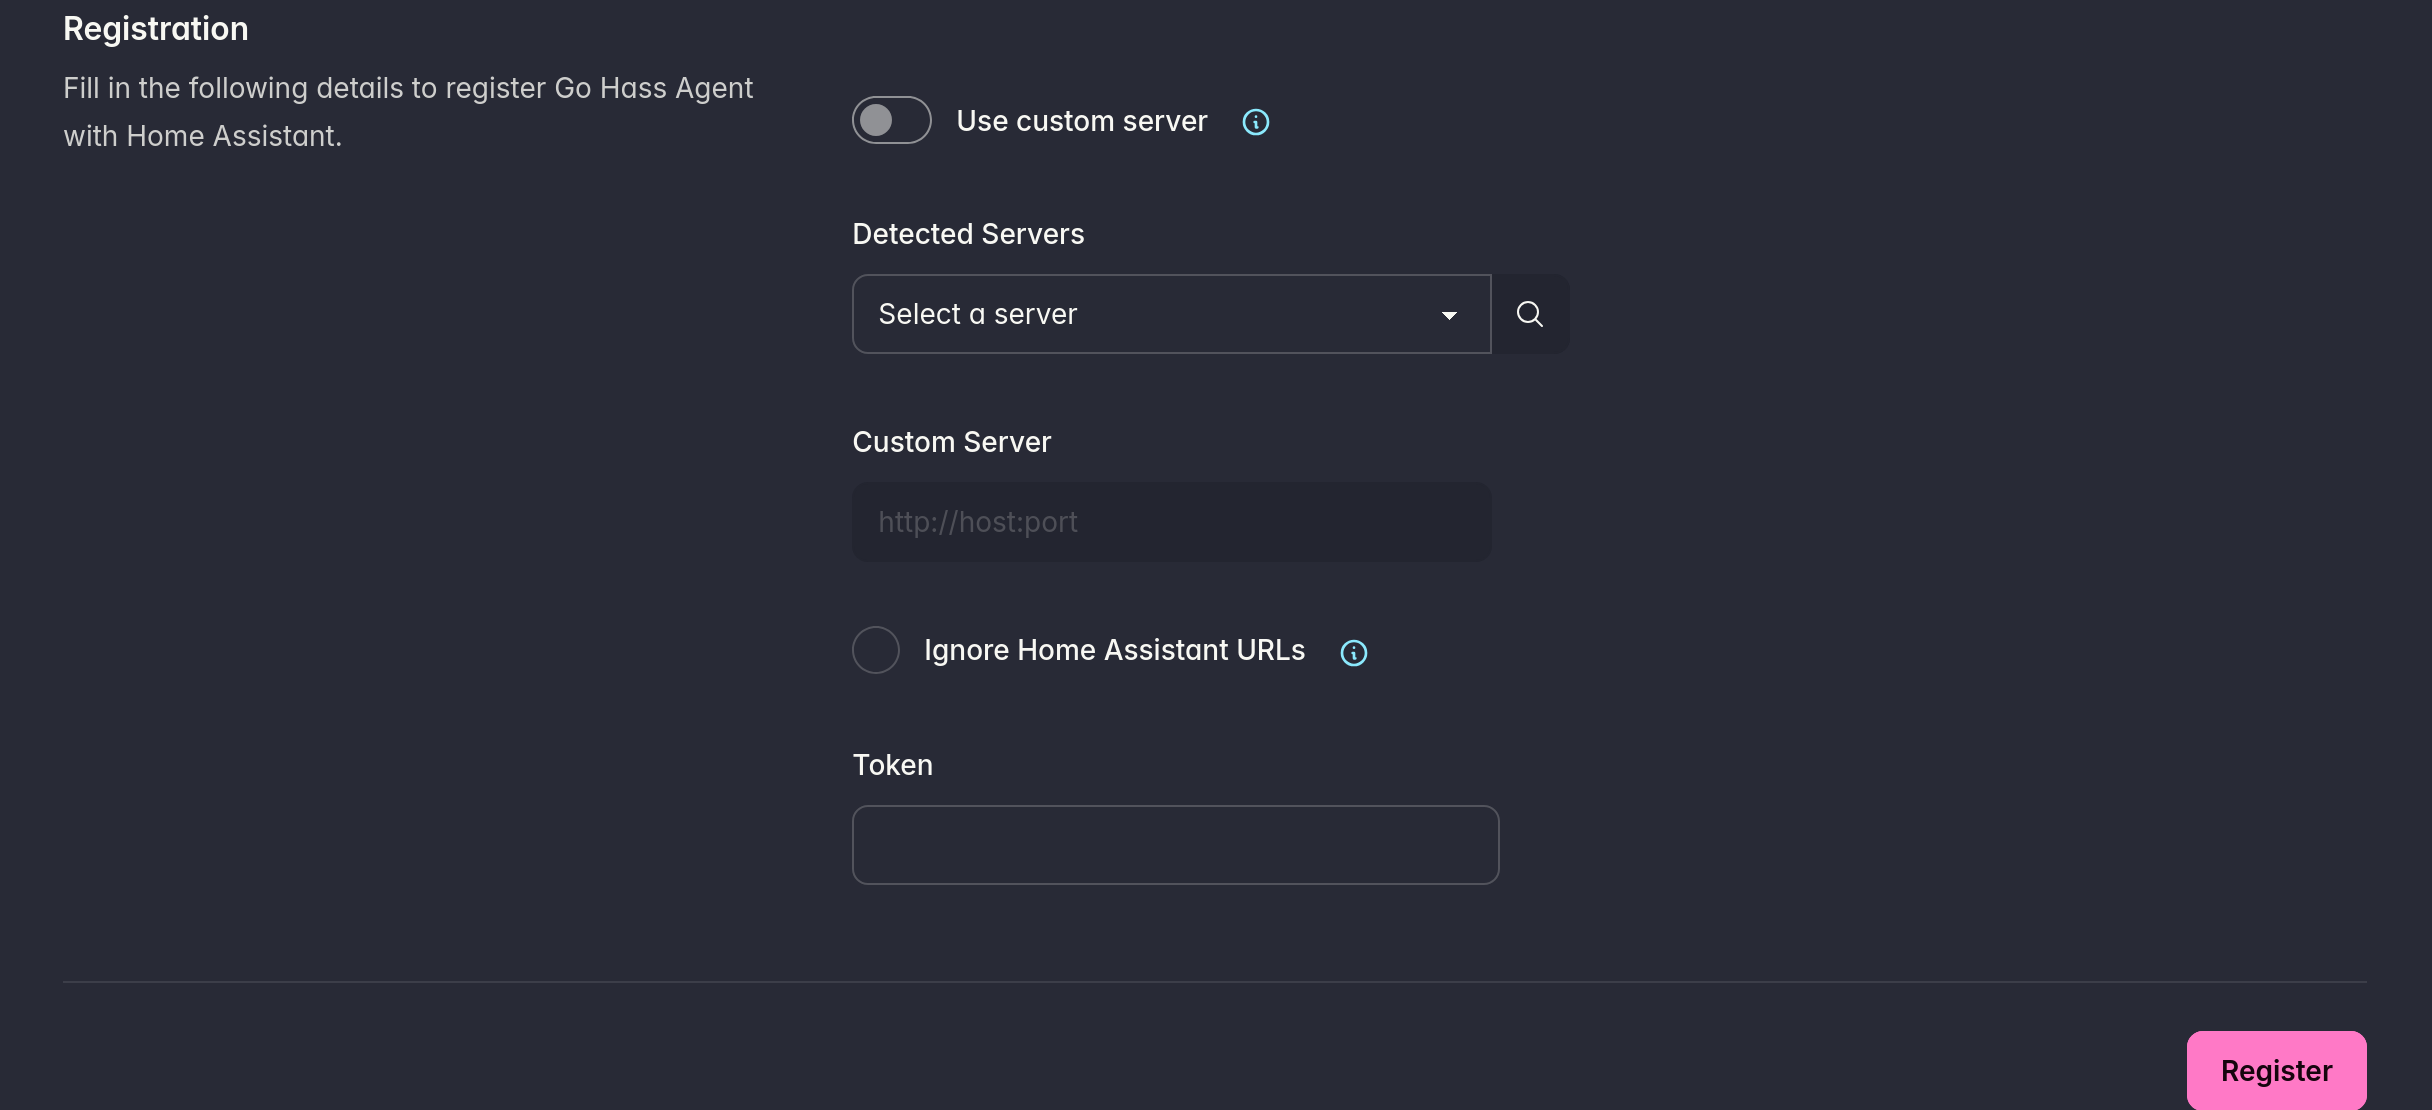
You will need:
When you have entered all the details, click Register and the agent should start running and reporting sensors to the Home Assistant instance.
Alternatively, you can register Go Hass Agent on the command-line by running:
go-hass-agent register --token _TOKEN_ --server _URL_
Once registered, Go Hass Agent should start sending sensor/event data to Home Assistant.
Go Hass Agent packages install a .desktop file exposes Go Hass Agent in your
desktop's application menu that can be used to start the agent. Use your
desktop's autostart functionality to set this desktop entry to autostart
(consult your desktop documentation for details, or consult the links
here
or
here).
Go Hass Agent packages install a systemd service file that can be enabled and used to run the agent as a service. You will still need to register the agent manually before starting as a service (see above, in particular registering on the command-line).
You will also need to ensure your user has “lingering” enabled. Run
loginctl list-users and check that your user has LINGER set to “yes”. If
not, run loginctl enable-linger.
Once you have registered the agent and enabled lingering for your user. Enable
the service and start it with the command:
systemctl --user enable go-hass-agent && systemctl --user start go-hass-agent.
You can check the status with systemctl --user status go-hass-agent. The agent
should start with every boot.
For other init systems, consult their documentation on how to enable and run user services.
There is rough support for running Go Hass Agent within a container. Pre-built images are available for armv6/v7, arm64 and amd64 architectures. The image is based on the latest stable Alpine Linux release.
To register the agent running in a container, run the following:
    podman run --rm --network host \
      --volume go-hass-agent:/home/go-hass-agent:U \
      ghcr.io/joshuar/go-hass-agent:_VERSION_ register \
      --server https://some.server:port \
      --token 'longlivedtoken'
_VERSION_ to a release version. Do not use latest, which is
unstable and likely to break.--server to your Home Assistant server.--token to a long-lived token retrieved from Home
Assistant.
--rm) as we
just want to register and generate the configuration file. We will use a
different command below to actually run Go Hass Agent.Once registered, run the agent with:
podman run --hostname _HOSTNAME_ --name go-hass-agent \
  --network host \
  --volume go-hass-agent:/home/go-hass-agent:U \
  --volume /proc:/host/proc:ro --volume /sys:/host/sys:ro \
  --env PROCFS_ROOT=/host/proc --env SYSFS_ROOT=/host/sys \
  --volume /run/dbus:/run/dbus:ro \
  --volume /run/user/1000/bus:/run/user/1000/bus:ro \
  --device /dev/video0:/dev/video0 \
  --cap-add SYS_ADMIN --cap-add SYS_RAWIO --cap-add MKNOD \
  ghcr.io/joshuar/go-hass-agent:VERSION # add any Go Hass Agent options here.
Change the value passed to --name to a unique name for your running container
and --hostname for the hostname that will be presented to Home Assistant
during registration.
All the other volume mounts are optional, but functionality and the sensors reported will be severely limited without them:
--volume /proc:/host/proc:ro --volume /sys:/host/sys:ro--env PROCFS_ROOT=/host/proc --env SYSFS_ROOT=/host/sys
--volume /run/dbus:/run/dbus:ro--volume /run/user/1000/bus:/run/user/1000/bus:ro
1000 to the uid of
your user.--cap-add SYS_ADMIN --cap-add SYS_RAWIO --cap-add MKNOD
--device /dev/video0:/dev/video0
Go Hass Agent supports alternative system mount points, which can be especially useful when running in a container. You can set the following environment variables to specify the location Go Hass Agent will use for various mounts:
PROCFS_ROOT: alternative mount point for /proc.DEVFS_ROOT: alternative mount point for /dev.SYSFS_ROOT: alternative mount point for /sys.When these are set, any sensors that would normally source their data from a file in one of the canonical system mount points, will use the alternative mount point location specified.
For running in a container, example usage would be to add the following command-line arguments to the container run command:
podman run \
  ...other options... \
  --volume /proc:/host/proc:ro --volume /sys:/host/sys:ro --volume /dev:/host/dev:ro \
  --env PROCFS_ROOT=/host/proc --env SYSFS_ROOT=/host/sys --env DEVFS_ROOT=/host/dev \
  ...other options...
The web server starts by default on localhost:8223, without TLS. You can configure a key/cert for TLS and change the hostname/port combination with the following options:
--server-hostname=machine.lan--server-port=1234--server-https-cert=path/to/cert.file--server-https-key=path/to/key.fileWhen running, Go Hass Agent will appear as a device under the Mobile App integration in your Home Assistant instance. It should also report a list of sensors/entities you can use in any automations, scripts, dashboards and other parts of Home Assistant.
The preference file (preferences.toml) is located in
CONFIG_HOME/go-hass-agent/ where CONFIG_HOME will OS-dependent:
~/.config.~/Library/Application Support.LocalAppData.Preferences under [sensors] or [controls] can be used to adjust various
aspects of those sensors/controls, or disable them entirely. See
sensors and controls for mapping
the preferences to individual sensors/controls.
Warning
Preferences in the other sections should not be edited manually. Editing preferences outside the above two groups may cause Go Hass Agent to stop functioning or produce errors.
Go Hass Agent supports utilizing scripts to create sensors. In this way, you can extend the sensors presented to Home Assistant by the agent. Note that as the agent is a “mobile app” in Home Assistant, any script sensors will be associated with the Go Hass Agent device in Home Assistant.
Each script run by the agent can create one or more sensors and each script can run on its own schedule, specified using a Cron syntax.
scripts folder under the configuration directory
(see Preferences Location for the full path).Any typical scripting language that can be invoked with a shebang can be used
for scripts. All scripts do not need to be written in the same language. So or
the typical shells can be used such as bash, sh, zsh, fish, etc.
Scripting languages such as Python, Perl, and Ruby can also be used.
All scripts should produce output that is either valid JSON, YAML or TOML. Scripts do not need to use the same format; you can have one script that produces JSON and another that produces TOML. All scripts will need to output the following fields:
schedule field containing a cron-formatted schedule.sensors field containing a list of sensors.Sensors themselves need to be represented by the following fields:
sensor_name: the friendly name of the sensor in Home Assistant (e.g., My
Script Sensor).sensor_icon: a
Material Design Icon
representing the current state. It can be changed dynamically based on the
current state or remain constant. Format is mdi:icon_name.sensor_state: the current value of the sensor. For numerical states, without
the units. Otherwise, a string or boolean (for binary sensors).
true/false in quotes.The following optional fields can also be specified, which help control the display in Home Assistant.
sensor_units: the units for the state value.sensor_type: the type of sensor. If this is a binary sensor with a boolean
value, set this to “binary”. Else, do not set this field.sensor_device_class: a Home Assistant
Device Class
for the sensor, which will dictate how it will be displayed in Home Assistant.
There are many, pick an appropriate one (see
internal/hass/sensor/deviceClass.go).
If setting sensor_device_class, it is likely required to set an appropriate
unit in sensor_units as well.sensor_state_class: the Home Assistant
State Class.
Either measurement, total or total_increasing.sensor_attributes: any additional attributes to be displayed with the
sensor.The following examples show a script that produces two sensors, in different output formats.
JSON output can be either compressed:
{
  "schedule": "@every 5s",
  "sensors": [
    {
      "sensor_name": "random 1",
      "sensor_icon": "mdi:dice-1",
      "sensor_state": 1
    },
    {
      "sensor_name": "random 2",
      "sensor_icon": "mdi:dice-2",
      "sensor_state_class": "measurement",
      "sensor_state": 6,
      "sensor_attributes": { "foo": "bar", "baz": 1 }
    }
  ]
}
Or pretty-printed:
{
  "schedule": "@every 5s",
  "sensors": [
    {
      "sensor_name": "random 1",
      "sensor_icon": "mdi:dice-1",
      "sensor_state": 2
    },
    {
      "sensor_name": "random 2",
      "sensor_icon": "mdi:dice-2",
      "sensor_state_class": "measurement",
      "sensor_state": 6,
      "sensor_attributes": {
        "foo": "bar",
        "baz": 1
      }
    }
  ]
}
schedule: "@every 5s"
sensors:
  - sensor_name: random 1
    sensor_icon: mdi:dice-1
    sensor_state: 8
  - sensor_name: random 2
    sensor_icon: mdi:dice-2
    sensor_state_class: measurement
    sensor_state: 9
    sensor_attributes:
      foo: "bar"
      baz: 1
schedule = '@every 5s'

[[sensors]]
sensor_icon = 'mdi:dice-1'
sensor_name = 'random 1'
sensor_state = 3

[[sensors]]
sensor_icon = 'mdi:dice-2'
sensor_name = 'random 2'
sensor_state = 3
sensor_state_class = 'measurement'
sensor_attributes = { foo = "bar", baz = 1 }
For a binary sensor, the output should have sensor_type set to “binary” and
the sensor_state as true or false (without quotes). As an example in
compressed JSON format:
{
  "schedule": "@every 10s",
  "sensors": [
    {
      "sensor_name": "random 4",
      "sensor_type": "binary",
      "sensor_icon": "mdi:dice-3",
      "sensor_state": false
    }
  ]
}
The schedule field is used to specify the schedule or interval on which the
script will be run by the agent. Each script is run on its own schedule. All
sensors and their values should be returned each time the script is run. The
following formats are supported.
Regular Cron expressions as per the Quartz format.
You may use one of several pre-defined schedules in place of a Cron expression.
| Entry | Description | Equivalent To |
|---|---|---|
@yearly (or @annually) |
Run once a year, midnight, Jan. 1st | 0 0 1 1 * |
@monthly |
Run once a month, midnight, first of month | 0 0 1 * * |
@weekly |
Run once a week, midnight between Sat/Sun | 0 0 * * 0 |
@daily (or @midnight) |
Run once a day, midnight | 0 0 * * * |
@hourly |
Run once an hour, beginning of hour | 0 * * * * |
Arbitrary intervals are supported with the format:
@every <duration>
<duration> must be a string accepted by
time.ParseDuration.
Running scripts can be dangerous, especially if the script does not have robust error-handling or whose origin is untrusted or unknown. Go Hass Agent makes no attempt to do any analysis or sanitization of script output, other than ensuring the output is a supported format. As such, ensure you trust and understand what the script does and all possible outputs that the script can produce. Scripts are run by the agent and have the permissions of the user running the agent. Script output is sent to your Home Assistant instance.
Note
If Home Assistant is connected to MQTT, you can also configure Go Hass Agent to connect to MQTT, which will then expose some sensors and controls in Home Assistant to control the device running the agent. Additionally, you can configure your own custom controls to run either D-Bus commands or scripts and executables.
To configure the agent to connect to MQTT:
Open your browser and navigate to the Go Hass Agent preferences page: http://localhost:8223/preferences:
Toggle Use MQTT and then enter the details for your MQTT server (not your Home Assistant server).
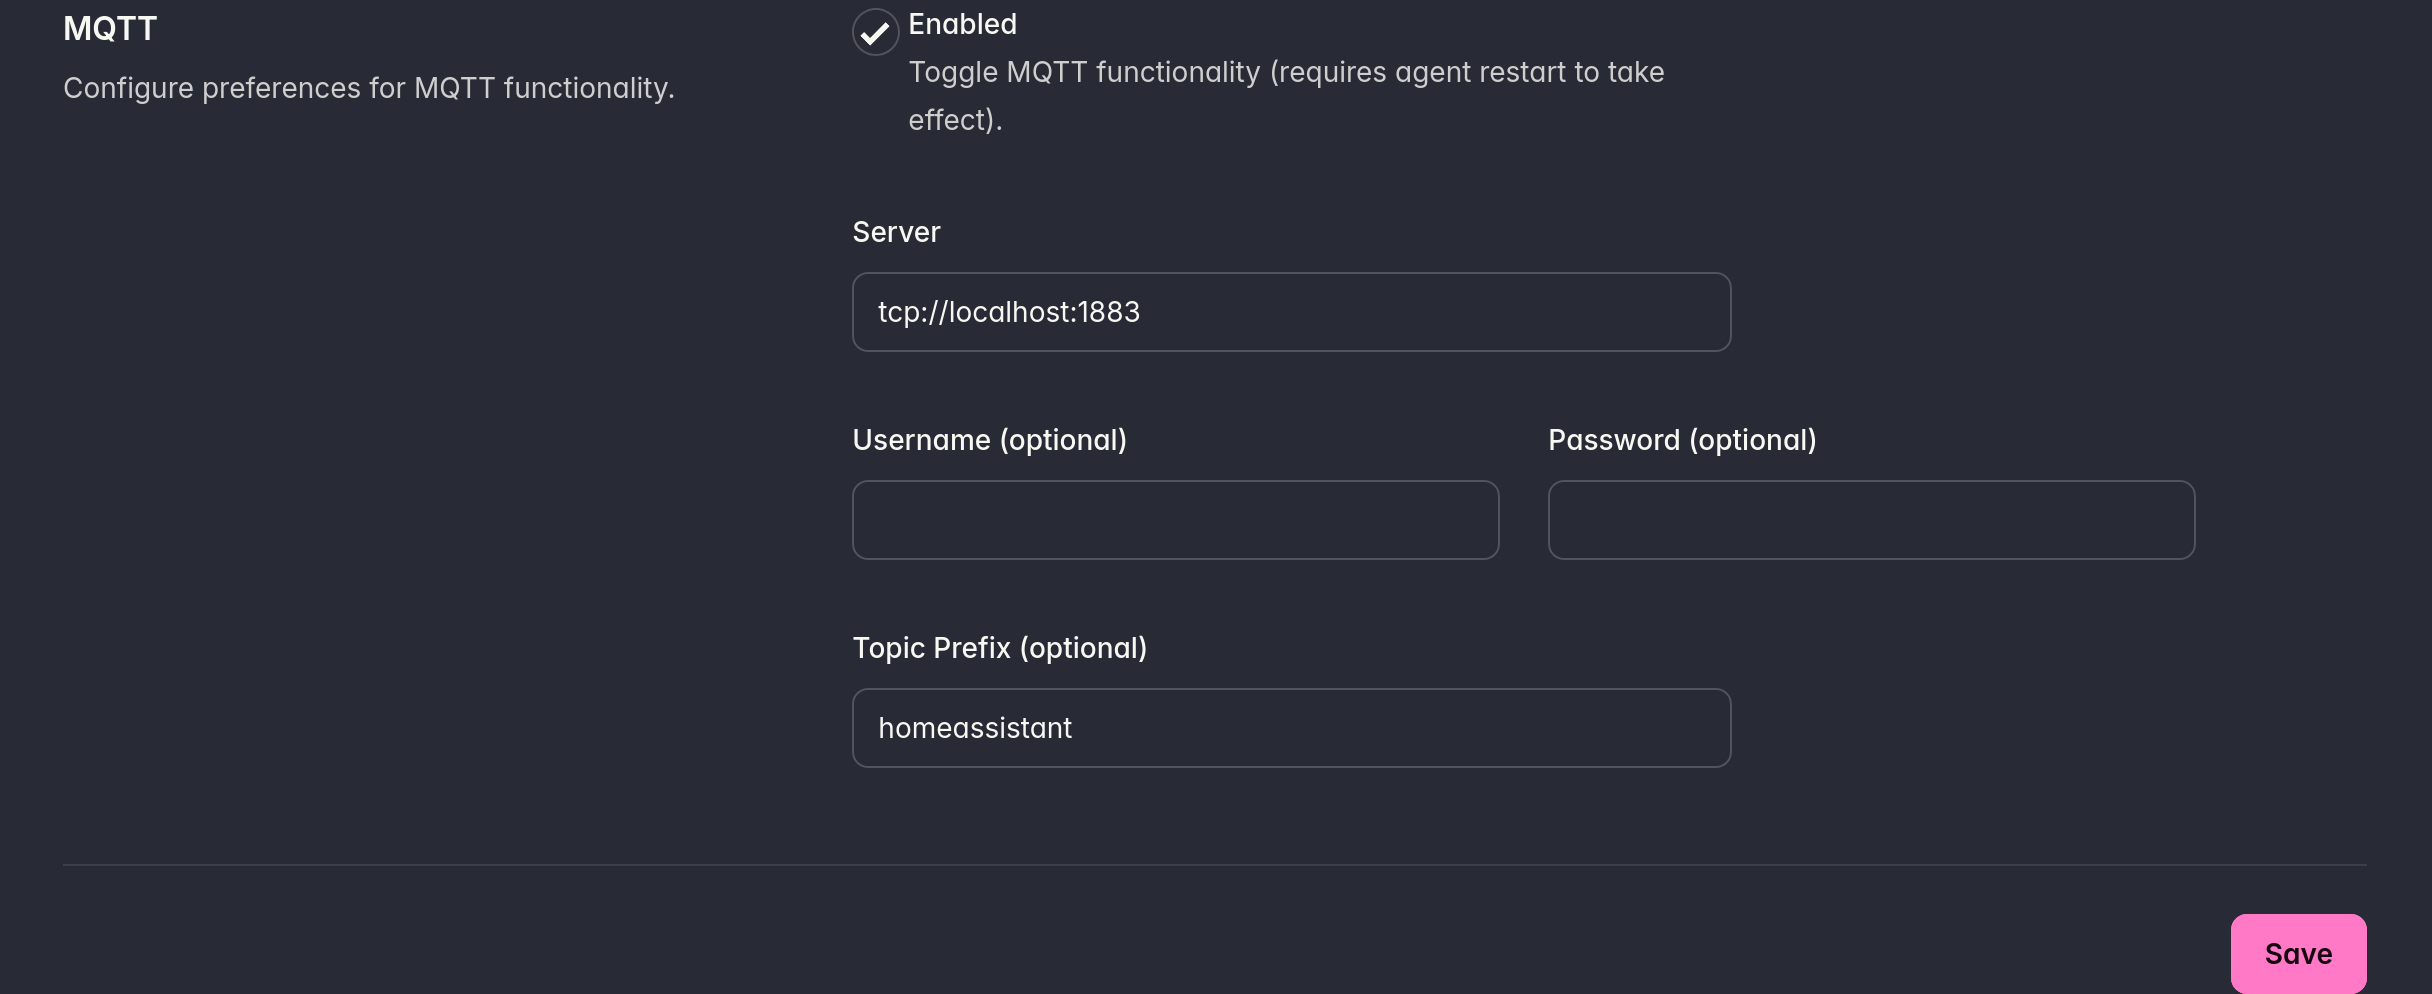
Click Save.
Restart Go Hass Agent.
You can also set MQTT preferences on the command-line:
Stop Go Hass Agent if running.
Use the config command option to specify your MQTT server parameters:
go-hass-agent config --mqtt-server=tcp://localhost:1883 --mqtt-user=some-user --mqtt-password=superseret
--mqtt-server is required.Restart Go Hass Agent.
After the above steps, Go Hass Agent will appear as a device under the MQTT integration in your Home Assistant.
Note
Go Hass Agent will appear in two places in your Home Assistant. Firstly, under the Mobile App integration, which will show all the sensors that Go Hass Agent is reporting. Secondly, under the MQTT integration, which will show the controls and sensors exposed over MQTT for Go Hass Agent. Unfortunately, due to limitations with the Home Assistant architecture, these cannot be combined in a single place.
To disable MQTT features again, navigate back to the preferences URL above and
toggle Use MQTT off, or, run the command
go-hass-agent config --no-mqtt-enabled.
When MQTT is configured, Go Hass Agent will also listen on MQTT and run arbitrary D-Bus commands.
The agent will subscribe to the MQTT topic gohassagent/HOSTNAME/dbuscommand
(where HOSTNAME is the short hostname of the device running Go Hass Agent). It
listens for messages with a JSON payload (shown below) that contains details of
the D-Bus method to call. When a message is received, the method will be
executed. The easiest way to use this feature is with the mqtt.publish service
in Home Assistant.
As an example, the following will create a notification on the device running Go Hass Agent (YAML format used for readability):
service: mqtt.publish
data:
  qos: 0
  topic: gohassagent/HOSTNAME/dbuscommand
  payload: |
    {
      "bus": "session",
      "path": "/org/freedesktop/Notifications",
      "method": "org.freedesktop.Notifications.Notify",
      "destination": "org.freedesktop.Notifications",
      "args": [
          "my-app-name",
          0,
          "my-icon",
          "summary",
          "body",
          [],
          {},
          5000
      ],
      "use_session_path": false
    }
You can optionally create a commands.toml file under the configuration
directory (see preferences with custom commands to be exposed
in Home Assistant.
Supported control types and expected input/output:
display can be optionally set in the control configuration to specify how
the number control will be displayed in Home Assistant:
auto, box or slider. The default if display is not set is
auto, where Home Assistant will decide how the control will be
displayed.type can be optionally set in the control configuration to specify whether
the number control has int or float values. The default will be int if
omitted.Note
Commands run as the user running the agent. Commands do not invoke the system shell and does not support expansion/glob patterns or handle other expansions, pipelines, or redirections typically done by shells.
States are not kept in sync. This is most important for all controls besides buttons. For example, if you configure a switch, any changes to the state you make outside of Home Assistant will not be reflected in Home Assistant automatically.
Each command needs the following definition in the file:
# "control" should be replaced with one of the control types above.
[[control]]
# name is required.
# The pretty name of the command that will be the label in Home Assistant.
name = "my command name"
# exec is required.
# The path to the command to execute.
# Arguments can be given as required, and should be quoted if they contain spaces.
exec = '/path/to/command arg1 "arg with space"'
# icon is optional.
# The material design icon to use to represent the control in Home Assistant.
# See https://pictogrammers.com/library/mdi/ for icons you can use.
icon = "mdi:something"
# display is optional and only relevant for certain controls.
# How the control will be shown in Home Assistant. Refer to the control type for valid values.
display = "displayValue"
For number controls, additional configuration may be specified (default values shown):
# type is optional.
# Whether this number control has int or float values. Default is "int".
type = "int"
# min is optional.
# The minimum value of the number. Default is 0.
min = 0
# max is optional.
# The maximum value of the number. Default is 100.
max = 100
# step is optional.
# The amount to change the value by (i.e., increment/decrement), if applicable. Default is 1.
step = 1
The following shows an example that configures various controls in Home Assistant:
[[button]]
name = "My Command With an Icon"
exec = 'command arg1 arg2 "arg3"'
icon = "mdi:chat"

[[button]]
name = "My Command"
exec = "command"

[[switch]]
name = "Toggle a Thing"
exec = "command arg1 arg2"

[[number]]
name = "My number slider"
exec = "command"
display = "slider"
min = 1
max = 500
step = 5
There is a significant discrepancy in permissions between the device running Go Hass Agent and Home Assistant.
Go Hass Agent runs under a user account on a device. So the above controls will only work where that user has permissions to run the underlying actions on that device. Home Assistant does not currently offer any fine-grained access control for controls like the above. So any Home Assistant user will be able to run any of the controls. This means that a Home Assistant user not associated with the device user running the agent can use the exposed controls to issue potentially disruptive actions on a device that another user is accessing.
Besides Go, Go Hass Agent requires a javascript runtime/toolkit to bundle/build some assets required for the web UI. Nodejs works just fine, is packaged in nearly all distributions and has good cross-platform support.
Note
The devcontainer has all the necessary tooling installed for building Go Hass Agent.
From the root of the Go Hass Agent repository, use the following commands will build/bundle everything needed:
npm install
npm run build:js
npm run build:css
# the -X ... linker option is *required*
CGO_ENABLED=0 go build -ldflags="-w -s -X github.com/joshuar/go-hass-agent/config.AppVersion=$(git describe --tags --always --long --dirty)" -o dist/go-hass-agent
This will build a binary and place it in dist/go-hass-agent.
Go Hass Agent can also be built for arm (v6/v7) and arm64 with cross-compilation. Just change the go build in
the commands above as appropriate. For e.g.:
RUN GOOS=${TARGETOS} GOARCH=${TARGETARCH} go build -ldflags="-s -w -X github.com/joshuar/go-hass-agent/config.AppVersion=$(git describe --tags --always --long --dirty)" -o dist/go-hass-agent
Go Hass Agent uses nfpm to create packages for Fedora, Arch, and Ubuntu/Debian.
To build packages, use the following invocations:
for format in rpm deb archlinux; do
  go run github.com/goreleaser/nfpm/v2/cmd/nfpm@latest package --packager ${format} --config .nfpm.yaml --target dist
done
This will build packages for all possible formats and they will be available under the dist/ folder.
A Dockerfile that you can use to build an image can be found here.
You can build an image with a command like the following (using Podman):
podman build --file ./Dockerfile --tag go-hass-agent
As with building a binary, cross-compliation is supported:
# use either linux/arm64, linux/arm/v7 or linux/arm/v6
podman build --file ./Dockerfile --platform linux/arm/v7 --tag go-hass-agent
Note
By default, the container will run as a user with UID/GID 1000/1000. You can pick a different UID/GID when building by
adding --build-arg UID=999 and --build-arg GID=999 (adjusting the values as appropriate).
Note
Please note, as an open-source and hobby project, the Go Hass Agent developers cannot commit to a response within any given time-frame. However, we do endeavor to try to provide an initial response, and ongoing cadence of 1 week.
This repository is using conventional commit messages. This provides the ability to automatically include relevant notes in the changelog. The TL;DR is when writing commit messages, add a prefix:
feat: for a new feature, like a new sensor.fix: when fixing an issue.refactor: when making non-visible but useful code changes.Please read the Code of Conduct
Check out what I'm working on for future releases.
worker sections, you can find some controls to disable some sensor groups.Generally, Go Hass Agent will try to reserve sensor renames to major version upgrades, which may contain breaking changes.
Unfortunately, sometimes sensor names may inadvertently get changed in non-major releases.
Regrettably, there is no way to rename the sensors in Home Assistant such that long-term statistics and existing automations and dashboards continue to work uninterrupted.
For long-term statistics, you can remove the old sensors manually, under Developer Tools→Statistics in Home Assistant, for example. The list should contain sensors that are no longer “provided” by the agent. Or you can wait until they age out of the Home Assistant long-term statistics database automatically.
For automations and dashboards the repairs integration, will direct you to any broken items and how to fix them.
Stop Go Hass Agent if already running.
Open your Home Assistant mobile_app integrations page:
Locate the entry for your existing Go Hass Agent device. It should be named the same as the hostname of the device it is running on.
Click on the menu (three vertical dots) at the right of the entry:

Choose Delete.
From a terminal, run the agent with the command: go-hass-agent register --force (add --server someserver --token sometoken for
non-graphical registration).
The agent will go through the initial registration steps. It should report that registration was successful.
Restart the agent.
sensors command (part of lm-sensors), there will be discrepancies; lm-sensors has a database of
chips with scaling/transformation information for their values and applies those as required before displaying the values.more like this
A to-do list that runs your Claude Code agents — capture anywhere, dispatch in parallel, review from your phone.
Arduino library and MATLAB/Simulink API for the AutomationShield Arduino expansion boards for control engineering educa…
search projects, people, and tags