perplexity-cli
🧠 A simple command-line client for the Perplexity API. Ask questions and receive answers directly from the terminal! 🚀🚀🚀
Python★ 176
ChatGPT at home! A better alternative to commercial smart home assistants, built on the Raspberry Pi using LiteLLM and…
 judahpaul16
ChatGPT at home! Basically a better Google Nest Hub or Amazon Alexa home assistant. Built on the Raspberry P iusing LiteLLM and LangGraph.
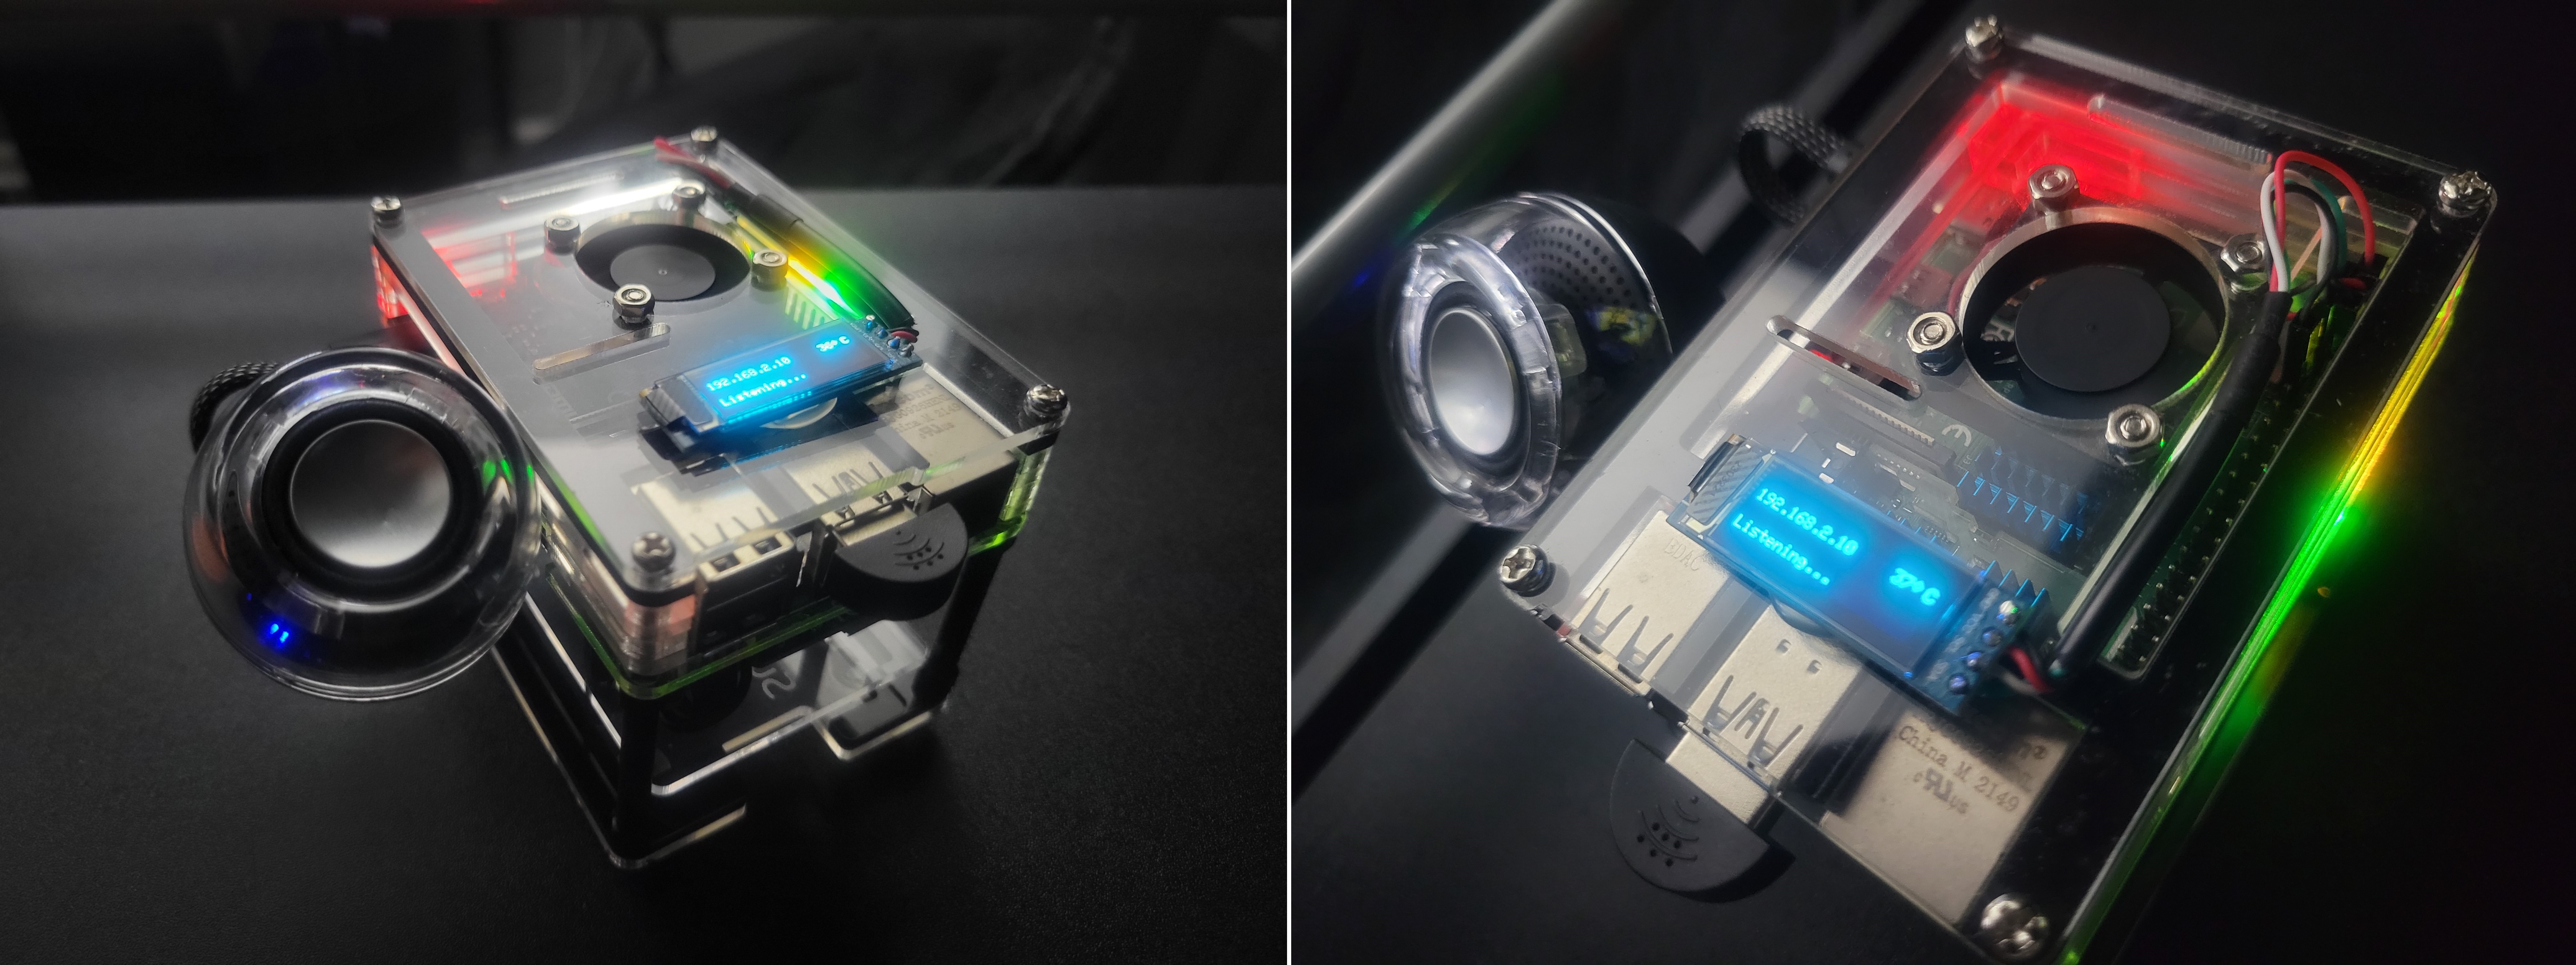
This guide will explain how to build your own. It's pretty straight forward. You can also use this as a reference for building other projects on the Raspberry Pi.
|
|
||||||||
📖 Developer Documentation: For in-depth technical documentation, architecture details, and API references, visit the GPT Home Wiki.
curl -s https://raw.githubusercontent.com/judahpaul16/gpt-home/main/contrib/setup.sh | \
    bash -s -- --no-build
cd ~/gpt-home
cp .env.example .env
sed -i 's/^LITELLM_API_KEY=$/LITELLM_API_KEY=your-api-key-here/' .env
docker compose down && docker compose up -d
Tip: You can also set the API key via the web interface at
gpt-home.local/settings. See LiteLLM docs for all supported providers.
docker compose logs -f
git clone https://github.com/judahpaul16/gpt-home.git
cd gpt-home
cp .env.example .env
# Edit .env with your API keys
nano .env
# Start dev environment with hot reload
COMPOSE_PROFILES=dev docker compose up
# or
docker compose --profile dev up
Access at http://localhost (nginx routes to frontend and API).
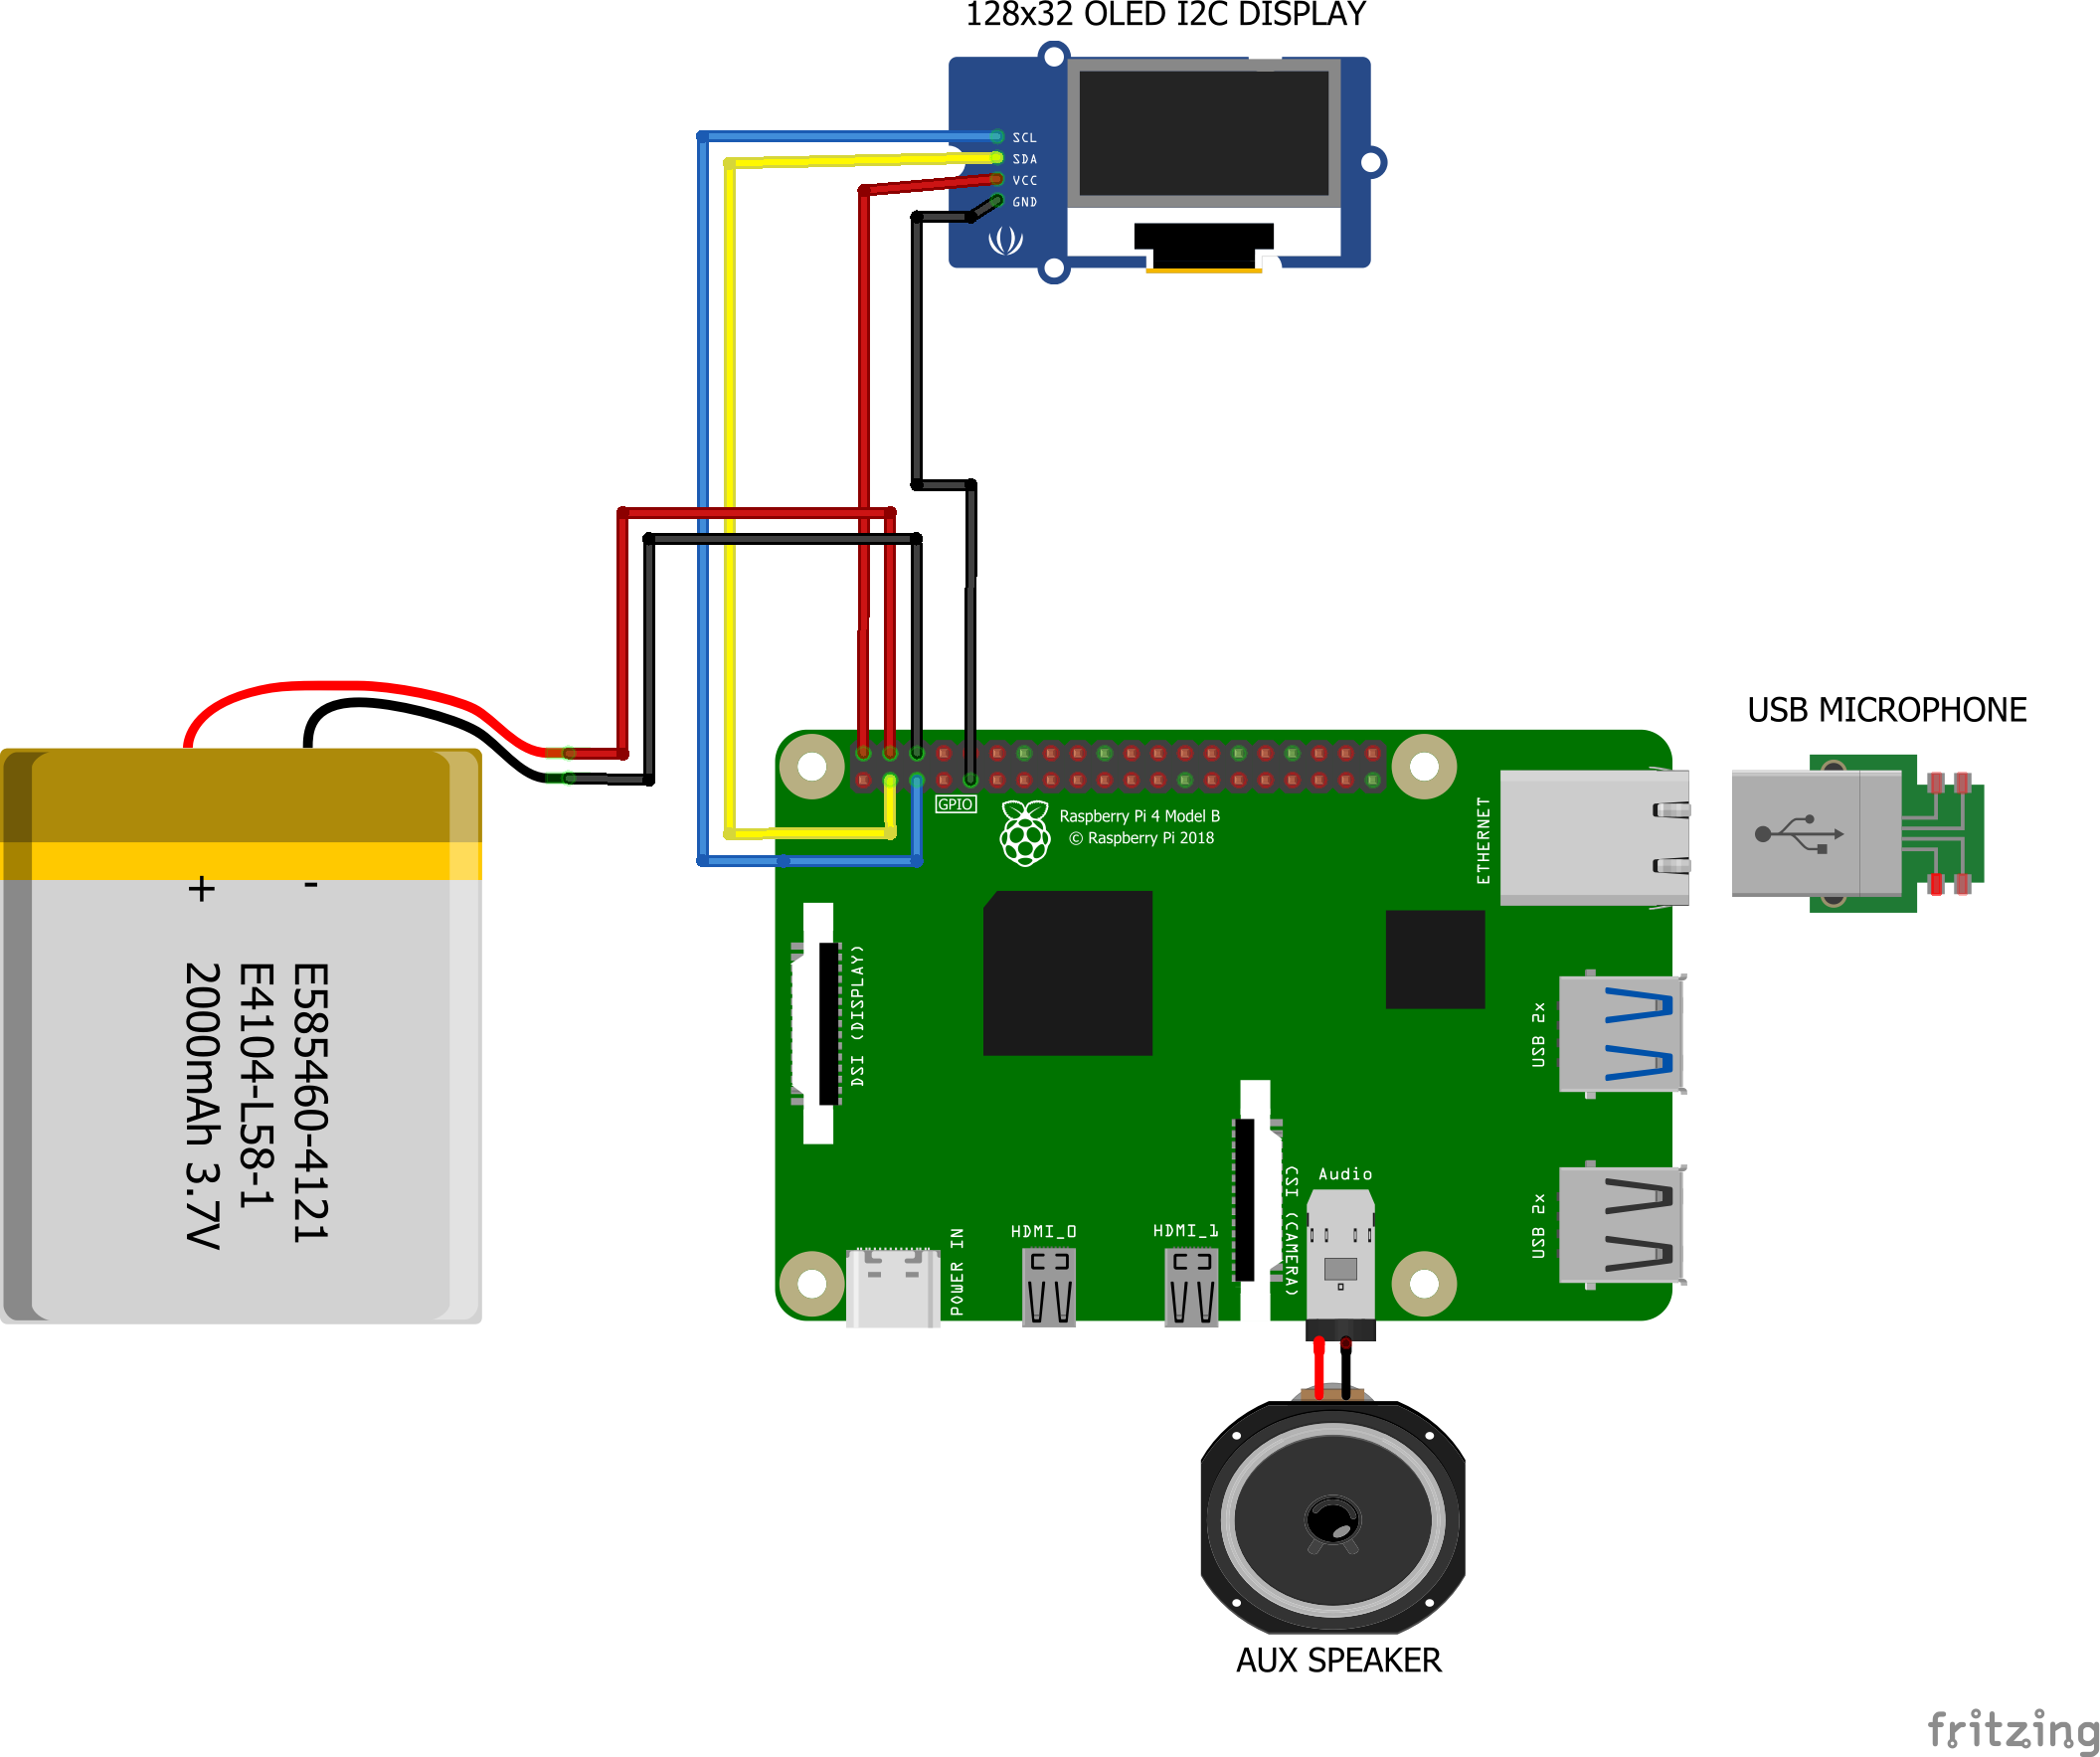
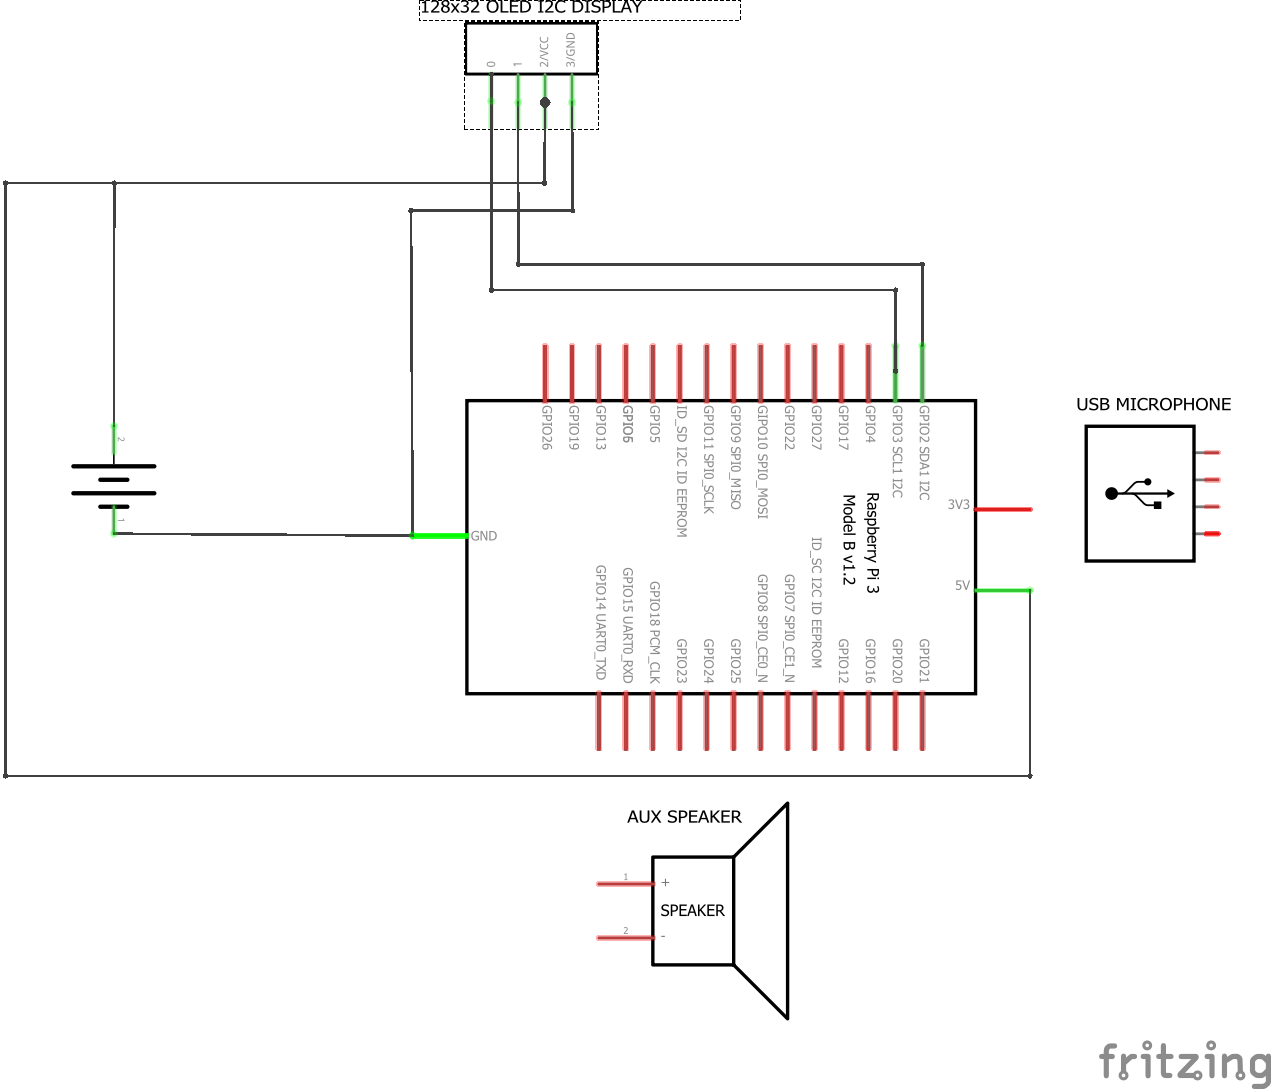
IMPORTANT: The image on the left is for illustration purposes. Do not connect the battery directly to the Raspberry Pi. Use a UPS or power supply with a battery like this one. Connecting the battery directly to the Raspberry Pi can cause damage to the board from voltage fluctuations.
Before connecting the battery, ensure that the polarity is correct to avoid damage to your Raspberry Pi or other components. Disconnect power sources before making changes.
 |
 |
| Minimum | Recommended | |
|---|---|---|
| Board | Raspberry Pi Zero 2 W | Raspberry Pi 4B / 5 |
| CPU | Quad-core ARM Cortex-A53 @ 1GHz | Quad-core ARM Cortex-A72 @ 1.5GHz+ |
| RAM | 512MB | 1GB+ |
| Storage | 16GB microSD | 32GB+ microSD |
| OS | Raspberry Pi OS Lite (64-bit) | Ubuntu Server (64-bit) |
All system dependencies (Docker, time sync, etc.) are installed automatically by the setup script.
This is the list of parts I used to build my first GPT Home. You can use this as a reference for building your own. I've also included optional parts that you can add to enhance your setup. To be clear you can use any system that runs Linux.
Core Components
Alternative Boards
Audio HATs
Optional Components
If your Pi isn't connected via Ethernet, use the included Wi-Fi setup script. It configures wpa_supplicant + systemd-networkd, disables NetworkManager (which can interfere), sets up DNS, and disables Wi-Fi power saving:
curl -s https://raw.githubusercontent.com/judahpaul16/gpt-home/main/contrib/wifi-setup.sh | \
    sudo WIFI_SSID="your-ssid" WIFI_PSK="your-password" bash
Or run it interactively (prompts for SSID and password):
curl -s https://raw.githubusercontent.com/judahpaul16/gpt-home/main/contrib/wifi-setup.sh | \
    sudo bash
You can also set WIFI_IFACE (default: wlan0) and WIFI_COUNTRY (default: US) if needed.
NetworkManager (Ubuntu, Armbian, some Raspberry Pi OS images):
sudo nmcli dev wifi connect "your-ssid" password "your-password"
To list available networks: nmcli dev wifi list
raspi-config (Raspberry Pi OS):
sudo raspi-config
Navigate to System Options > Wireless LAN and enter your SSID and password.
Ethernet: If Wi-Fi is unreliable, a wired Ethernet connection is always the most stable option and requires no configuration.
Note: GPT Home uses LiteLLM which supports 100+ LLM providers. Set your LITELLM_API_KEY in the .env file or via the web interface at gpt-home.local/settings. See the LiteLLM docs for supported providers.
Optional: Add these aliases to your .bashrc file for easier management.
# Set working directory
alias gpt-home="cd ~/gpt-home"

# Manage all services
alias gpt-up="cd ~/gpt-home && docker compose up -d"
alias gpt-down="cd ~/gpt-home && docker compose down"
alias gpt-restart="cd ~/gpt-home && docker compose restart"
alias gpt-logs="cd ~/gpt-home && docker compose logs -f"
alias gpt-status="cd ~/gpt-home && docker compose ps"

# Manage individual services
alias gpt-backend-logs="cd ~/gpt-home && docker compose logs -f backend"
alias gpt-backend-restart="cd ~/gpt-home && docker compose restart backend"
alias gpt-backend-shell="cd ~/gpt-home && docker compose exec backend bash"

alias gpt-frontend-logs="cd ~/gpt-home && docker compose logs -f frontend"
alias gpt-frontend-restart="cd ~/gpt-home && docker compose restart frontend"

alias gpt-nginx-logs="cd ~/gpt-home && docker compose logs -f nginx"
alias gpt-nginx-restart="cd ~/gpt-home && docker compose restart nginx"

alias gpt-spotify-logs="cd ~/gpt-home && docker compose logs -f spotify"
alias gpt-spotify-restart="cd ~/gpt-home && docker compose restart spotify"

# Development mode (hot reload)
alias gpt-dev="cd ~/gpt-home && docker compose --profile dev up"
Run source ~/.bashrc to apply the changes to your current terminal session.
The setup script will take quite a while to run (900.0s+ to build and setup dependencies on my quad-core Raspberry Pi 4B w/ 1G RAM). It will install all the dependencies and build the Docker containers. However, you can skip the build process by passing the --no-build flag to the script; it will install the dependencies, set up the firewall, and pull the containers from Docker Hub and run them.
curl -s https://raw.githubusercontent.com/judahpaul16/gpt-home/main/contrib/setup.sh | \
    bash -s -- --no-build
Alternatively, for development purposes, running setup.sh without the --no-build flag builds all the service images locally. This is useful for testing changes to the codebase.
curl -s https://raw.githubusercontent.com/judahpaul16/gpt-home/main/contrib/setup.sh | \
    bash -s
You can also access a shell inside a running container for debugging:
docker compose exec backend bash   # Voice assistant container
docker compose exec frontend bash  # Web server container
docker compose exec nginx sh       # NGINX container
Explanation of Docker Compose Configuration
The docker-compose.yml configures six services:
services:
  db:
    # PostgreSQL with pgvector for persistent memory storage
    image: pgvector/pgvector:0.8.1-pg18-trixie
    volumes:
      - postgres-data:/var/lib/postgresql/data

  nginx:
    # Reverse proxy - routes /api, /logs, /settings to backend; static to frontend
    image: nginx:alpine
    ports: ["80:80"]
    depends_on: [backend]

  backend:
    # Voice assistant (app.py) + FastAPI backend (backend.py) on :8000
    image: judahpaul/gpt-home-backend:latest
    privileged: true
    expose: ["8000"]
    devices: ["/dev/snd:/dev/snd", "/dev/i2c-1:/dev/i2c-1", "/dev/dri:/dev/dri"]

  frontend:             # Production (profile: prod)
    # Multi-stage build: React static files served by nginx
    image: judahpaul/gpt-home-frontend:latest
    expose: ["80"]

  frontend-dev:         # Development (profile: dev)
    # React dev server with hot reload
    build: compose/web/Dockerfile.dev
    expose: ["80"]
    volumes:
      - ./src/frontend:/app  # Hot reload

  spotify:
    # Spotify Connect + Avahi mDNS
    image: judahpaul/gpt-home-spotify:latest
    network_mode: host  # Required for mDNS discovery
Profiles: By default,
COMPOSE_PROFILES=prodis set in.env, sofrontendruns. For development with hot reload, usedocker compose --profile dev up.
Setup Script Flags
The setup.sh script supports the following flags:
| Flag | Description |
|---|---|
--no-build |
Skip building and pull the pre-built image from Docker Hub instead |
--no-cache |
Build without using Docker's cache (forces fresh build) |
--prune |
Prune Docker system and volumes before building (cleans up disk space) |
Examples:
# Default build (uses cache, no prune)
./setup.sh

# Pull from Docker Hub without building
./setup.sh --no-build

# Fresh build without cache
./setup.sh --no-cache

# Full cleanup and fresh build
./setup.sh --prune --no-cache
|
|
|
|
||||||||||||||||||||||||||||||||||||||||||||||||||||||||||||||||
Contributions are certainly welcome! Please read the contributing guidelines for more information on how to contribute.
This project is licensed under the GNU GPL v3.0 License - see the LICENSE file for details.
more like this
🧠 A simple command-line client for the Perplexity API. Ask questions and receive answers directly from the terminal! 🚀🚀🚀
A to-do list that runs your Claude Code agents — capture anywhere, dispatch in parallel, review from your phone.
search projects, people, and tags