xylocopa
A to-do list that runs your Claude Code agents — capture anywhere, dispatch in parallel, review from your phone.
Python★ 51
Qolsys IQ Panel 2+ gateway to an Home Assistant Alarm Control Panel
 xaf
xafgit clone https://github.com/xaf/qolsysgw.gitxaf/qolsysgwqolsysgw

Qolsys Gateway (qolsysgw) is an AppDaemon
automation that serves as a gateway between a Qolsys IQ Panel
(2, 2+ or 4)
and Home Assistant. Qolsys Gateway works by establishing a connection
to your Qolsys Panel and uses the MQTT integration of Home Assistant.
It takes advantages of the MQTT discovery
feature (automatically enabled when you setup the integration) to declare the
device, alarm control panels (for each partition) and different sensors, and
keep them up to date with the information coming from the panel, while
providing you with the means to arm, disarm or trigger your alarm directly
from Home Assistant, manually or through automations.
Qolsys Gateway is an async application and has a few parallel workflows:
The communication with the Qolsys Panel
Qolsys Gateway connects to your Qolsys Panel using the configured information (hostname, token, port), thanks to a Control4 interface
As soon as the connection is established, Qolsys Gateway requests from the panel the information on the current state of the panel, its partitions and sensors
Qolsys Gateway listens for messages from the panel, and calls a callback method everytime a message can be parsed to an executable action; the callback will push that message in an MQTT thread (that step is not mandatory but doing that loop allows to debug the application from Home Assistant by sending events directly in MQTT)
Every 4 minutes, a keep-alive message is sent to the connection, in order to avoid the panel from disconnecting Qolsys Gateway
The communications with MQTT
Qolsys Gateway listens to an event topic, when a message is received,
we update the state of the panel according to the event (it can be
updating the sensors, the partitions or the panel itself). Messages in
that topic are the messages that come from the Qolsys Panel, and that
we intepret as change to the state of the panel. In general, with the
update, we will trigger a few MQTT messages to be sent to update the
status of the element at the source of the event in Home Assistant.
Qolsys Gateway also listens to a control topic, when a message is
received, we communicate the action to perform to the Qolsys Panel.
Messages in that topic are coming from Home Assistant as reactions
to service calls on the alarm_control_panel entities, or of manually
configured actions. They can be used to arm or disarm the system,
or even to trigger the alarm on the device.
A Qolsys IQ Panel 2 or 2+ (software version 2.5.3 or greater), or 4
(software version 4.1 or greater),
for which you have the dealer code (defaults to 2222). In some cases,
the installer code (defaults to 1111) might be sufficient, but in my
experience, it was not, as the required menus were not visible.
Understanding that this automation is not part of the core of Home Assistant and is thus not officially supported by Home Assistant. By using it, you agree that neither Home Assistant nor myself are responsible for any issues with your Home Assistant configuration, loss of data, or whatever could be caused by using Qolsys Gateway. Setting up Qolsys Gateway requires enabling the Control4 protocol on your Qolsys Panel, which may open to security issues and someone taking over control of your alarm system, so please be aware of what you are doing, and only do it if you are ready to take those risks.
Installing Qolsys Gateway requires the following steps.
You can get to the Home Assistant documentation for installation page in order to setup Home Assistant for your needs.
You will require a working MQTT broker alongside your Home Assistant
installation. Home Assistant provides documentation on how to install
and configure an MQTT broker.
If you wish to use MQTT through a docker deployment, you can use the
eclipse-mosquitto docker image.
If you can, setup a username and password to secure your broker even more.
Qolsys Gateway is an AppDaemon automation, which means it depends on a working and running version of AppDaemon, connected to your Home Assistant. You can find all the resources necessary in AppDaemon's documentation about how to install AppDaemon and how to configure it with the HASS plugin for communicating with Home Assistant, and with the MQTT plugin for communicating with your MQTT broker.
If you wish to use AppDaemon through a docker deployment, you can use the
acockburn/appdaemon docker image.
appdaemon.yamlappdaemon:
time_zone: "America/New_York" # Adapt this to your actual timezone
# All three of those might be already filled for you, or you set the
# values here, or use the secrets.yaml file to setup the values
latitude: !secret latitude
longitude: !secret longitude
elevation: !secret elevation
plugins:
# If using the add-on in Home Assistant, that plugin will already be
# enabled; when using the docker container, you will have to add it here
HASS:
type: hass
ha_url: "http://homeassistant:8123"
token: !secret ha_token # The token you get from home assistant
# And we need to add the MQTT plugin
MQTT:
type: mqtt
namespace: mqtt # We will need that same value in the apps.yaml configuration
client_host: mosquitto # The IP address or hostname of the MQTT broker
client_port: 1883 # The port of the MQTT broker, generally 1883
# Only if you have setup an authenticated connection, otherwise skip those:
client_user: appdaemon # The username
client_password: !secret mqtt_password # The password
HACS is the Home Assistant Community Store and allows for community integrations and automations to be updated cleanly and easily from the Home Assistant web user interface. If it is simple to install Qolsys Gateway without HACS, keeping up to date requires manual steps that HACS will handle for you: you will be notified of updates, and they can be installed by a click on a button.
If you want to use HACS, you will have to follow their documentation on how to install HACS.
Installing Qolsys Gateway is pretty simple once all the applications above are setup. You can either follow the path using HACS (a bit more steps initially, easier on the longer run) or use the manual setup approach.
To install Qolsys Gateway with HACS, you will need to make sure that you enabled AppDaemon automations in HACS, as these are not enabled by default:
Configuration on the left menu bar in Home Assistant Web UIDevices & ServicesIntegrationsHACS and click on ConfigureEnable AppDaemon apps discovery & tracking
is checked, or check it and click SubmitNow, to install Qolsys Gateway with HACS, follow these steps:
HACS on the left menu bar in Home Assistant Web UIAutomations in the right panelExplore & download repositories in the bottom right cornerqolsysgw, and click on Qolsys Gateway in the list that appearsDownload this repository with HACSDownload, and wait for HACS to
proceed with the downloadInstalling Qolsys Gateway manually can be summarized by putting the content of the
apps/ directory of this repository (the qolsysgw/ directory) into the apps/
directory of your AppDaemon installation.
For instance, if your Home Assistant configuration directory is in /hass/config/,
you most likely have AppDaemon setup in /hass/config/appdaemon/, and you can thus
put qolsysgw/ into /hass/config/appdaemon/apps/.
The MQTT integration of Home Assistant needs to be configured with your MQTT broker in order for Qolsys Gateway to work. If you haven't setup the MQTT integration yet, you can do so with the following steps:
Configuration on the left menu bar in Home Assistant Web UIDevices & ServicesIntegrationsAdd Integration in the bottom right cornerMQTT, and click on the MQTT integrationSubmit, Home Assistant will try and connect to the MQTT broker,
and the integration will be setup upon success.If you already have the Control4 token for your Qolsys IQ Panel, you can skip that step. If you do not understand what that sentence is about, you definitely need to go through that step.
Qolsys Gateway communicates with your Qolsys Panel using a protocol that exists for communications with Control4 automation. That protocol is not enabled on your Qolsys Panel by default, so we will need to enable it and note the token that will be provided to us.
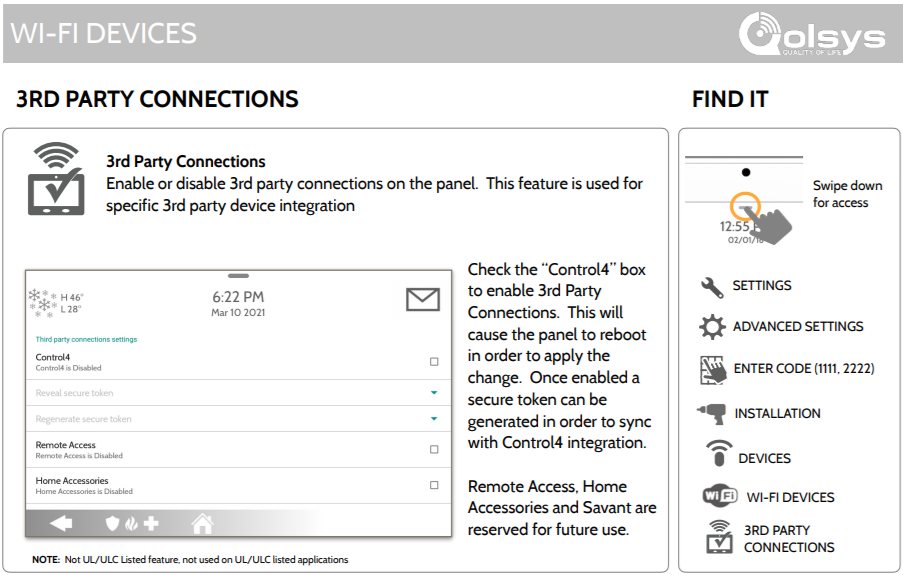
To enable the feature and get your secure token, you will need to:
Settings.Advanced Settings and use either the installer code or
the dealer code (you might have access with the main user code, too).Wi-Fi.Enable Wi-Fi box if not already active.
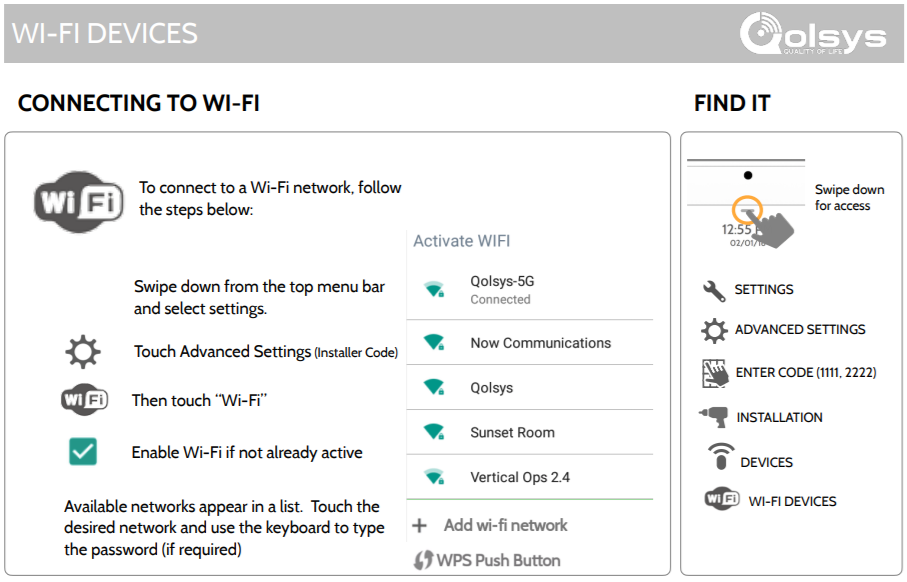
Settings.Advanced Settings and use the dealer code (you might have
access with the installer code, too).Installation.Devices.Wi-Fi Devices.3rd Party Connections.Control4 box to enable 3rd Party Connections.Reveal secure token and note the token that the panel is
providing you, we will need it to configure Qolsys Gateway.Regenerate secure token in order to make sure that nobody can
get access to control your alarm system.
Qolsys Gateway needs to be configured in the apps.yaml file of AppDaemon.
If your Home Assistant configuration directory is in /hass/config/, and
AppDaemon in /hass/config/appdaemon/, you will find this file in
/hass/config/appdaemon/apps/apps.yaml (next to the qolsysgw/ directory
we moved here previously).
The minimum configuration to use Qolsys Gateway is the following:
qolsys_panel:
  module: gateway
  class: QolsysGateway
  panel_host: <qolsys_panel_host_or_ip>
  panel_token: <qolsys_secure_token>
With:
panel_unique_id, to be able to configure multiple devices.qolsysgw/gateway.py file.QolsysGateway class in the qolsysgw/gateway.py file.12345.qolsys_panel: # ... panel_port: 4242 # use the port 4242 # ...
qolsys_panel:
  # ...
  panel_mac: aa:bb:cc:dd:11:22
  # ...
null), you will not be able to disarm your alarm system
without providing a code in Home Assistant.
Defaults to null.qolsys_panel: # ... panel_user_code: 1234 # there is a code '1234' allowing me to disarm my Qolsys Panel # ...
0 will instantly arm the alarm system. Setting to
null will let the panel use its default value. Setting
to any other positive value will set that delay. This will not change
the default behavior of the panel when handled manually, simply what
will happen when arming away from Home Assistant through Qolsys Gateway.
Note that if "Auto Stay" is enabled (may be the default in some cases),
an exit delay is configured, and no door is opened or closed
during the delay, the panel will be set to "Arm Stay" instead.
Defaults to null.qolsys_panel: # ... arm_away_exit_delay: 0 # arming instantly when triggered from Home Assistant, since related to automations # ...
0 will instantly arm the alarm system. Setting to
null will let the panel use its default value. Setting
to any other positive value will set that delay. This will not change
the default behavior of the panel when handled manually, simply what
will happen when arming stay from Home Assistant through Qolsys Gateway.
Defaults to null.qolsys_panel: # ... arm_stay_exit_delay: 10 # arming in 10 seconds when triggered from Home Assistant # ...
true will always bypass open sensors
when arming away, while setting it to false will always
disable the bypass. If you have a default behavior for this defined in
your panel, this parameter will override it. Leaving the parameter
unset will leave the panel decide what to do.
Defaults to null.qolsys_panel: # ... arm_away_bypass: true # will bypass the open sensors if any # ...
true will always bypass open sensors
when arming stay, while setting it to false will always
disable the bypass. If you have a default behavior for this defined in
your panel, this parameter will override it. Leaving the parameter
unset will leave the panel decide what to do.
Defaults to null.qolsys_panel: # ... arm_stay_bypass: false # will NOT bypass the open sensors if any # ...
ARM_CUSTOM_BYPASS from Home Assistant. This
arming type will automatically enable bypassing the open sensors.
Setting the value to arm_away will lead to the panel being
armed in away mode with bypass enabled when ARM_CUSTOM_BYPASS is used.
Setting the value to arm_stay will lead to the panel being
armed in stay mode.
Defaults to arm_away.qolsys_panel: # ... arm_type_custom_bypass: arm_stay # to arm the panel in stay mode when using the custom bypass arming type # ...
qolsys_panel.qolsys_panel: # ... panel_unique_id: meerkat # there cannot be another device with 'meerkat' as ID, it can help if you want to use Qolsys Gateway for two+ panels # ...
Qolsys Panel.qolsys_panel: # ... panel_device_name: Steve # hey, Steve! # ...
false, the code will never be checked
in home assistant even if required for arming, disarming or triggering
the alarm, and will always be sent to Qolsys Gateway for checking. If
set to true and the code is required for one of the actions,
if will be checked by the Home Assistant user interface, and never
sent through the network to Qolsys Gateway (a session token is shared
to Home Assistant by Qolsys Gateway to make sure it is receiving control
messages from the right instance). Note that in case of issues of checking
a code in Qolsys Gateway, things will simply fail silently.
Requires panel_user_code to be set, will silently
revert to false otherwise.
Defaults to true.qolsys_panel: # ... ha_check_user_code: false # we want Qolsys Gateway to receive the code and perform the check # ...
ha_check_user_code is set to true, then
the verification of that code will be done in Home Assistant directly. If
set to false, Qolsys Gateway will use that code to compare
against what Home Assistant will send in the control topic.
Requires panel_user_code to be set, will raise an
error otherwise.
Defaults to null.qolsys_panel: # ... ha_user_code: $up3r$ecre7!! # this will be the code expected from the user # ...
panel_user_code to be set, will raise an
error otherwise as the Qolsys Panel does not require any code to arm
the alarm system, and Qolsys Gateway cannot do that check without a
configured code.
Defaults to false.qolsys_panel: # ... code_arm_required: true # ...
true if
panel_user_code is not set, as Qolsys Gateway will not be
able to disarm the alarm system without a code.
Defaults to false.qolsys_panel: # ... code_disarm_required: true # ...
panel_user_code to be set, will raise an
error otherwise as the Qolsys Panel does not require any code to trigger
the alarm system, and Qolsys Gateway cannot do that check without a
configured code.
Defaults to false.qolsys_panel: # ... code_trigger_required: true # ...
TRIGGER.qolsys_panel: # ... default_trigger_command: TRIGGER_FIRE # if we want to trigger the fire alarm by default # ...
safety.qolsys_panel: # ... default_sensor_device_class: null # if we do not want to get a sensor if the device class is not directly mapped # ...
false, you will have the ability to enable them on a
sensor-by-sensor basis in Home Assistant. If setting it to true,
you will also be able to disable them on a sensor-by-sensor basis in
Home Assistant.
Defaults to false.qolsys_panel: # ... enable_static_sensors_by_default: true # ...
appdaemon.yaml, so if you did not use mqtt, you will
need to use that option for Qolsys Gateway to work properly.
Defaults to mqtt.qolsys_panel: # ... mqtt_namespace: mqtt-homeassistant # if we used that namespace in appdaemon.yaml # ...
retain, then Home Assistant
will not know the state. However, using retain means that we need to
handle the cases where AppDaemon is killed, this means that for this option to be
considered, we need the birth_topic and will_topic of
AppDaemon to be the same, so we can consider AppDaemon's availability as an
information of the availability of our partitions and sensors.
Defaults to true.qolsys_panel: # ... mqtt_retain: false # if we do not want to use MQTT retain # ...
discovery_prefix configured for the MQTT module in the Home
Assistant configuration, which is homeassistant by default.
Defaults to homeassistant.qolsys_panel: # ... discovery_topic: hass-discovery # if the discovery_prefix was changed to hass-discovery in Home Assistant # ...
{panel_unique_id}
as part of the value, it will be converted to the value as defined by
the panel_unique_id parameter, allowing to automatically
handle multiple instances of Qolsys Gateway for multiple panels, since
you will have to define different unique IDs for each.
Defaults to {discovery_topic}/alarm_control_panel/{panel_unique_id}/set.qolsys_panel:
# ...
control_topic: panel_{panel_unique_id}/control
# ...
{panel_unique_id}
as part of the value, it will be converted to the value as defined by
the panel_unique_id parameter, allowing to automatically
handle multiple instances of Qolsys Gateway for multiple panels, since
you will have to define different unique IDs for each.
Defaults to qolsys/{panel_unique_id}/event.qolsys_panel:
# ...
event_topic: panel_{panel_unique_id}/event
# ...
null,
this is simply disabled (only the session token will be considered valid).
Defaults to null.qolsys_panel: # ... user_control_token: My$ecr3tT0k3n! # ...
The initial findings that made this project possible are discussed in the community forum of Home Assistant, where the Control4 interface was initially mentioned, as well as a number of the events and actions that could be used once the connection initiated with the Qolsys Panel.
The ad-qolsys project by @roopesh, which I
used before deciding to rewrite the automation from scratch with different
features and a different way to handle events and actions. This project is not
using a line of code of ad-qolsys, but was initially inspired
by it.
more like this
A to-do list that runs your Claude Code agents — capture anywhere, dispatch in parallel, review from your phone.
Arduino library and MATLAB/Simulink API for the AutomationShield Arduino expansion boards for control engineering educa…
search projects, people, and tags