moxon-frame-generator
simple generator for 3D-printed frames for a moxon rectangle antenna
OpenSCAD★ 50
ESP32‑S3 air‑quality station with LVGL UI, MQTT, Home Assistant
 21cncstudio
Project Aura AQ is an open-source ESP32-S3 air-quality station built for makers who want a polished, finished device rather than a temporary sensor prototype. You print the enclosure, install top-tier sensors, flash the firmware from a browser, and get a touchscreen air-quality monitor with a local web dashboard, OTA updates, MQTT/Home Assistant integration, optional 0-10V ventilation control, and no cloud dependency.
This repository contains the firmware source code and configuration needed to flash and customize the device.
Support the project: back the MakerWorld project to get the detailed build guide, 3D-printable enclosure models, Bambu-ready 3MF files, and wiring instructions: https://makerworld.com/en/crowdfunding/159-project-aura-aq-make-the-invisible-visible
Join the community: GitHub Discussions
Watch the demo:
Also watch the hands-on review: Project Aura review on YouTube
Full assembly guide:
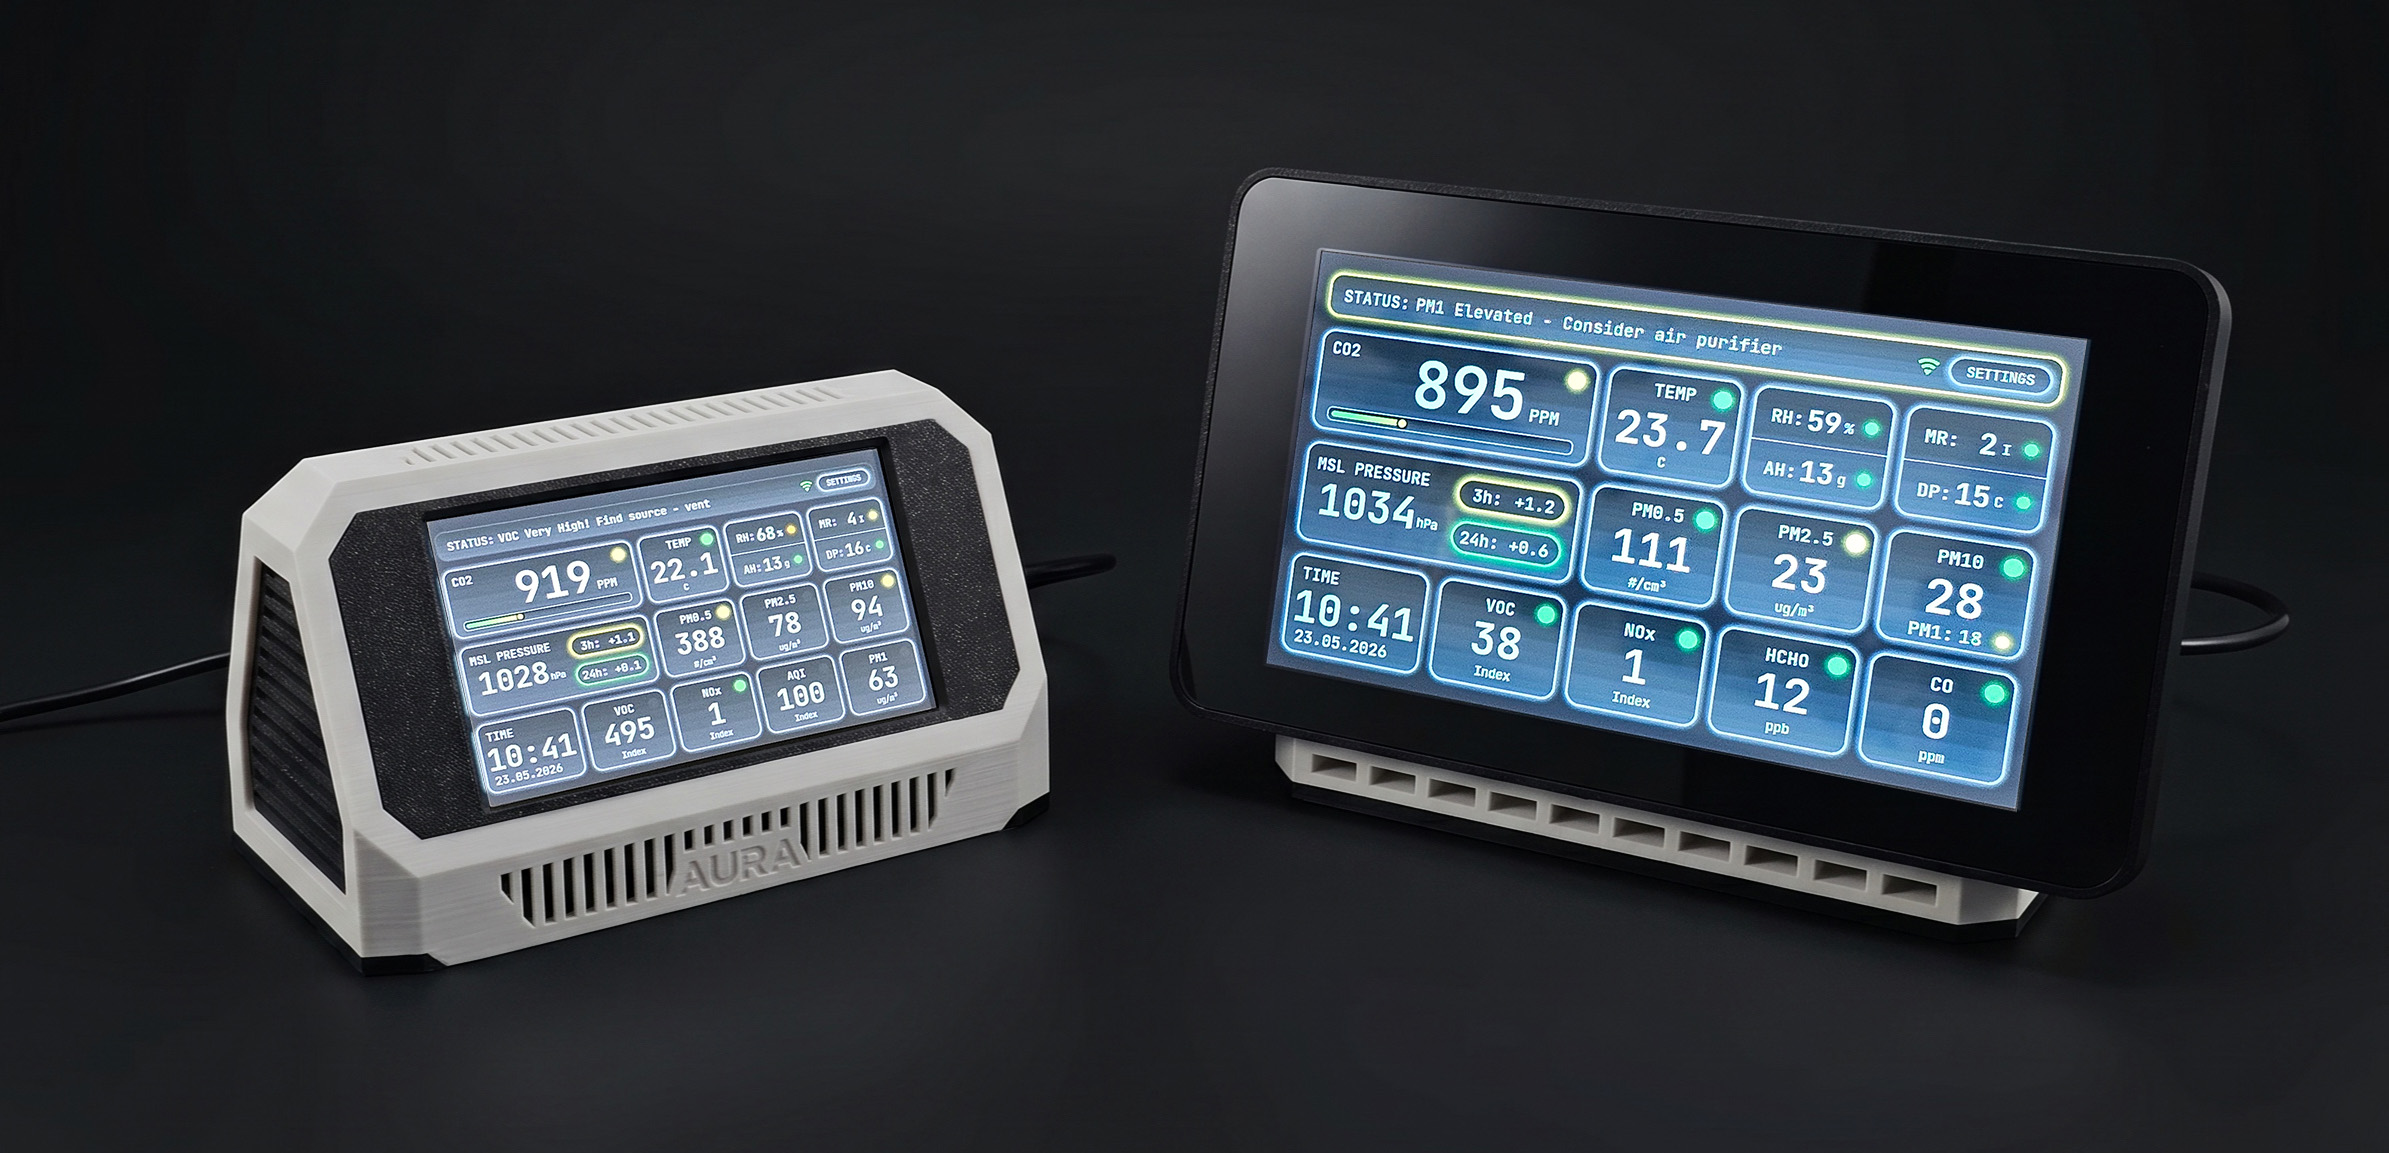
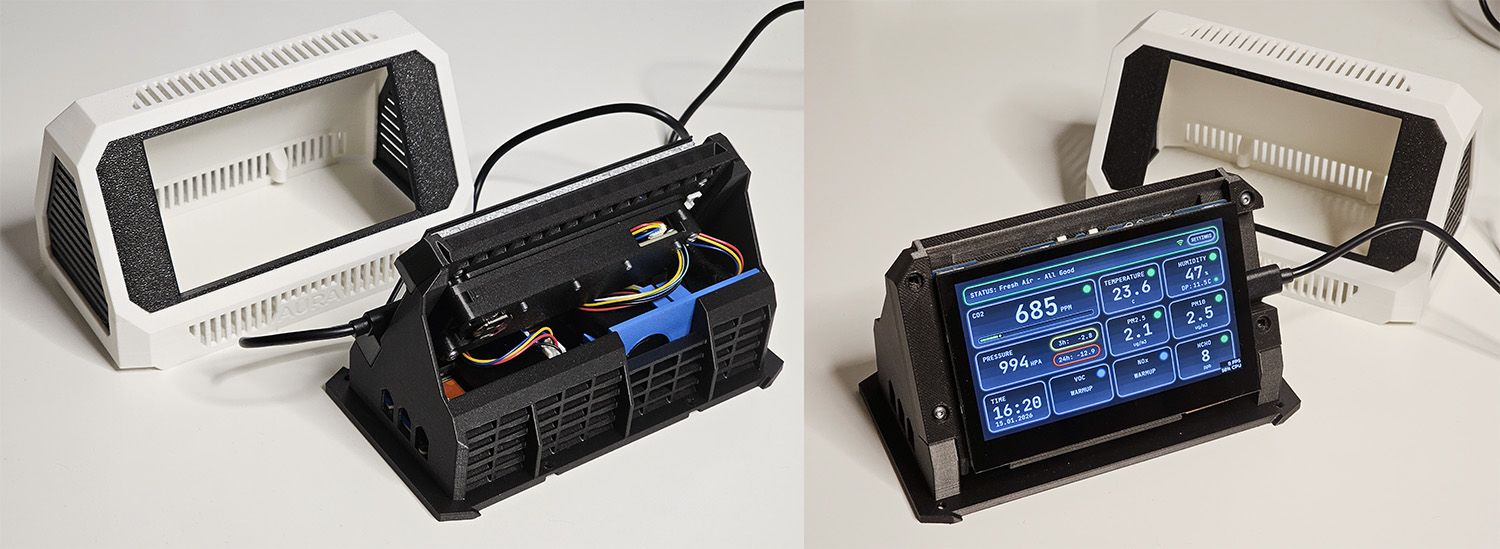
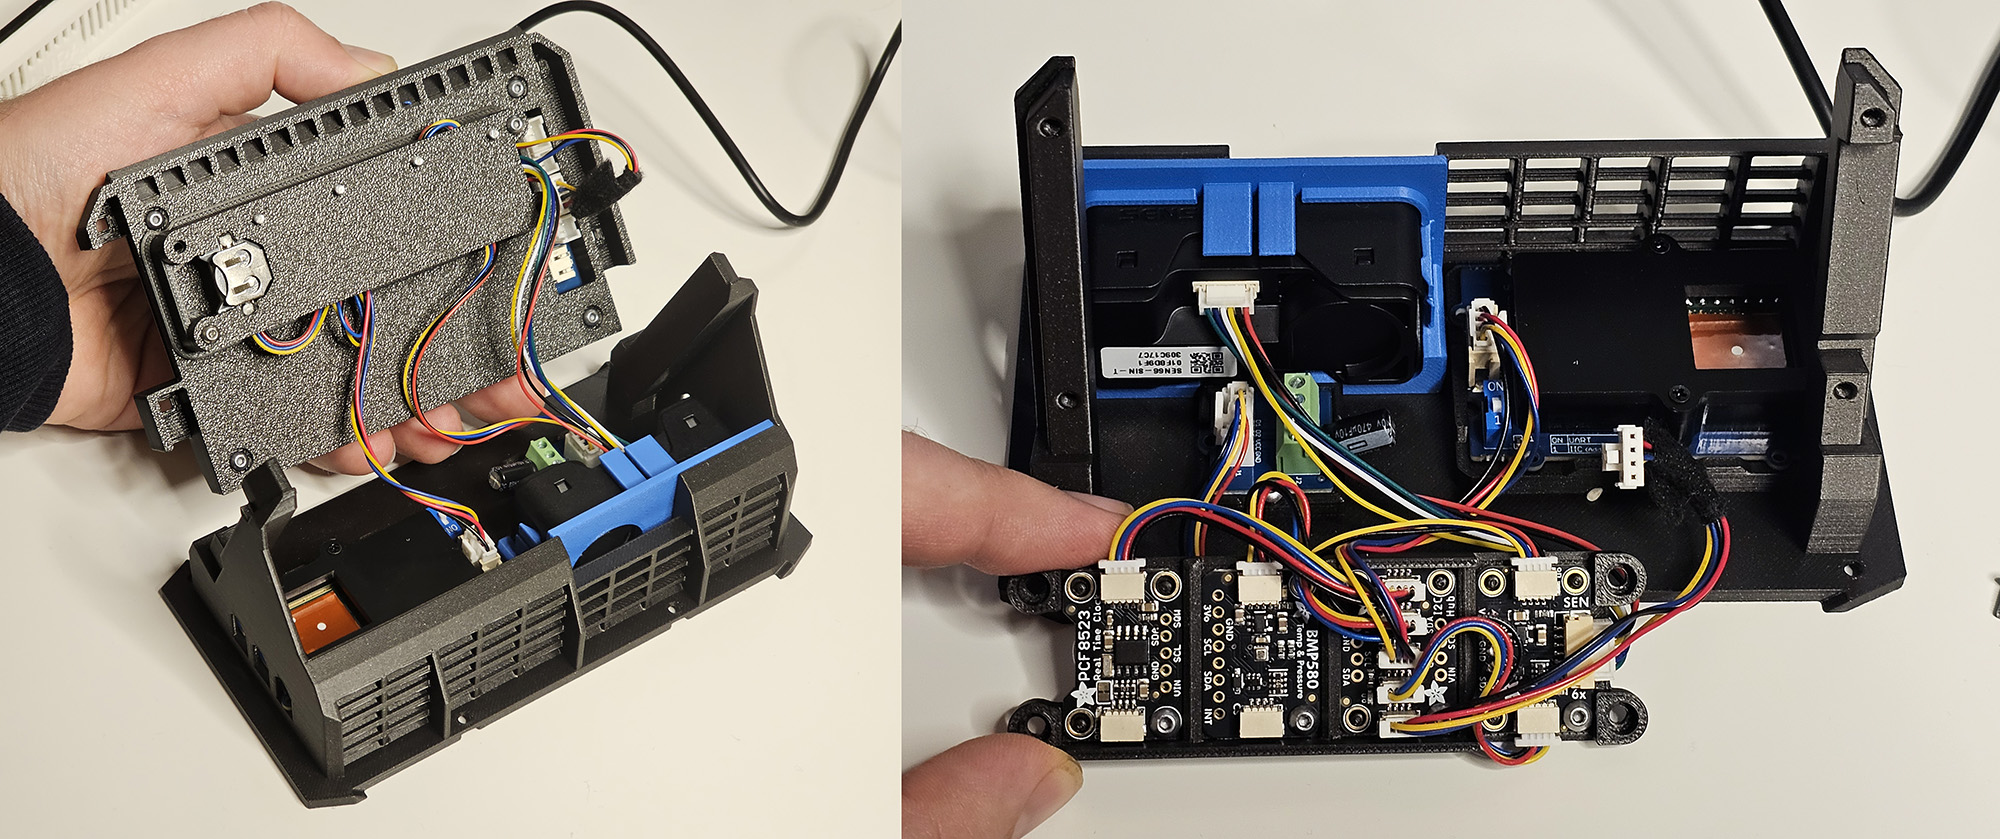
The assembly video walks through both supported build styles: the original 4.3" Aura AQ with classic Adafruit/STEMMA QT modules, and the 7" Aura XL build with the custom Aura Sensor Hub PCB. It covers I2C cable pin swaps, custom sensor cables, module and PCB connections, enclosure mounting, first boot testing, and the 180-degree screen rotation setting for the 7" build.
Telemetry
UI and integration
/dashboard: live state, charts, events, settings sync, DAC page, OTA firmware updatehttp://<hostname>.local)Hardware
value <= threshold).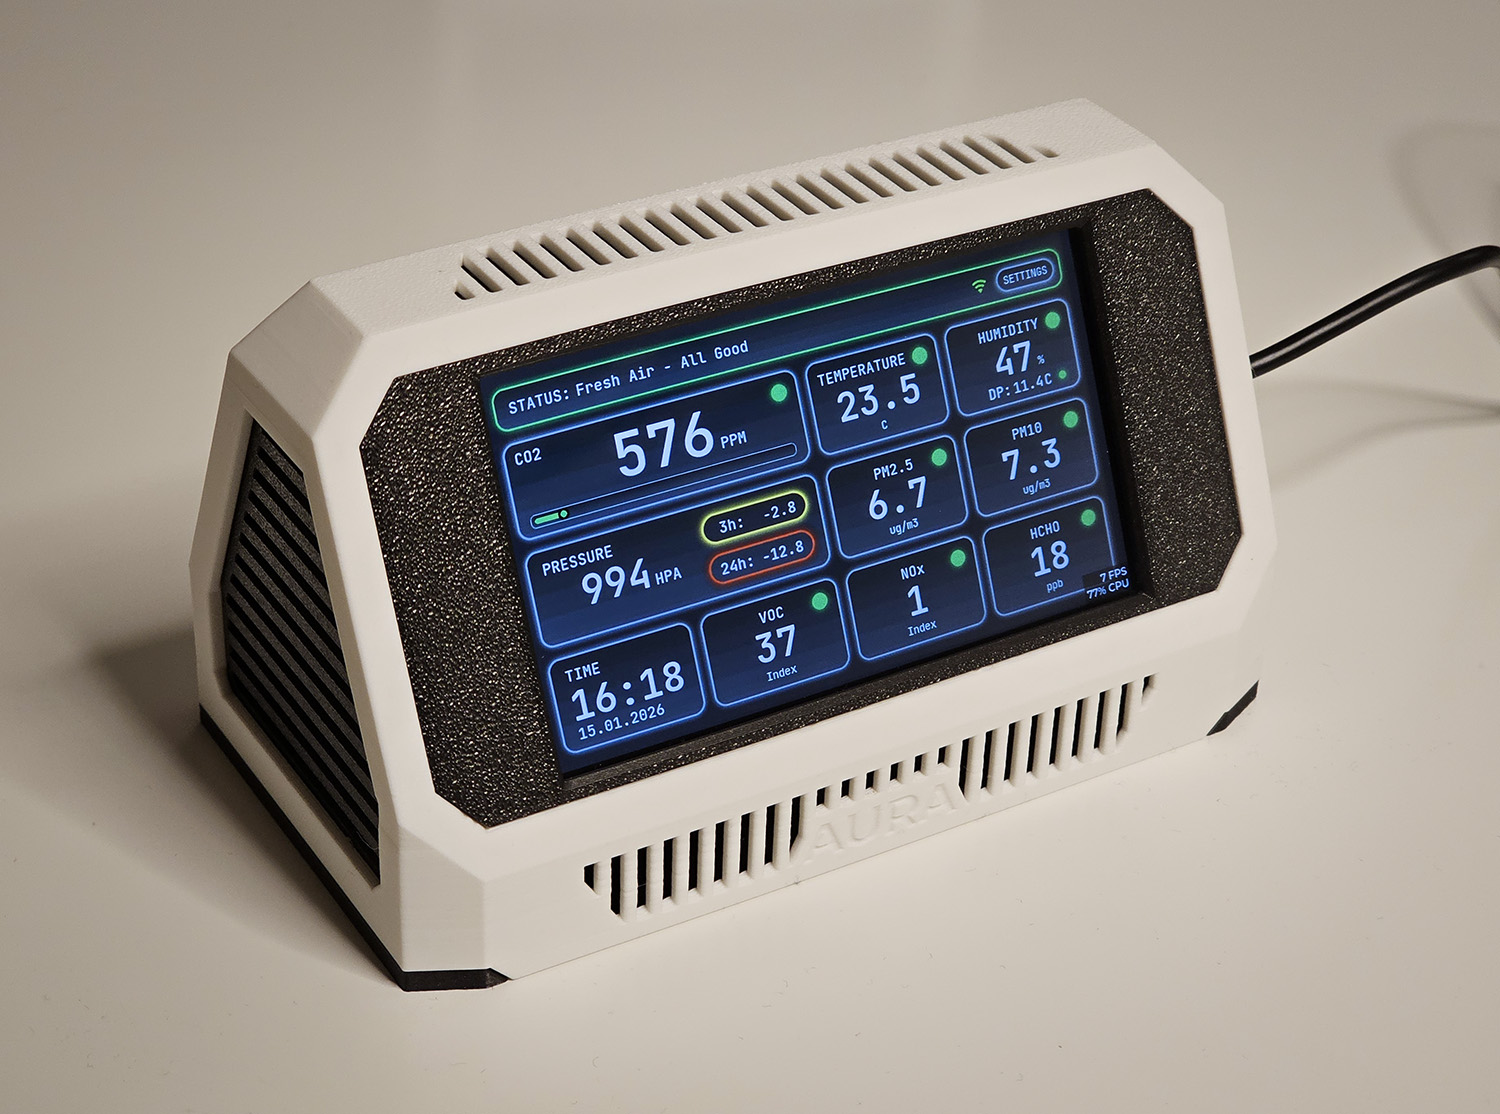
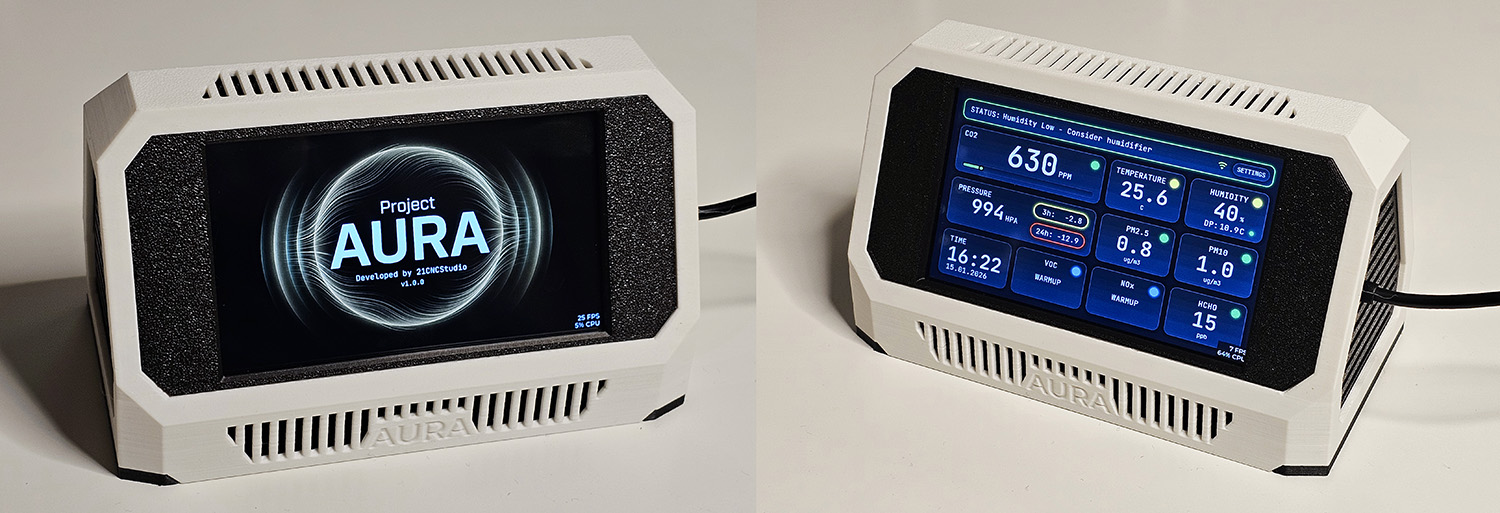
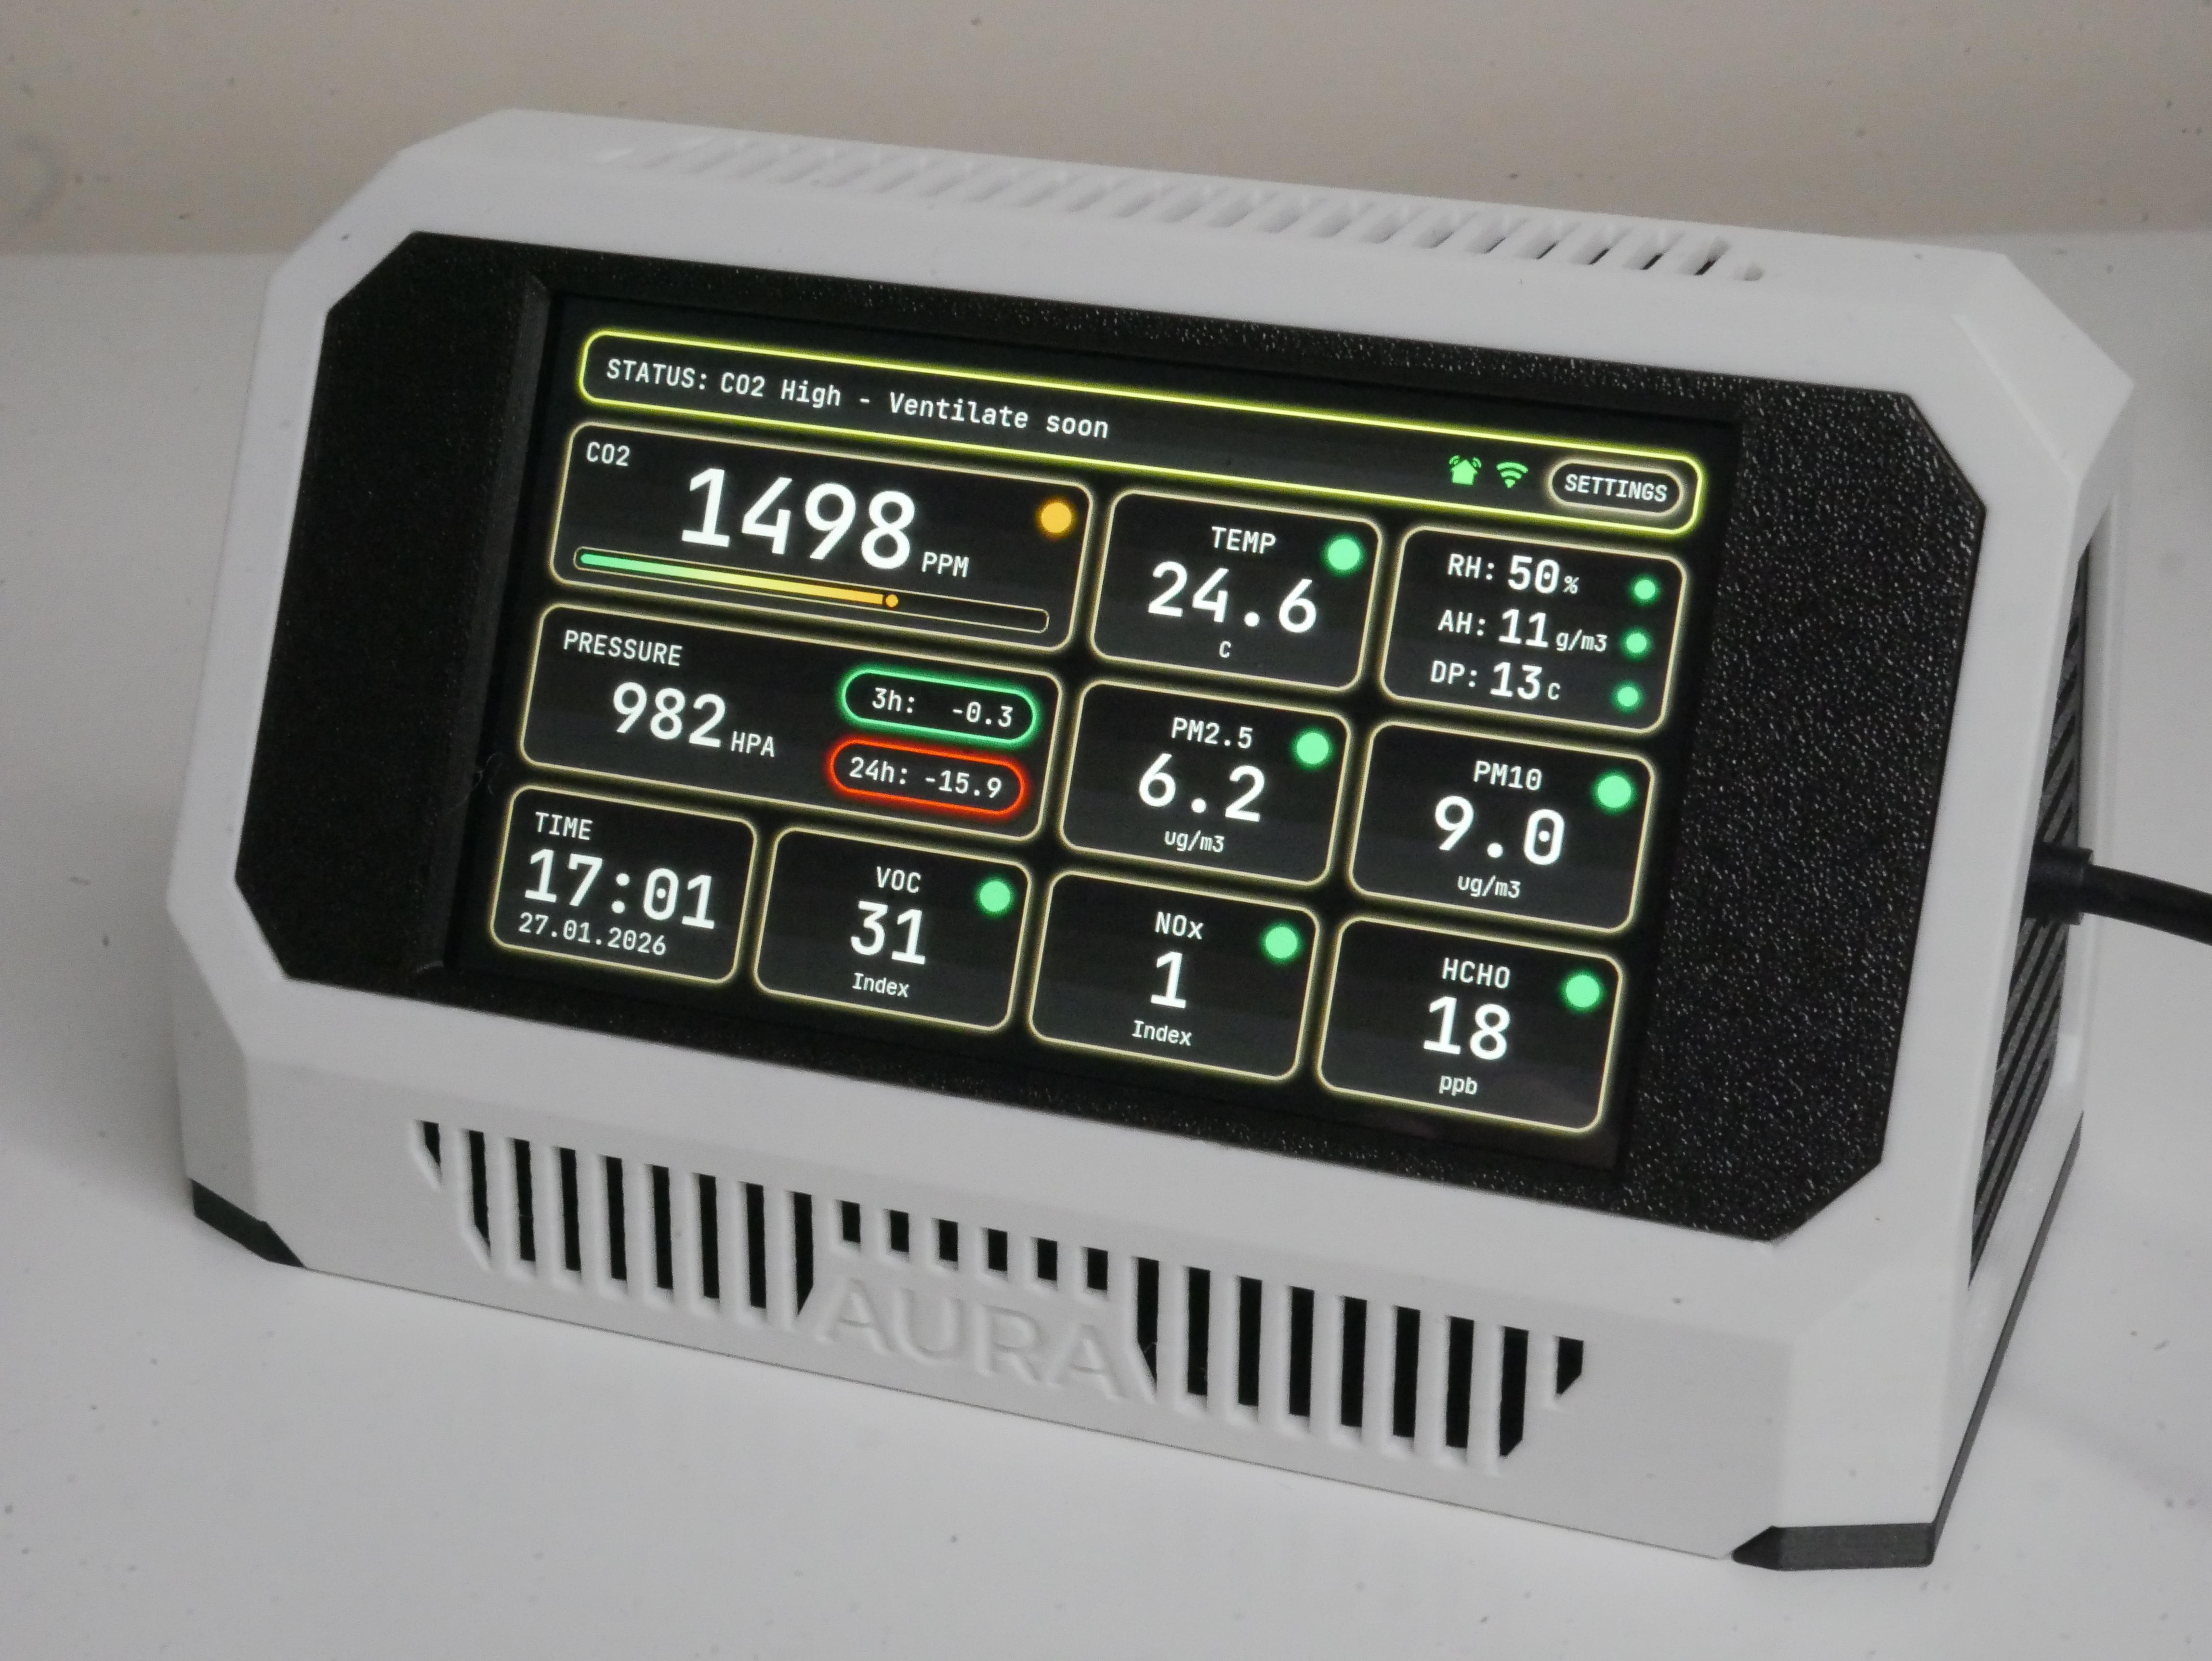 Dashboard |
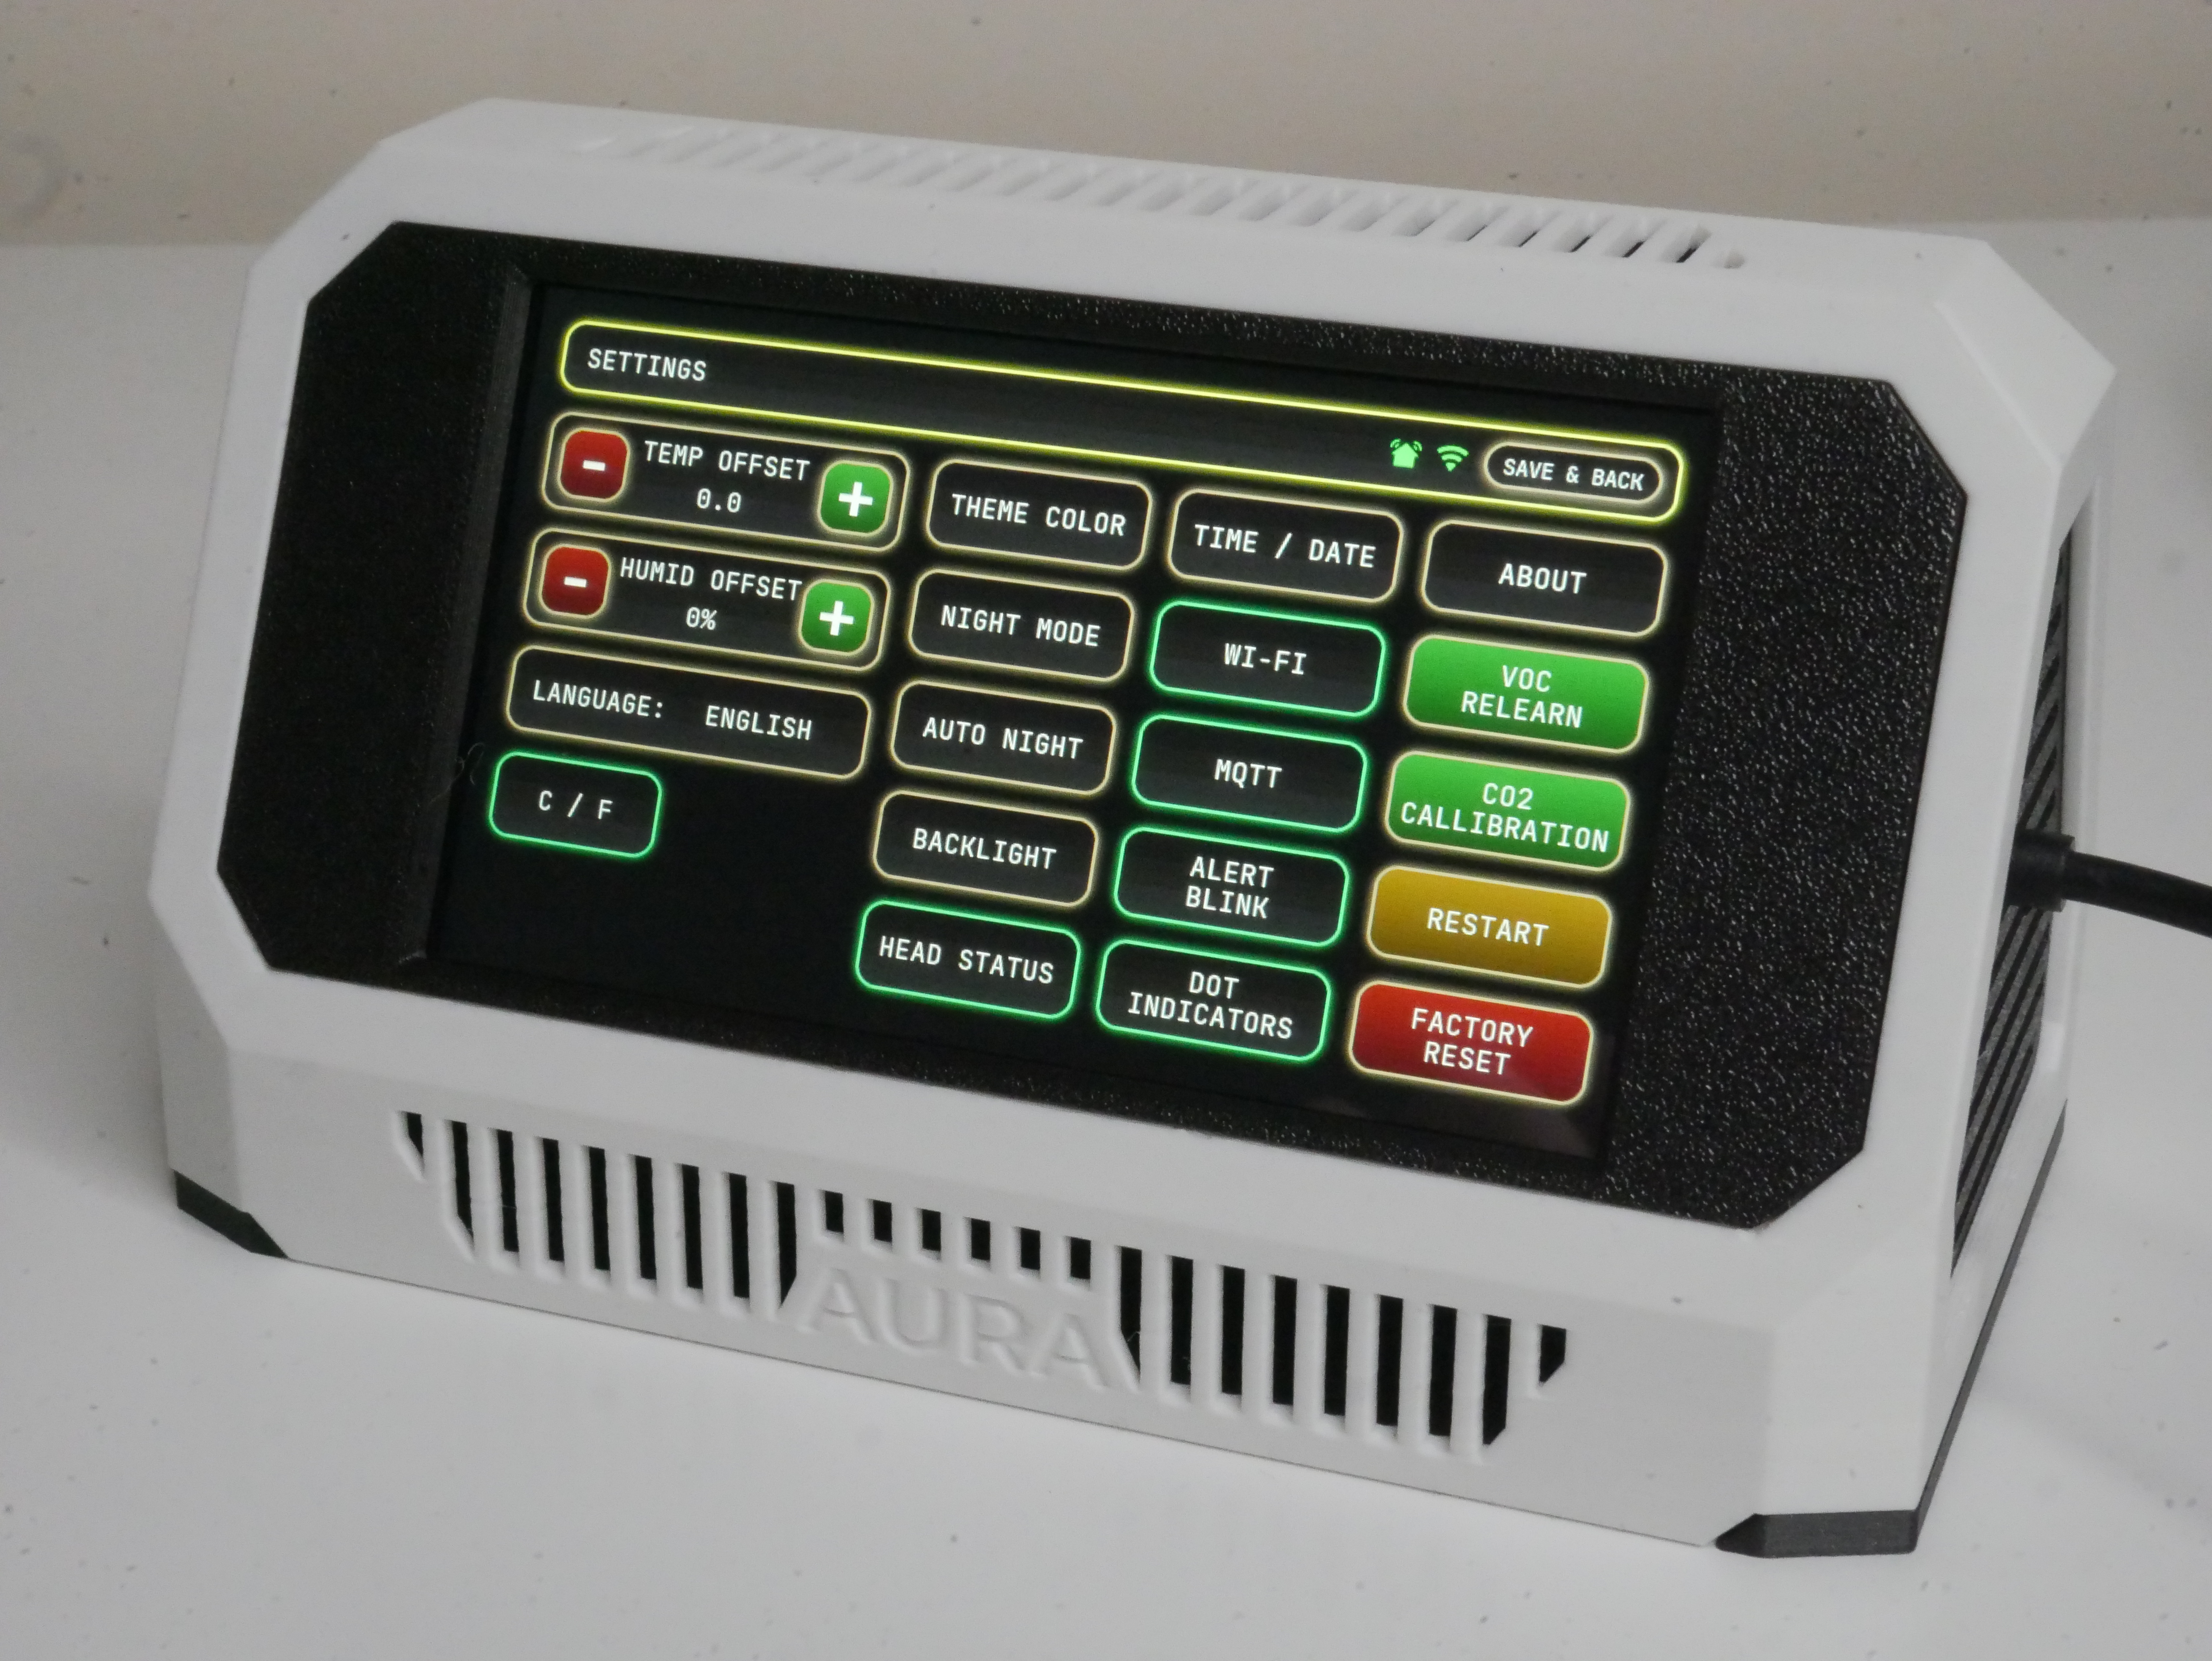 Settings |
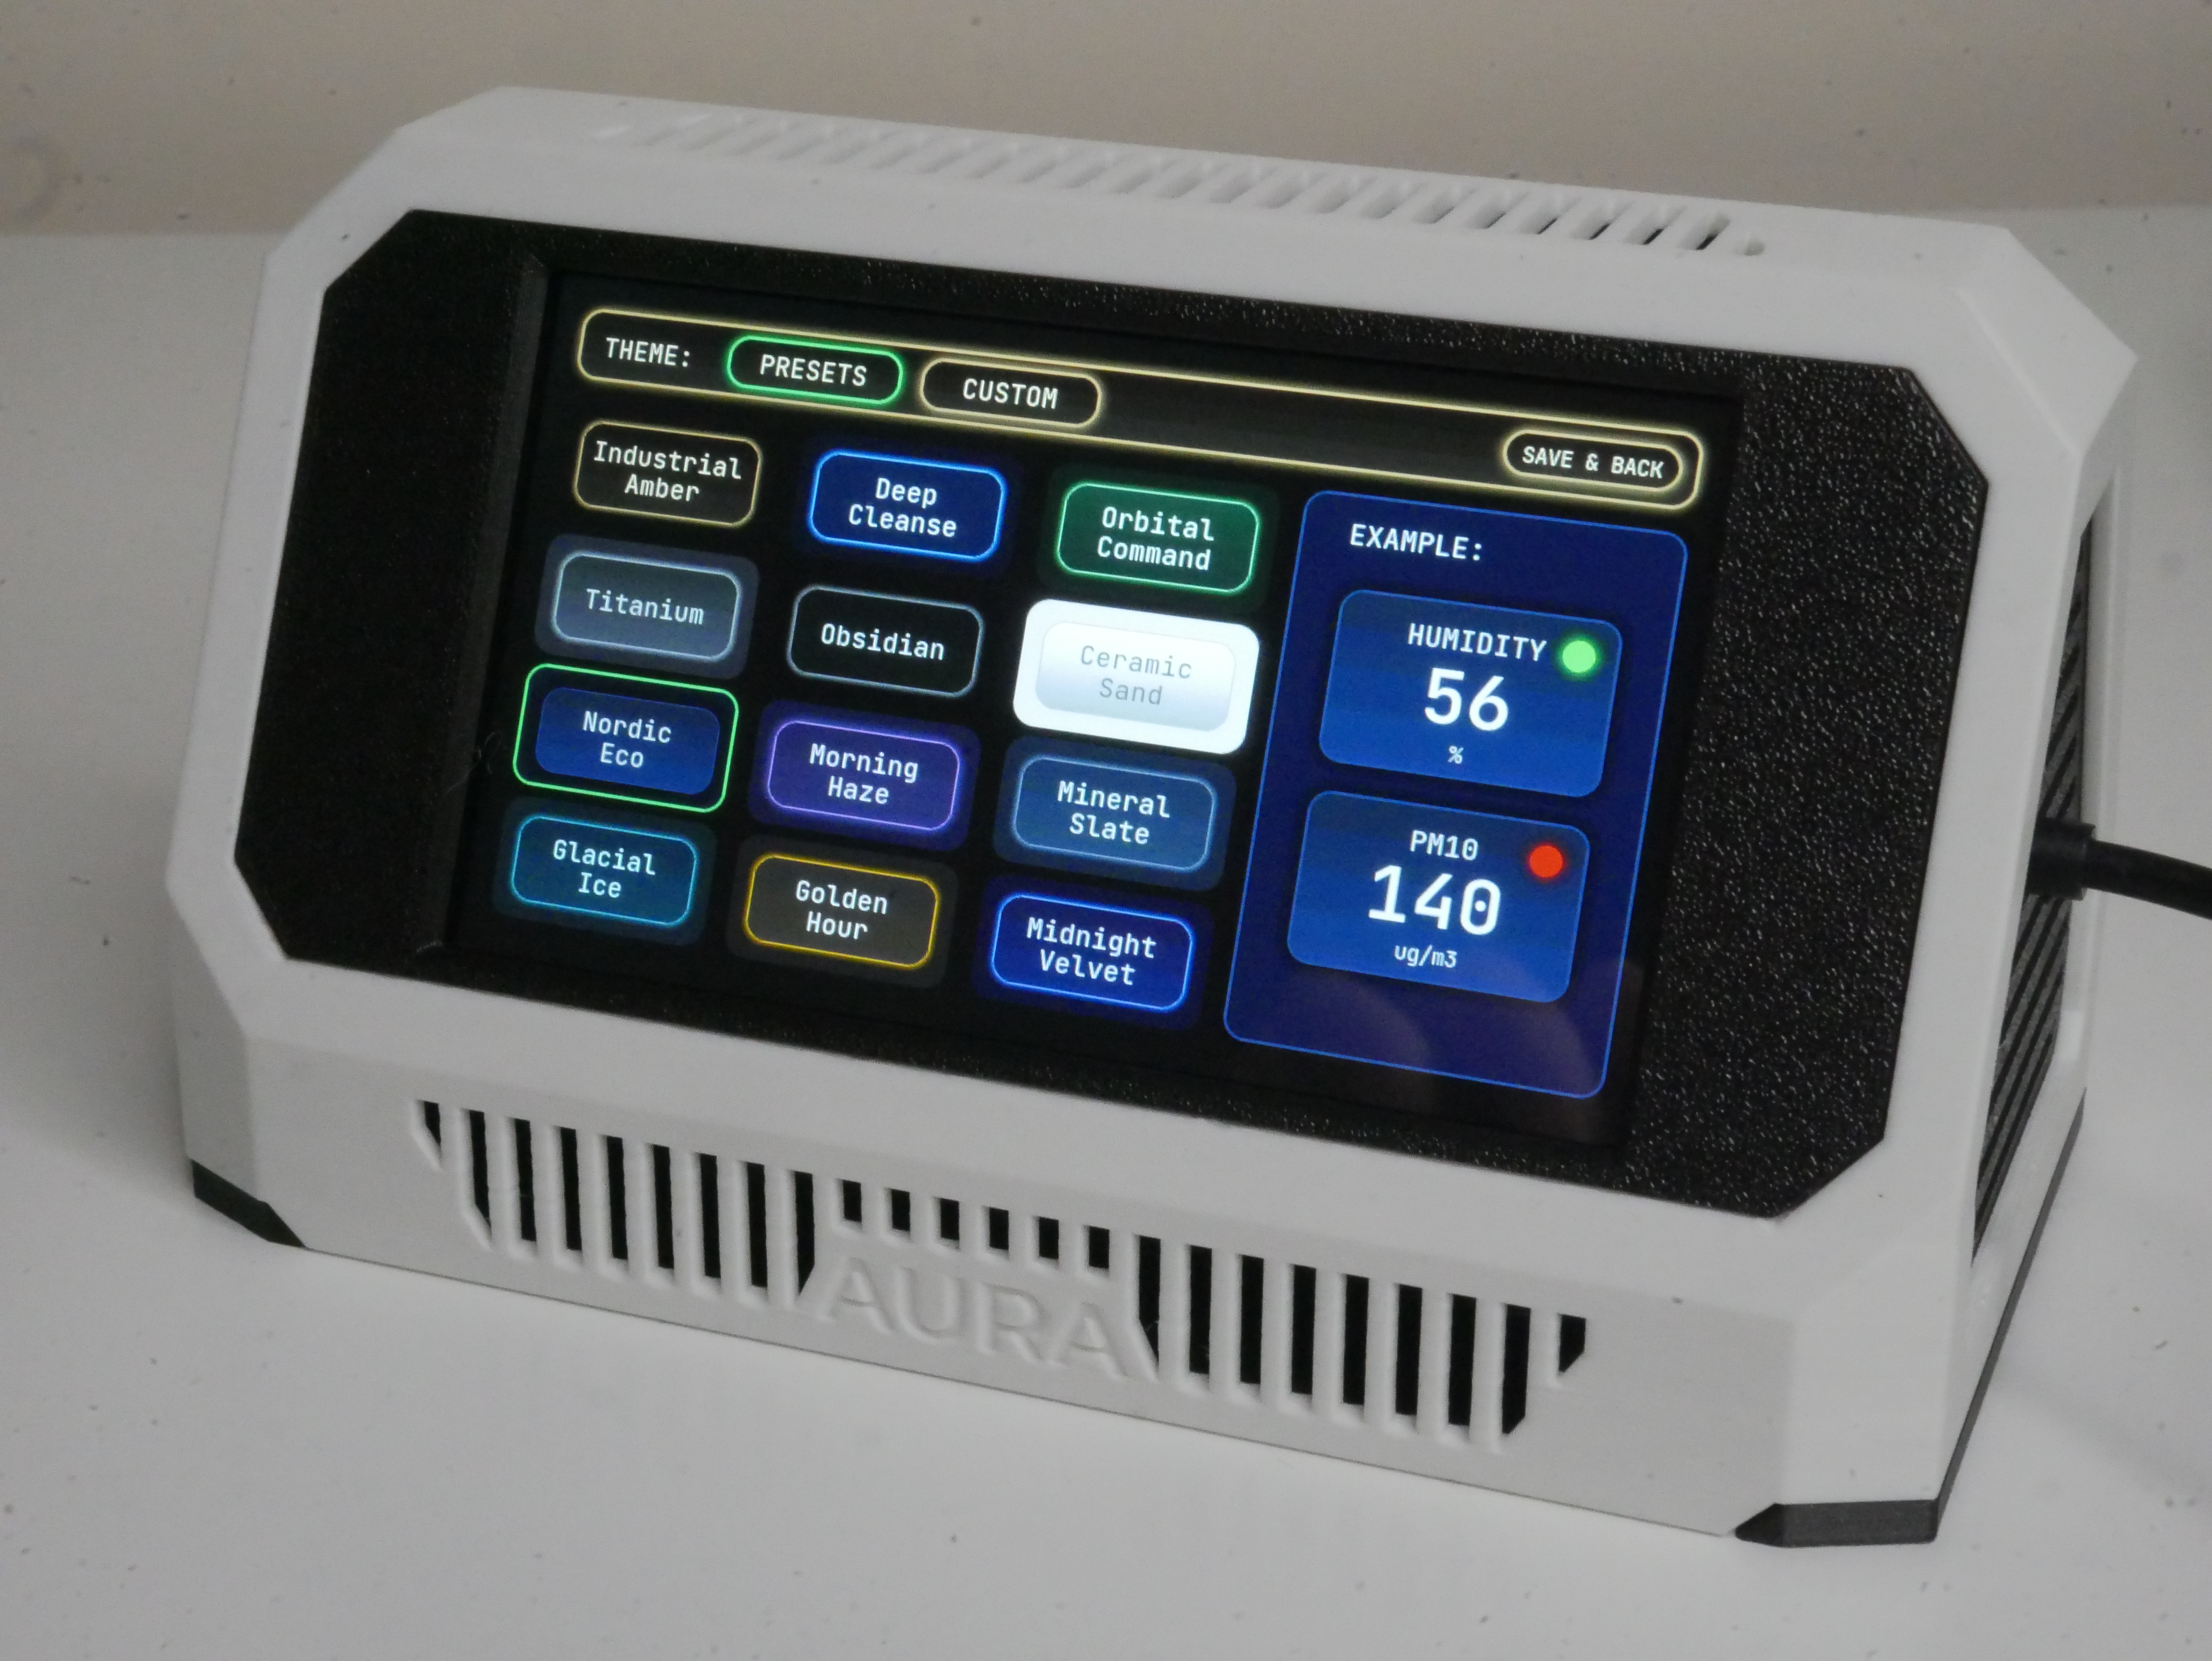 Theme Presets |
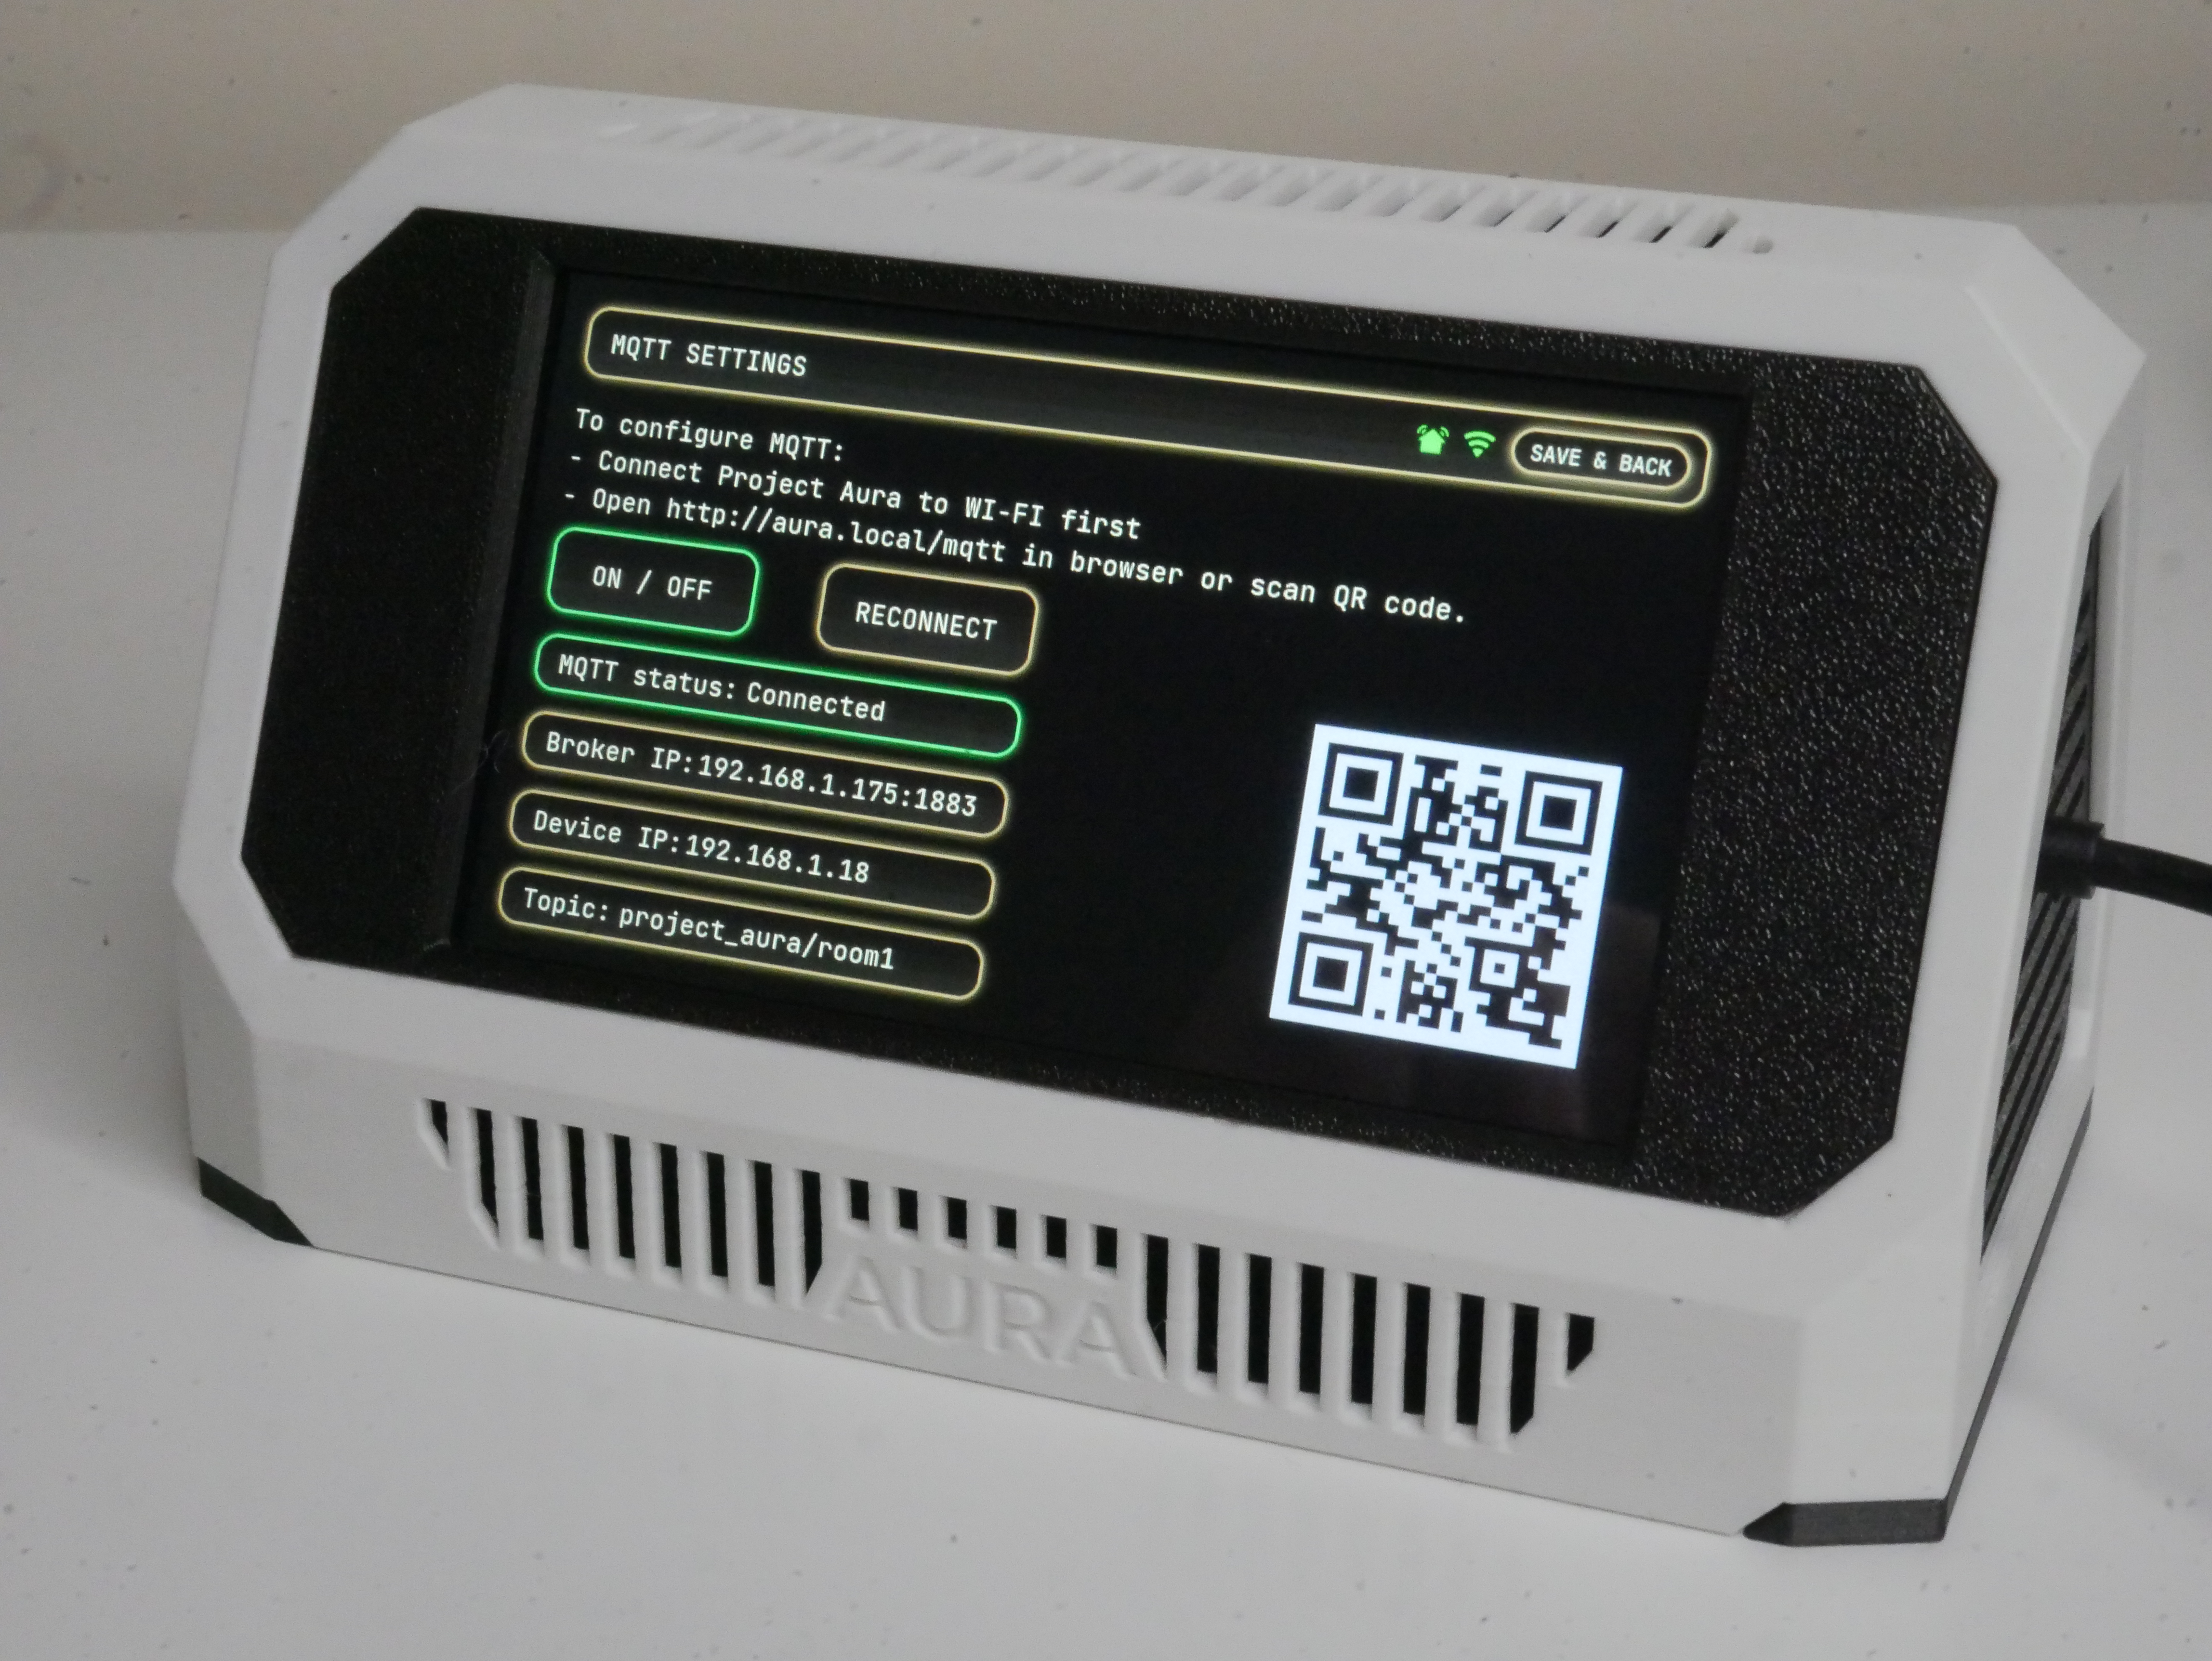 MQTT |
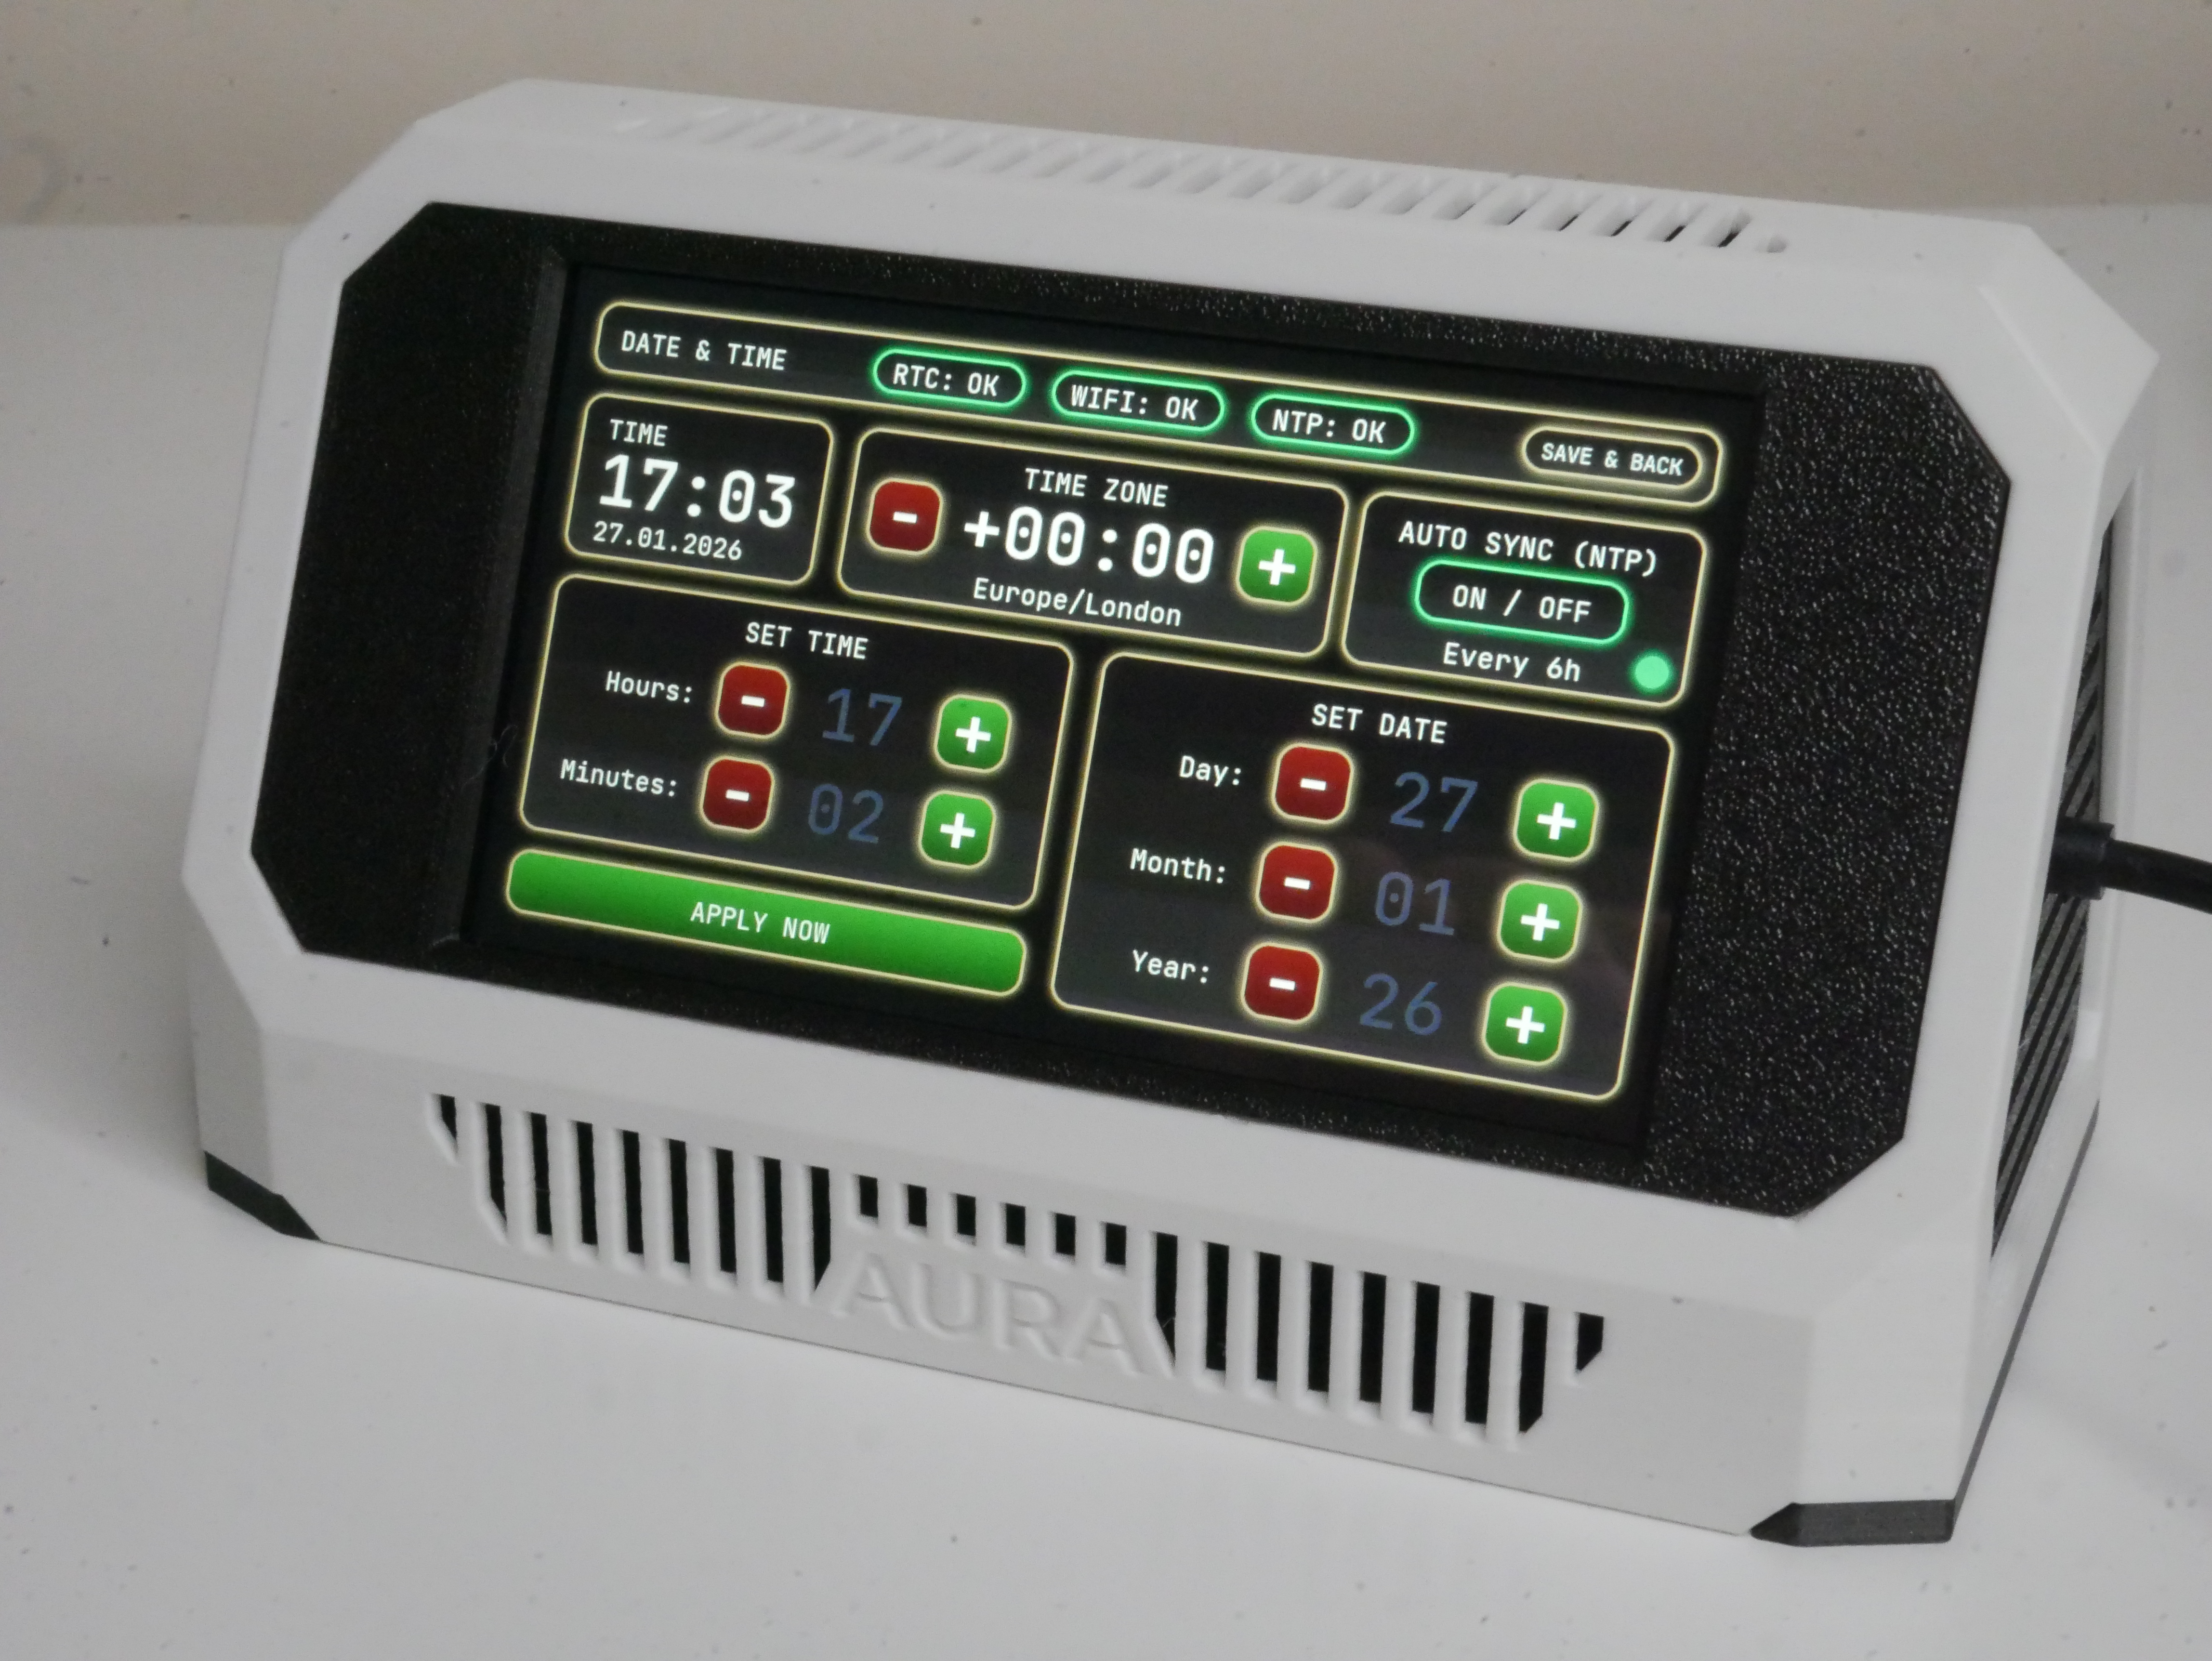 Date & Time |
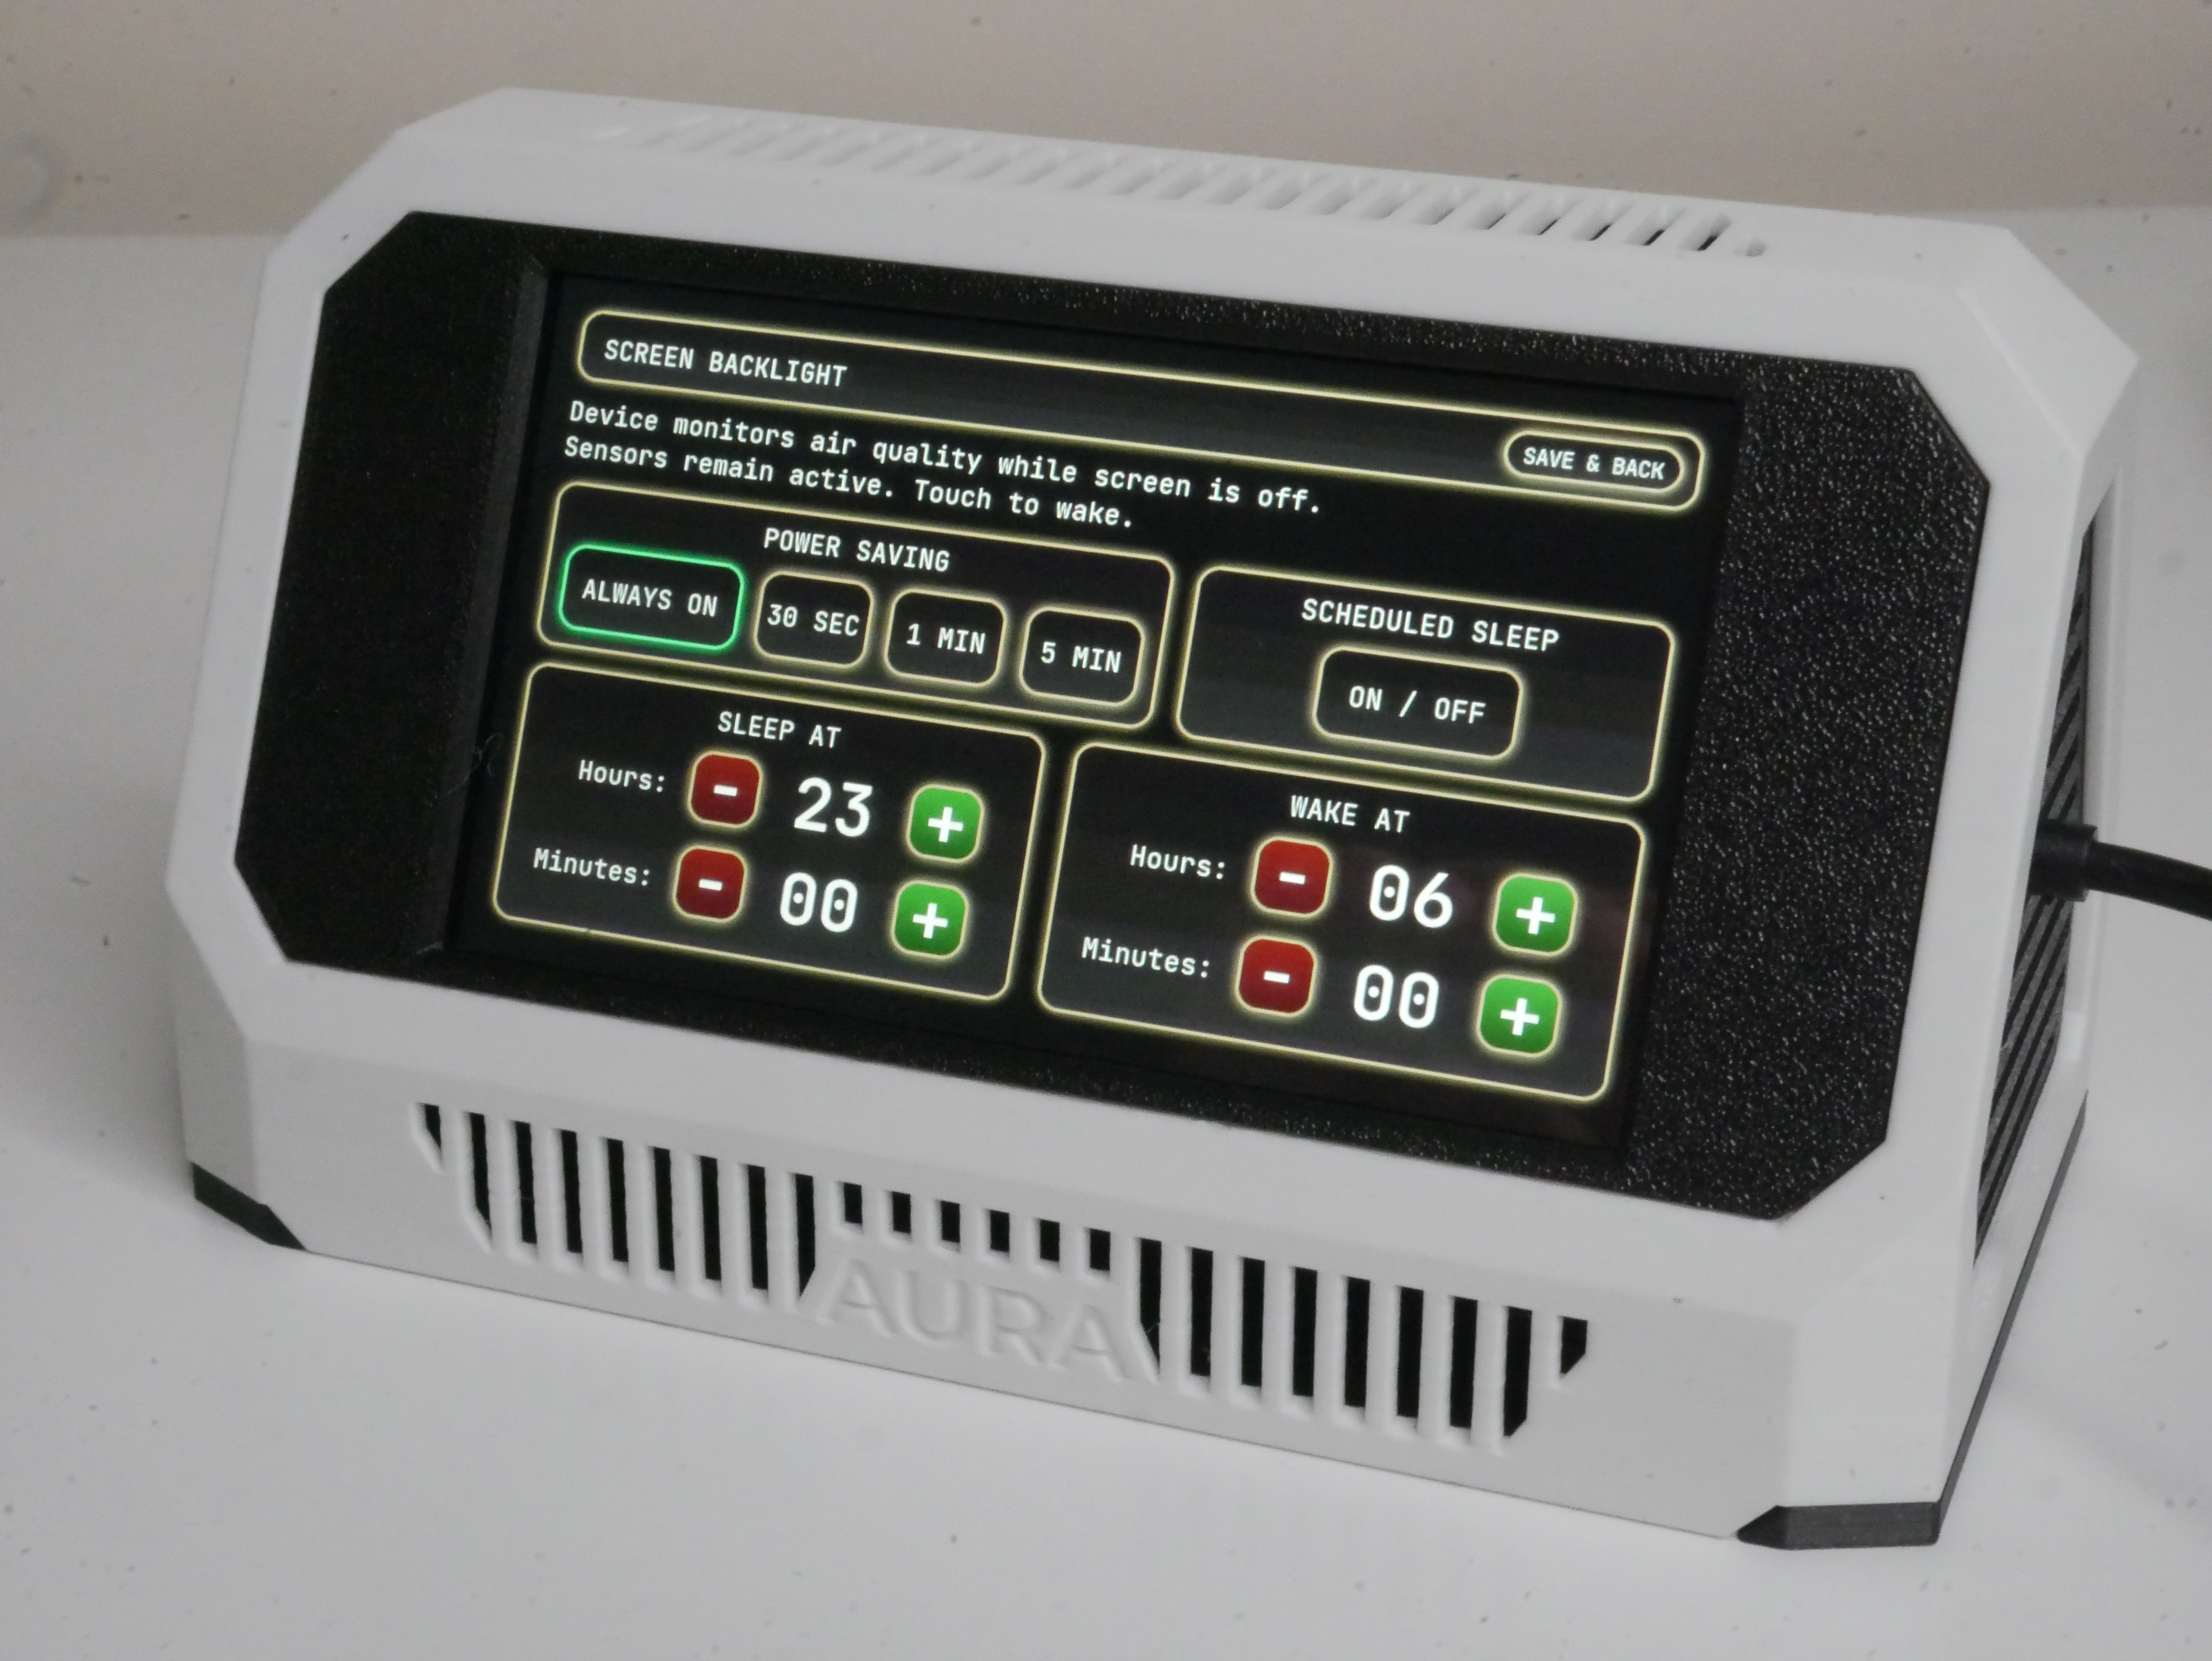 Backlight |
Project Aura serves two web experiences from the device:
/ in AP mode shows the captive Wi-Fi setup flow (/wifi)./dashboard): tabs for Sensors, Charts, Events, Settings, and System./dac): live status, manual controls, auto mode, and auto-threshold config..bin directly via the web UI.Useful API routes used by the dashboard:
GET /api/stateGET /api/charts?group=core|gases|pm&window=1h|3h|24hGET /api/eventsGET /api/diag (AP setup mode only)POST /api/settingsPOST /api/otaThis GitHub repository contains the open-source firmware, web dashboard assets, Home Assistant examples, test suite, and developer build configuration.
MakerWorld backers receive the digital build ecosystem that is not stored in this repository:
Electronic components are purchased separately. You can build Aura using the recommended custom Aura PCB path or the classic module-based path; you do not need both.
Project Aura is designed around high-quality components to ensure accuracy and long-term usefulness. If you are sourcing parts yourself, start with the display board and the SEN66. Add optional sensors only when they make sense for your room, workshop, printer setup, or automation goals.
| Component | Part / Model |
|---|---|
| Core Board, 4.3" | Waveshare ESP32-S3-Touch-LCD-4.3 (800x480) |
| Core Board, 7" | Waveshare ESP32-S3-Touch-LCD-7.0 |
| Main Sensor | Sensirion SEN66 via custom Aura PCB or Adafruit SEN6x breakout |
| Recommended Sensor Hub | Project Aura AQ Sensor Hub PCB v1.1 with built-in BMP388 pressure sensor, RTC module, capacitor, and the required sensor connectors (optional but recommended) |
| Carbon Monoxide (CO) | DFRobot SEN0466 — Factory Calibrated Electrochemical CO (0-1000 ppm, I2C & UART) (optional) |
| Formaldehyde (HCHO) | Sensirion SFA30 (0-1000 ppb) or SFA40 — both autodetected. SFA40 available as the DFRobot SEN0661 breakout (optional) |
| Optional DFR Gas Slot | One DFRobot electrochemical sensor at a time: SEN0469 NH3, SEN0470 SO2, SEN0471 NO2, SEN0467 H2S, SEN0472 O3, or SEN0465 O2 (0-25 %Vol). Set the module's I2C address to 0x75 per the DFRobot SEN0465 documentation (optional) |
| Pressure | Adafruit BMP580 or DPS310. Firmware autodetects BMP580/581, BMP585, BMP388, BMP390, and DPS310 (recommended) |
| RTC | Adafruit PCF8523. Firmware autodetects PCF8523 and DS3231; a manual RTC override is also available (recommended) |
| DAC Output | DFRobot GP8403 2-Channel I2C DAC (0-10V), DFR0971 — VOUT0 used (optional) |
Notes
0x74, which conflicts with the dedicated SEN0466 CO sensor. Set SEN0465 to 0x75 before connecting it to Aura.0-25 %Vol, 0.1 %Vol resolution). Its specified detection error is +/-10% of the reading or +/-5% of full scale, whichever is greater. Aura uses the OSHA definitions of oxygen-deficient (<19.5 %Vol) and oxygen-enriched (>23.5 %Vol) atmospheres as reference thresholds, not as a safety guarantee. Aura is not a certified safety monitor and SEN0465 is not suitable for Nitrox analysis or other breathing-gas decisions.Recommended retailers: Mouser, DigiKey, LCSC, Adafruit, Seeed Studio, DFRobot, and Waveshare.
Most consumer air-quality monitors stop at PM, CO2, VOC, temperature, and humidity. Aura can go further because the firmware, UI, dashboard, MQTT discovery, and optional hardware are designed as one expandable platform.
Optional sensors let one build focus on the environment it is actually monitoring:
Install only the sensors that match your real use case. Aura is not a certified safety or regulatory instrument; for life-safety or compliance work, use certified detectors and calibrated instruments. The goal is to make one open, repairable platform adaptable to places where ordinary consumer monitors cannot see enough.
Choose one electronics path. You do not need both.
Recommended path: custom Aura PCB
PCB and reseller links:
Classic path: Adafruit / STEMMA QT / Qwiic modules
Please pay close attention to cabling and power before turning the device on.
For the recommended Aura PCB path, the build is designed to be a clean plug-together process using the documented connectors. For the classic module-based path, some off-the-shelf cables may need pin-order changes and the wiring requires more attention.
Backers: please refer to the comprehensive Build Guide included in your reward for the exact wiring diagram and a trouble-free assembly.
DIY: verify pinouts against the pin table below before powering on to avoid damaging components. Use a stable 5V/2A USB power supply and a short, good-quality USB cable.
| Component | Pin (ESP32-S3) | Notes |
|---|---|---|
| 3V3 | 3V3 | Power for external I2C sensors |
| GND | GND | Common ground |
| I2C SDA | GPIO 8 | Shared bus for all sensors and the DAC (see BOM) |
| I2C SCL | GPIO 9 | Shared bus |
Display and touch are integrated on the board; no external wiring is needed for them.
For DAC control, analog output is generated on the GP8403 module (VOUT0), not on a direct ESP32 pin.
Project Aura speaks your language. You can switch languages in the Settings menu:
Japanese UI text uses generated LVGL font subsets. After editing
src/ui/strings/UiStrings.ja.inc, regenerate the Japanese fonts with:
python tools/generate_ui_font_subset.py --font path/to/NotoSansJP-Regular.ttf
The EEZ-generated screens keep the default Latin layout fonts; runtime localization swaps the 14/18 px body fonts for CJK languages.
Data flow and responsibilities are intentionally split into small managers:
graph TD
    subgraph Hardware
        Sensors[Sensors<br/>SEN66, SFA30/SFA40, SEN0466, optional DFR gas, BMP58x/BMP3xx/DPS310]
        Touch[Touch<br/>GT911]
        RTC[RTC<br/>PCF8523 or DS3231]
        DAC[DAC<br/>GP8403]
        Actuator[External Fan / Actuator]
        LCD[LCD + Backlight]
    end

    subgraph Core
        SM[SensorManager]
        FC[FanControl]
        NM[NetworkManager]
        MM[MqttManager]
        TM[TimeManager]
        CoreLogic[BootPolicy / Watchdog / MemoryMonitor]
    end

    subgraph Data
        History[PressureHistory]
        Storage[(LittleFS<br/>config/last_good/voc/pressure)]
    end

    subgraph UI
        LVGL[LVGL UI]
        Web[Web Config Portal]
    end

    Sensors -->|I2C| SM
    RTC -->|I2C| TM
    Touch -->|I2C| LVGL
    LCD --> LVGL
    SM -->|Data| LVGL
    SM -->|Data| FC
    SM -->|Data| History
    FC -->|I2C| DAC
    DAC -->|0-10V| Actuator
    History <-->|save/load| Storage
    Storage <-->|config| NM
    Storage <-->|config| MM
    NM --> Web
    NM --> MM
    MM -->|Publish| HA[Home Assistant]

    style CoreLogic fill:#f96,stroke:#333,stroke-width:2px
Loading
Core modules live in src/core/ and orchestrate startup (AppInit, BoardInit).
Feature managers are in src/modules/, UI in src/ui/, and web pages in src/web/.
For most builders, the first flash is easiest through the browser-based Aura Web Installer:
Connect the Waveshare board through its data USB-C port, open the installer in a compatible browser,
and follow the build guide. After first flash and Wi-Fi setup, normal firmware updates can be done
from Aura's local dashboard using OTA .bin files from GitHub releases.
For development builds, use PlatformIO CLI or VSCode + PlatformIO extension. The firmware is built with Arduino ESP32 core 3.1.1 (ESP-IDF 5.3.x).
git clone https://github.com/21cncstudio/project_aura.git
cd project_aura
pio run -e project_aura                  # build firmware
pio run -e project_aura -t upload        # flash firmware
pio run -e project_aura -t uploadfs      # flash LittleFS image (web/UI assets)
pio device monitor -b 115200             # serial monitor
Note:
uploadfsis required at least once on a fresh device. Without it the web dashboard and translations will be missing. Re-run it whenever assets indata/change.
Aura-XXXXXX-AP (fallback: ProjectAura-Setup).
Connect to it and open http://192.168.4.1 to configure Wi-Fi credentials.http://<hostname>.local/ (default hostname format: aura-XXXXXX, for example aura-1a2b3c.local) or by IP.
Do not keep using http://192.168.4.1 after STA connection; that address is AP-setup only.
In STA mode, / opens the dashboard. In AP mode, / opens setup and /dashboard opens the offline dashboard.docs/home_assistant/dashboard.yaml.
Setup guide: docs/home_assistant/README.md.Optional compile-time defaults belong in include/secrets.h, which is ignored by git.
Copy and edit (Windows / Unix):
copy include\secrets.h.example include\secrets.h    # Windows
cp    include/secrets.h.example include/secrets.h    # macOS / Linux
<base>/state<base>/status<base>/command/* (night_mode, alert_blink, backlight, restart)homeassistant/*/configCO (co), PM0.5 (pm05), and the optional DFR gas slot (nh3, so2, no2, h2s, o3, o2, plus generic optional gas value/type/unit fields as applicable).MQTT stays idle until configured and enabled.
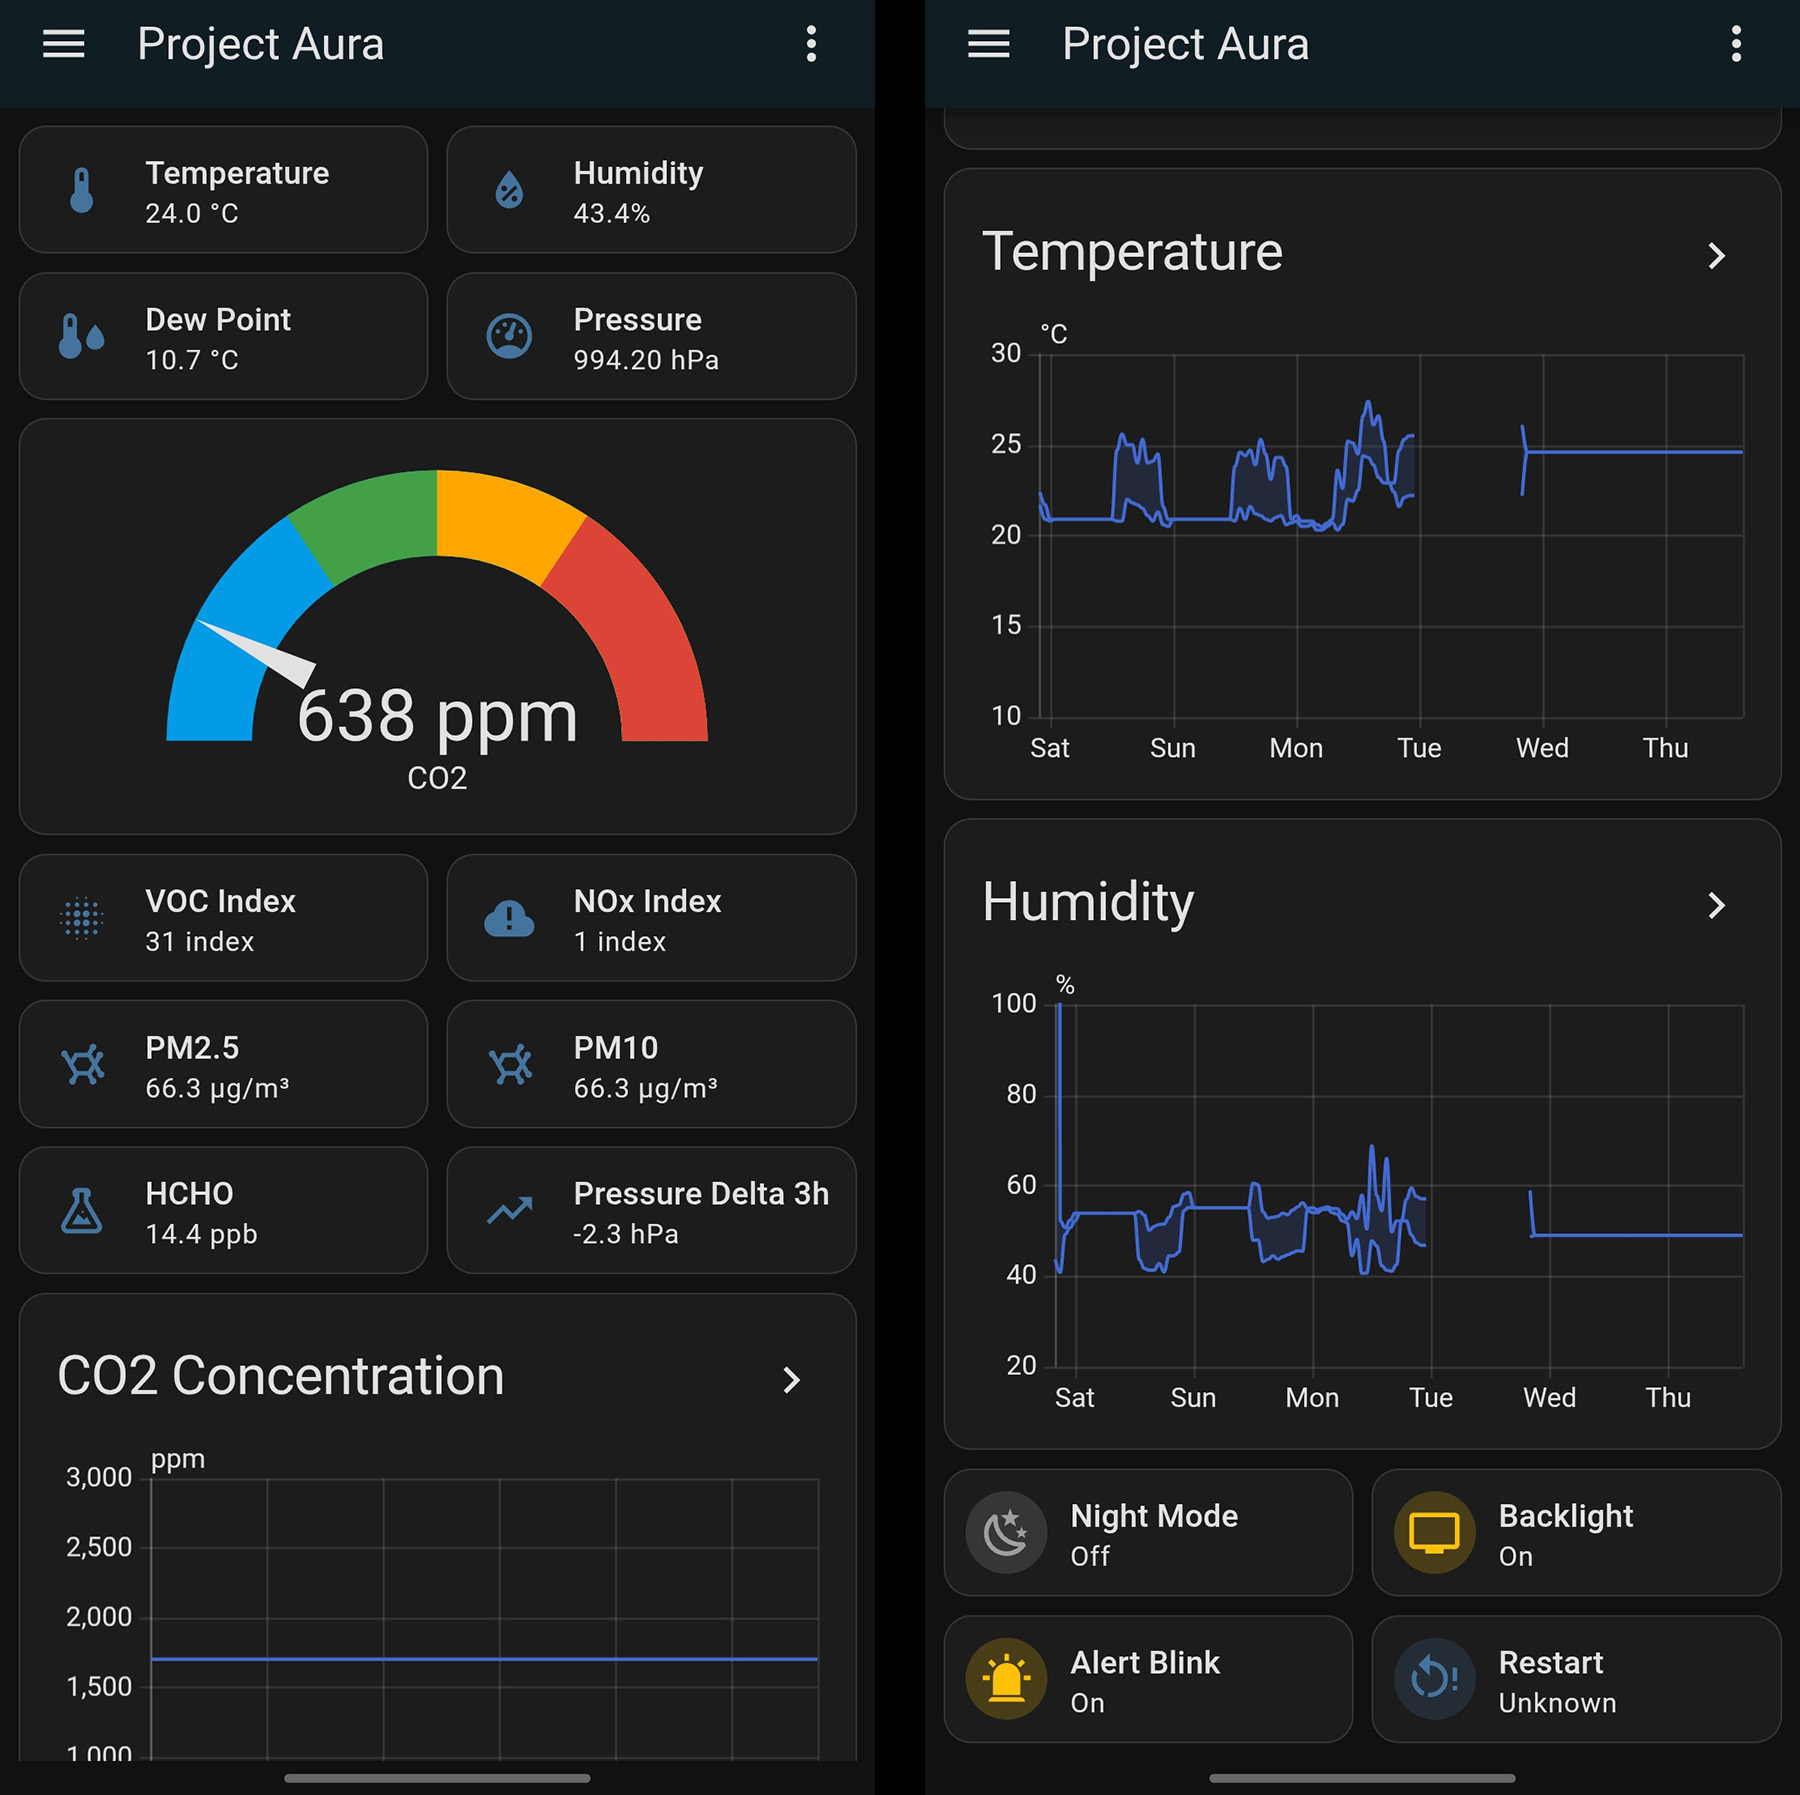
http://192.168.4.1) is local-only and works without internet.http://<hostname>.local/dashboard or http://<ip>/dashboard) requires the client and Aura to be in the same L2/L3 network path..local) is blocked on your network, use the direct IP from the device screen or router DHCP table.80 to Aura5353 multicast (only for .local hostname discovery)Quick diagnostics for support:
GET /api/state should return live JSON with network.mode, network.ip, and sensor payload.GET /api/diag (available in AP setup mode) shows Wi-Fi state, IP/hostname, heap, OTA busy state, and recent warnings/errors.The electronic component cost is not money received by the project. It is the approximate market price of the hardware you buy separately: touchscreen board, SEN66 sensor, PCB or modules, cables, fasteners, power parts, and any optional sensors you choose to add. The final price depends on your country, shipping, taxes, availability, and selected options.
What MakerWorld backers support is the work behind the device: enclosure design, firmware architecture, touchscreen UI, web installer, local dashboard, OTA update flow, Home Assistant integration, testing, documentation, updates, and support.
Cheap closed monitors can be useful, but Project Aura AQ is a different kind of device. It is for people who want control, transparency, repairability, local integration, open-source firmware, and the experience of building a real device themselves.
Contributions are welcome! Please read CONTRIBUTING.md for details on the process for submitting pull requests and the Contributor License Agreement (CLA).
Community contributions that were manually integrated or reworked are acknowledged in CONTRIBUTORS.md.
Found a bug? Open an Issue: https://github.com/21cncstudio/project_aura/issues Have a question? Ask in Discussions: https://github.com/21cncstudio/project_aura/discussions
LICENSE).COMMERCIAL_LICENSE_SUMMARY.md).TRADEMARKS.md.See TESTING.md for native host tests and scripts/run_tests.ps1.
src/core/ boot, init, reliabilitysrc/modules/ sensors, storage, network, MQTT, timesrc/ui/ LVGL screens, assets, controllerssrc/web/ HTML templates and handlerstest/ native tests and mocksParts of this project are developed with AI-assisted workflows. Primary coding assistance is provided by GPT-5 Codex in a local developer workspace.
more like this
simple generator for 3D-printed frames for a moxon rectangle antenna
GPX 轨迹转 3D 可打印地形模型 | Hiking trail to 3D printable terrain | Electron + Vue。 一款面向户外爱好者与 3D 打印玩家的 Web 工具。将 GPX 徒步/骑行轨迹一键转…
Install and monitor KlipperScreen on Android via DroidKlipp APK, USB ADB forwarding, and WiFi fallback
search projects, people, and tags